Difference between revisions of "Documentation:Windows Section 5.2"
Jholsenback (talk | contribs) m (external link handling change after recent update) |
Jholsenback (talk | contribs) m (external link handling change after recent update) |
||
| Line 609: | Line 609: | ||
the word's best POV-Ray artists. Whilst on the International Space Station, Mark rendered | the word's best POV-Ray artists. Whilst on the International Space Station, Mark rendered | ||
a 6000x8000 pixel version of that scene. This scene is now available as a poster; | a 6000x8000 pixel version of that scene. This scene is now available as a poster; | ||
| − | [http://www.povray.org/posters/ | + | [http://www.povray.org/posters/ see our website for more information and purchasing options]. |
</p> | </p> | ||
Revision as of 15:17, 23 June 2009
|
This document is protected, so submissions, corrections and discussions should be held on this documents talk page. |
Confine Caret to Text
This is the same as the Constrain Caret To Text option in the Editor Menu. Please refer to that documentation.
Color Syntax Highlighting
If checked, color syntax highlighting will be used according to the Language setting. You can control the colors used from the Color/Font.
See The Editor Window for an example of the appearance of syntax highlighting.
Show Horizontal/Vertical Scrollbar
These two options select whether the edit window has horizontal scrollbars, vertical scrollbars, or both.
Note that if you turn off a scrollbar, you lose the ability to split the window in that direction (since the window splitter for each direction is on the scrollbar). In this case, the appropriate 'Allow Splitting' option (see below) will be dimmed and unavailable.
Allow Horizontal/Vertical Splitting
These two options select whether or not you can split a window by dragging on the horizontal or vertical splitters (see The Editor Window for an example of what the splitters look like).
Using this method you can split the window into up to four different sections. Each section will still show the same file, but the sections can show different parts of the file. Editing in one section causes the changes to be immediately visible in any other sections that are showing the same part of the file.
Line Numbering
This allows you to turn on line numbering, which may be in decimal, hex, octal or binary (!). Note that this setting does not influence whether or not line numbers are included in printouts you make of the file; if you want printed line numbers, you can select that option in the print dialog.
Note that, unlike the other settings on this property page, the Line Numbers setting only applies to the current editor file. Additionally, it is not preserved across invocations of the editor; once you exit, the setting is forgotten.
Max Undoable Actions
Allows you to set a limit on the number of edit actions that will be stored in the 'undo' buffer. Actions older than this limit will be discarded. Unless you are critically low on memory (or don't like having hundreds of undo's available), we recommend that you leave this on the default setting of 'infinite'.
Insert Menu
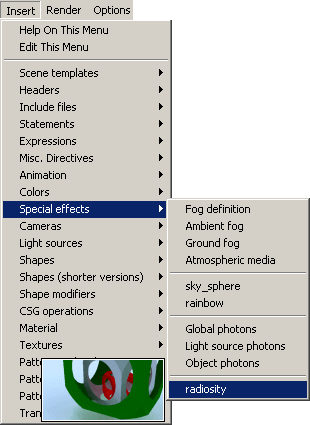
The Insert menu allows you to insert header sections, object definitions, etc. into a file you are editing with the internal editor, with only a few clicks of your mouse. It is only visible if you have selected an editor window.
This menu is built dynamically from the directory called 'Insert Menu', which is in the POV-Ray for Windows installation directory. The way it works is similar to the Windows 95/NT Start Menu. You can even edit it at run-time, and POVWIN will automatically pick up the fact that it's been changed and re-load it.
It has the additional special feature that menu entries may optionally have an image file associated with them, which is displayed when that entry is highlighted. A set of these image files is shipped with POV-Ray for Windows as standard; you can re-render these at a higher resolution if you like - see Re-Render Insert Menu Bitmaps in the Other Settings menu.
How the Insert Menu is Built
Physical Layout
Each sub-menu in the Insert Menu is a directory (also called a 'folder' these days). To create a new sub-menu, just create a new directory. The submenu will have the same name as the directory.
The actual items that you can insert in your scene files are simply text files. POVWIN recognizes them by the extension .TXT. Any .TXT file in the Insert Menu directory tree will appear in the Insert Menu. The name shown in the Insert Menu will be the filename of the .TXT file, minus the .TXT extension. If you select this file from the Insert Menu, the contents of the corresponding text file will be inserted into your scene file at the current cursor location.
Sorting the Insert Menu
It is possible to order the insert menu entries any way you like, both for folders and for the files (or sub-folders) within them. Normally, the entries are added to the menu in alphabetical order, with all folders being added before files. However, you can influence the ordering of each group (folders and files) by prepending a 'NN - ' to a folder or file, where 'NN' is any letter or digit (note however that this does not permit you to place a file before a folder).
For example, suppose you wanted to move the folder called 'Transformations'
(which creates the menu entry called 'Transformations' in the above sample
image) so that it appears between the 'Expressions' and 'Headers'
items in the menu. You could achieve this by re-naming the folder from 'Transformations'
to, say, 'F0 - Transformations' (the choice of 'F0' in this
example is arbitrary - you could use anything that will alphabetically sort between
'Expressions' and 'Headers').
When the editor code builds the insert menu (which happens each time you change it), any file or folder that starts with a prefix of 'NN - ' (note the trailing space) will be sorted using the prefix, but displayed without the prefix.
Adding a Separator
Creating a special file called '-.txt' (a hyphen followed by .txt)
usually prefixed by a 'NN - ' (e.g. '30 - -.txt'), will cause
a menu separator to be drawn instead of inserting a new item into the menu. The contents
of the file are ignored.
To create a separator between sub-menus, do the same thing as above, but create a folder instead
of a file and leave off the '.txt' extension.
Using the Insert Menu
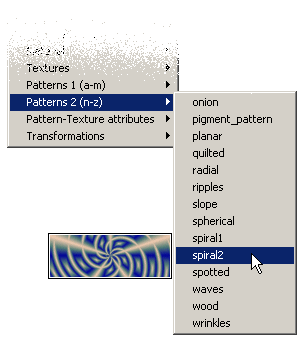
Each Insert Menu text file can have an associated BMP file that provides a preview of the
item that the text file can generate. In the above example image, the item provides the
spiral2 pattern, so the preview image shows a rendered example of this pattern.
Preview images can be of any bit-depth, but if you want to distribute them we strongly recommend that they be no more than 8-bit. Additionally, they should be no larger than 640x480 pixels.
The easiest way to understand how it all fits together is to inspect the Insert Menu directory that ships with POV-Ray for Windows. The first item in the Insert Menu will allow you to do that by opening an Explorer window located at that point on your disk.
See also Re-Render Insert Menu Bitmaps in the Other Settings menu.
Render Menu
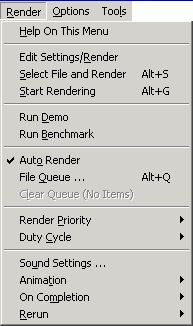
The Render Menu contains options that relate to starting, stopping, and controlling the rendering process (i.e. the generation of images).
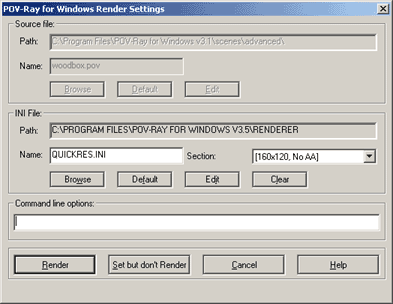
Edit Settings/Render
This command lets you select an INI and/or a POV file and make any last-minute command-line changes to the POV-Ray options before rendering.
In the 'Ini file' box, you can select an INI file by typing in the filename. You can also browse your directory structure for it. POV-Ray for Windows remembers the last directory from which an INI file was actually selected. If you select an INI file that has sections (see Sections in Understanding File Types), the Section box shows the first section label. Clicking on the down arrow brings up a menu of other sections in the INI file for you to choose from.
In the 'Source file' box, you can select a POV file by typing in the filename. You can also browse your directory structure for it. Once again, the directory that shows up is the last directory from which a POV file was actually selected.
If you currently have an editor window selected, you will not be able to change these entries as they will be set to the name of the file you are editing (even if its extension is not .POV). If you want to use these fields you need to choose the Message window first.
The commands are processed from top to bottom. Any options in the INI file you select override the default POVRAY.INI file as well as any POVRAY.INI file in the directory where the scene file resides. A selected POV file overrides any 'Input_File_Name=' option in the selected INI file. Finally, any command-line options override corresponding options in any INI file. The command line is processed from left to right; if an option is repeated on the command line, the one last processed applies.
If you want to change the command-line settings but do not want to start rendering the currently loaded POV file, press "Set but don't Render".
The command line is versatile. If you have a POV file and a number of options loaded, you can override the scene to be rendered by typing the name of another POV file on the command line. Conversely, you can type in one or more options (or the name of an INI file), forcing POV-Ray for Windows to render the currently loaded POV scene with the new options. If you type the name of an INI file which specifies a new POV file with the 'Input_File_Name=' option, the current scene file as well as the current options are overridden. See also Understanding File Types.
Select File and Render
This is the way to select a file from disk for immediate rendering. If the file is a POV file, it is rendered with the current options. If it is an INI file with no POV input file specified, the options will apply to the currently loaded POV file, only to be overridden by command-line settings. If the INI file specifies a POV input file, that POV scene is rendered with the options set in the INI file. See also Understanding File Types.
Start Rendering (Go!)/Stop Rendering
This is a toggle. If you are not currently rendering, the command Start Rendering instructs POV-Ray for Windows to start rendering the currently loaded POV file with the current settings. While POV-Ray for Windows is rendering, the command reads Stop Rendering and will interrupt the current rendering job. You can continue an interrupted rendering job by selecting 'Continue <filename>' from the Rerun Menu.
Run Demo
The easiest way to see what POV-Ray for Windows is capable of is selecting this command, which renders a sample POV-Ray file to screen. To interrupt rendering, select Render/Stop Rendering or double-click on the drawer icon in the top left-hand corner of the rendering window. See also Getting Started.
Run Benchmark
This command instructs POV-Ray for Windows to run the standard POV-Ray benchmark file, using a given set of options.
The file itself and the options used are built into the program and may not be changed (this includes the resolution). Any options specified on the command-line will be ignored.
Be aware that during the render, there is no image display, and furthermore, no output file is produced. The only purpose of the benchmark command is to determine how long it takes to render the standard file with the specific options used.
Immediately before POV-Ray for Windows starts writing the render information to the message display, it will output a line telling you what version of the official benchmark is being used.
If you choose to quote your benchmark results publicly, it is essential that you include the benchmark version and the exact version of POV-Ray that you ran it on. Changes to the benchmark file itself, and optimizations to POV-Ray, may make comparisions between different versions of the benchmark or different versions of POV-Ray meaningless, especially if it is CPU performance that you are testing.
Note that, as of the time of writing, running this benchmark takes a long time ! On a 2ghz Intel Pentium 4™, for example, the benchmark takes approximately one hour. (The POV-Team is looking forward to the day when that figure seems slow ;)
The actual benchmark file used is built-in to the program; it is not dependent on the benchmark.pov file which is included in the scenes\advanced directory. However, if you want to run the benchmark manually, or on another platform, you may use that file (just make sure it is the same version). The file also contains the recommended command-line parameters to be used with the render.
The benchmark command is most useful on NT-based versions of Windows (this includes Windows XP). This is because these operating systems provide a means for POV to determine the actual CPU time used by itself. Since Windows is a multi-tasking operating system, other processes (including the operating system itself) take time away from POV-Ray while it is rendering. In terms of benchmarking a processor, the elapsed time that a render takes is not really relevent - it is the CPU Time that really matters. Remember that the purpose of this benchmark is not to determine how long it takes to render a scene (in which case you care about elapsed time), but to determine the performace of a CPU. That is, it is not intended to be a test of POV-Ray itself, but of the architecture that it is running on.
If you are running Windows 95/98 or ME then you will only be able to get elapsed (clock) time, which is not as accurate. In this case you should make sure that no other applications are running during the render (this includes screensavers and also background apps such as virus checkers), and also you should increase the render priority to the highest level.
If you are running an NT-based operating system, after the render a dialog box will be displayed showing the average PPS (pixels per second) that the render took. Larger numbers are better (indicative of a faster and/or more efficient CPU). We recommend using this number when quoting results.
In case you are interested, here are the results the author of POV-Ray for Windows got on the two machines on which he ran the benchmark v1.01 on (note that this was with POV-Ray for Windows v3.5 final release). The operating system in both cases was Windows 2000 SP2.
| 2.0 GHz Intel Pentium™ 4 256 MB RDRAM | 1.4 GHz AMD Athlon™ 1024 MB DDR RAM |
| 54.04 PPS | 53.11 PPS |
For reference, here are the standard options supplied to the renderer as of the standard benchmark version 1.01 (be sure to check that this is the one you are using if you want to use the below options, as it is possible for them to have been changed without this document being updated).
All_Console=Off
Antialias_Depth=3
Antialias=On
Antialias_Threshold=0.3
Bits_Per_Color=8
Bounding=On
Bounding_Threshold=3
Buffer_Output=Off
Buffer_Size=0
Clock=0
Continue_Trace=Off
Create_Histogram=Off
Cyclic_Animation=Off
Debug_Console=On
Display=Off
Display_Gamma=1.0
Draw_Vistas=Off
End_Column=1
End_Row=1
Fatal_Console=On
Fatal_Error_Command=
Fatal_Error_Return=I
Field_Render=Off
Final_Clock=1
Final_Frame=1
Height=384
Histogram_Name=
Histogram_Grid_Size=0.0
Initial_Clock=0
Initial_Frame=1
Include_Header=
Jitter_Amount=1
Jitter=On
Light_Buffer=On
Odd_Field=Off
Output_Alpha=Off
Output_File_Name=
Output_File_Type=s
Output_To_File=Off
Palette=3
Pause_When_Done=Off
Post_Frame_Command=
Post_Frame_Return=I
Post_Scene_Command=
Post_Scene_Return=I
Preview_End_Size=1
Preview_Start_Size=1
Pre_Frame_Command=
Pre_Frame_Return=I
Pre_Scene_command=
Pre_Scene_Return=I
Quality=9
Remove_Bounds=On
Render_Console=On
Sampling_Method=1
Split_Unions=Off
Start_Column=0
Start_Row=0
Statistic_Console=On
Subset_End_Frame=1
Subset_Start_Frame=1
Test_Abort_Count=0
Test_Abort=Off
User_Abort_Command=
User_Abort_Return=I
Verbose=On
Version=3.5
Video_Mode=0
Vista_Buffer=On
Warning_Console=On
Width=384
File Queue
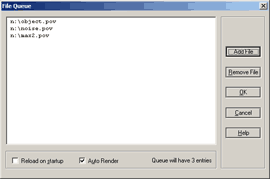
Selecting this command lets you look at the queue of files ready to be processed. You can add a file to the bottom of the queue or delete a file (you have to select it first by clicking on it). Once you have made your changes to the file queue, press OK to confirm the changes or Cancel to leave the queue as it was before you called up the screen. You can select multiple files in the file browse dialog box by using Control or Shift when clicking on them.
The File Queue dialog box has two checkboxes in addition to the normal controls (like add/remove file etc.)
The first, Reload on Startup, when selected, causes the contents of the file queue to be stored to disk each time it is accessed. When POV-Ray is started up with this option active, and the file queue had entries in it, they are loaded off disk and back into the queue. If Auto Render was also selected, POV-Ray would then start rendering them.
The second, Auto Render, instructs POV-Ray for Windows to render whatever is in the file queue (see File Queue below). When you switch Auto Render off, any files dropped onto the POV-Ray window are added to the queue but not rendered. In other words, while Auto Render is turned off, the file queue is inactive. However, any file selected with the Render/Start Rendering command will still be processed. Once you switch Auto Render back on again, if there are files in the queue, they will begin to be processed.
NOTE that due to the way that some versions of Windows returns multiple file selections to us, if you use Ctrl or Shift to select more than two files in the Add to Queue file browse box, and then click on OK, the first and last entries will be transposed. (We can't swap them back to their original position since we can't tell if the transposition has happened in the first place).
Clear Queue
If you want to clear the entire queue in one go, this is the way to do it. The command shows you how many entries you will be throwing away.
Animation Pane
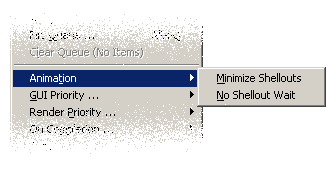
The Animation sub-menu contains options relating to running renders for the purposes of generating an animation. See the section on making animations in the tutorial for information on how to set POV-Ray up to do this.
Minimize Shellouts
The Minimize Shellouts options tells POV-Ray to run any specified shell-out in a minimized, non-active window. This can be important if you are doing some work in the foreground and do not want to be interrupted. Note that the command that you are starting must be capable of running in the background under Windows.
No Shellout Wait
If you specify a post-scene shell-out command in an INI file, POV-Ray for Windows hands over to the program specified. If you are running Windows 3.1x and Win32s, POV-Ray for Windows has no way of telling when the program shelled out to has finished, especially if it was a DOS program. All POV-Ray can do is show a screen explaining this and ask you to click the OK button when the external program has completed or if you don't want to wait for it to finish. If you do not want POV-Ray to display this message, select No Shellout Wait.
NOTE it is very important to note that if POV-Ray doesn't wait for the program, it must return immediately. If it returns immediately then obviously the program's return code cannot be monitored. In this case the return code will always be 0.
Render Priority
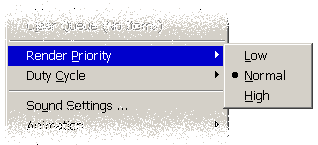
The higher the Rendering Priority, the more resources are devoted to rendering.
Some users have expressed surprise that changing this setting does not seem to significantly affect rendering times. This will of course be the case if the computer in question is not doing anything else at the time. The time when this setting starts to matter is when you are running another CPU-intensive process on the computer, one that would compete with POV-Ray for the CPU. It is then that changing this setting will make a noticable difference.
See also Speed Considerations.
Duty Cycle
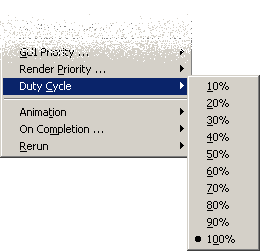
The Duty Cycle setting is provided only for unusual cases of heat accumulation. It is not intended to be used in other circumstances (as it offers little benefit other than as described below). Unless you are using a laptop in a restricted environment (or perhaps in orbit), this menu will be of little interest to you.
Some computers - particularly laptops or notebooks - cool their CPU's by convection. No CPU fan is used. This can make this type of device prone to overheating in certain circumstances (for example, where circulation of air is restricted, such as in a confined space, or where hot air does not, by its nature, rise, such as in zero-gravity).
POV-Ray makes extensive use of a processor's Floating Point Unit (FPU), a portion of the CPU that is not normally prone to high activity over long periods. Such use can potentially cause the CPU to generate more heat. Additionally, high CPU activity can cause the unit's normal heat-reducing facilities (such as lower-power CPU modes) to be inactive.
The Duty Cycle setting is used to tell POV-Ray to only use a certain percentage of the CPU's available time, even if nothing else is competing for the CPU. For example, a duty cycle of 10% would cause POV-Ray, during a render, to sleep for 90% of the available time, and only render during 10% of it.
During rendering, if the duty cycle is not set to 100% (the default), POV-Ray will update the status bar at the bottom of the window if it is in sleep mode. This update will show how many seconds remain until rendering starts again (which is based around a ten-second cycle). For example, a duty cycle of 70% would see POV-Ray render for seven seconds, then sleep for three.
While it may seem far-fetched to include a feature in POV-Ray that seems primarily to be of use in zero-gravity, it in fact is for this exact reason it is here. On 25 April 2002, African entrepreneur Mark Shuttleworth was blasted into space in a Russian Soyuz capsule. Accompanying Mark on this launch was a copy of POV-Ray for Windows v3.5 beta 15, and a special scene written for the purpose by two of the word's best POV-Ray artists. Whilst on the International Space Station, Mark rendered a 6000x8000 pixel version of that scene. This scene is now available as a poster; see our website for more information and purchasing options.
Sound Settings
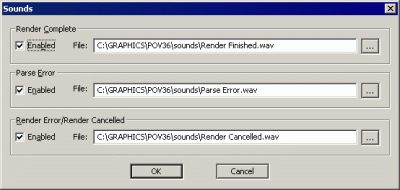
In the sound setting dialogue you can enable POV-Ray to signal the finishing of a render, a parse error and a render error or cancellation of a render. For each of the three signals a specific sound (WAV-file) can be set.
On Completion
The On Completion submenu allows you to specify what POV-Ray will do when it completes a rendering (or series of renderings, in the case of animations).
Do Nothing
No special actions are taken.
Display Message
This will cause POV-Ray for Windows to display a message window indicating that it has finished.
Exit POV-Ray for Windows
POV-Ray for Windows will exit after the render has completed.
Rerun
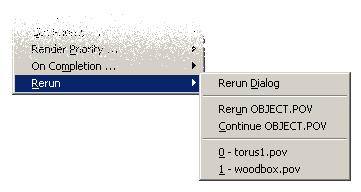
This sub-menu contains commands related to re-running (re-rendering) files that you have already rendered (or started to render).
Rerun Dialog
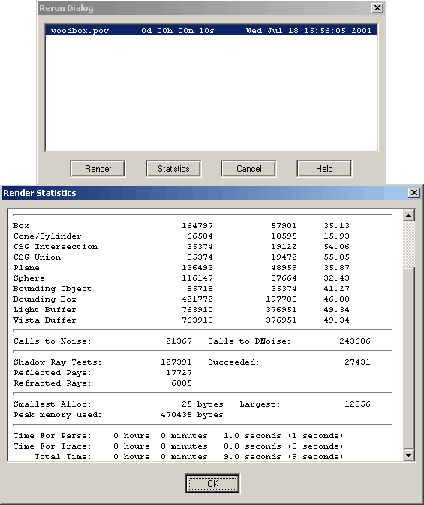
Selecting this command brings up a list of the last rendering jobs performed (up to 16). You can select any one of them by clicking on it. You then have the option of rendering the job with the same POV-Ray settings used for the original job or viewing the rendering statistics for that job. If you select Render, you are shown the current render settings, which override any settings that the file was originally rendered with. See Edit Settings/Render in the Render Menu.
Rerun
This command, like the following, is only displayed if you have interrupted rendering of a scene (by selecting Stop Rendering from the Render Menu). The command shows the name of the interrupted file, and selecting it instructs POV-Ray for Windows to re-render the scene from the start.
Continue
Like the previous command, this one restarts a current render, with the difference that any portion of the scene already rendered is taken up again. This only works if there was an output file being written.
File List
The file list shows the last 16 rendering jobs the same way that the Rerun Dialog does. It also lets you select a recent file for re-rendering, but it does not let you view the rendering statistics beforehand.
Options Menu
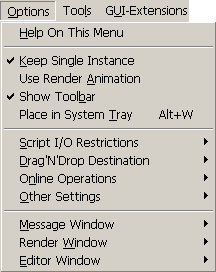
This menu contains settings that change the operation of POV-Ray for Windows as a whole.
Keep Single Instance
This option prevents more than one instance of POV-Ray for Windows from running at a time. If you attempt to launch a new one, the currently running one is activated instead. This is handy if you are using File Manager or Explorer to launch POV files by double-clicking. (Explorer users can get even more control by using the right mouse button menu.)
Use Render Animation
Turns on or off the use of the animated image in the top-right-hand corner of the tool bar. If it's turned on, and POV-Ray is rendering, an animation will be shown to indicate that a render is in progress. This animation is done from pre-generated images and uses very little CPU time.
Show Toolbar
This option will alternately show or hide the toolbar, and can be used if you want more room for the editor. Note that POV-Ray for Windows does not store any information about a customised toolbar in the registry, so if you have modified the toolbar by dragging sections of it, the changes will be lost on restart.
Place in System Tray
Places POVWIN in the system tray on the taskbar. Double-click to restore POVWIN. You can also right-click to get a context menu.
Script I/O Restrictions
See the I/O Restrictions topic.
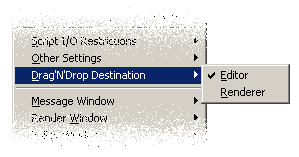
Drag'N'Drop Destination
This sub-menu allows you to select the destination for the Drag'N'Drop function.
See Dragging and Dropping Files for full information.
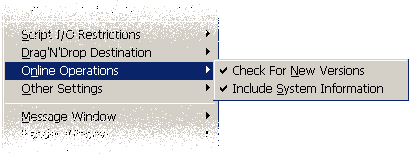
Online Operations
This sub-menu contains two options relating to POV-Ray for Window's ability to contact the POV-Ray web site to determine if there is an updated version available.
| Allow Column Selection | Check For New Versions |
|
This document is protected, so submissions, corrections and discussions should be held on this documents talk page. |
