Difference between revisions of "Documentation:Mac OS Section 8"
Jholsenback (talk | contribs) m (heading changes) |
Jholsenback (talk | contribs) m (1 revision: testing potential import problem) |
(No difference)
| |
Revision as of 14:53, 29 March 2010
!--wikitalk--- table width=100% border=1 cellspacing=0 cellpadding=5 trtd width=100% bgcolor=#FFEEEE This document is protected, so submissions, corrections and discussions should be held on this documents talk page. /td/tr /table br !--/wikitalk---
Dialogs
p/p
Preferences Dialog
pThis modeless dialog box is displayed when the user selects the quot;Edit: Preferences...quot; menu item. You can set the amount of CPU-time POV-Ray uses for rendering via a popup menu, and set paths to search for include files that will be used for every scene file in addition the scene specific files. Further you can specify how to be notified after POV-Ray has finished rendering, using a dialog and/or a beep sound. The selections you make here are saved in the program's preferences file, so that these preferences are remembered between runs of POV-Ray./p
General Pane
pThis pane contains settings for the POV-Ray application features like
the speed it will render, or the render engine core being used./p
p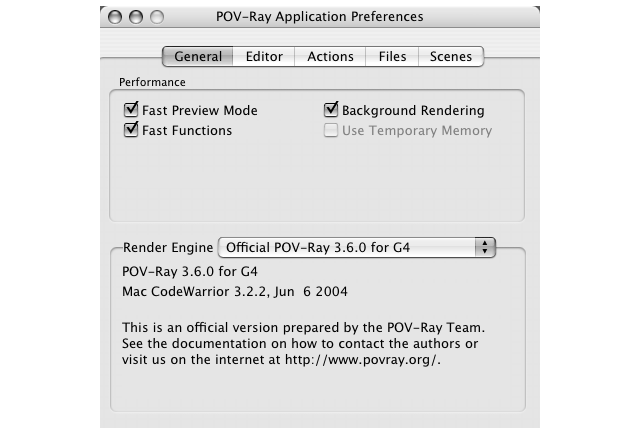 /p
/p
Fast Preview Mode
pIf fast Preview Mode is enabled, the preview window will only be updated for each line that has been rendered. If it is off, the preview window will show each pixel being rendered, which will slow down rendering of very simple scene (that take just a few secvonds to render) as the overhead of drawing each pixel in particular on Mac OS X is significant./p pFor scenes that take several hours to render this option makes no significant difference. Expect rendering to take an addition ten to twenty seconds (depending of preview image size) regardless of scene complexity if Fast Preview Mode is turned off./p
Fast Functions
pEnable this option to turn on the POV-Ray Mac just-in-time compiler for the quot;functionquot; keyword. It turns equations in functions to native PowerPC code executed directly instead of interpreting the equations. This will for example increase rendering speed of isosurfaces. However, certain statistics will not be gathered if Fast Functions is enabled and the just-in-time compilation does slow down parsing a tiny bit and does increase memory consumption./p
Background Rendering
pBy default POV-ray rendering takes place in the background (in a separate thread) and as such leaves the user interface of POV-Ray responsive. However, especially on Mac OS 8 and 9 on slow Macs with little memory and virtual memory enabled, tuurning this option off may increase rendering speed. However, disabling Background Rendering will make POV-Ray less responsive and on Mac OS X it may appear as if it has crashed due to Mac OS X automatically disabling window updates of unresponsive applications. On Mac OS 8 and 9 the whole system will be slow in responding when Background Rendering is disabled!/p
Use Temporary Memory
pOn Mac OS 8 and9 each application has a limited amount of memory assigned to it. Enable this option such that wehn rendering POV-Ray will aquire additional memory from the operating system when rendering, regardless of the application memory size you set for the POV-Ray application./p p class=ExplainOn Mac OS X applications may always use all available memory and as such, this option is disabled when running on Mac OS X!/p
Render Engine
pThe popup menu allows you to select which renderer will be used to render your images. You may select different versions optimised for different processors. Versions that cannot run on your system are shown, but cannot be selected./p pFurther, this menu may contain render engines of unofficial versions or custom compiles of POV-Ray that you installed by copying them into the quot;POV-Ray Coresquot; folder inside the POV-Ray application folder. Note that this folder will only be searched when you start the POV-Ray applications, and if you added or removed render engines from the folder, you will need to restart the POV-Ray application in order to see those changes!/p
Editor Pane
pThis pane contains all settings that will alter the display of the
source file text editor./p
p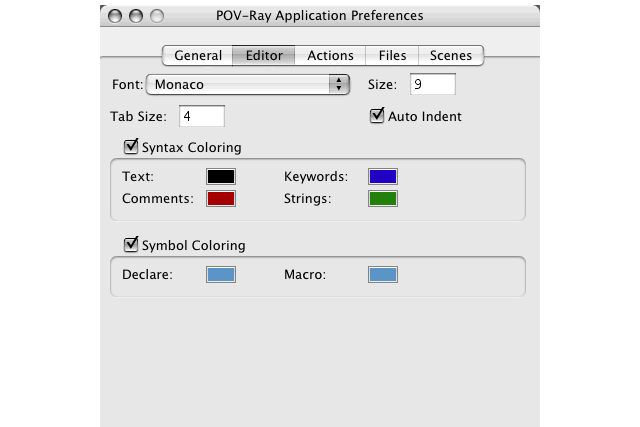 /p
/p
Font
pYou can choose the font you wish the text to be displayed with./p
Size
pThis will set the size of the font the text will be displayed with./p
Tab Size
pTabs are an important feature to make scenes more readable and they will give scene source display a better structure. You can set how many spaces to the right the text will be moved when it contains a tab character with this setting./p
Auto Indent
pTurn this feature on if you want the next line to begin already indented, directly under your current line. Turn this off to force the next line to always start at the far left side of the window, regardless of your current indenting./p
Syntax Coloring
pThis group-box allows you display the scene source text with different colors for different scene description language elements. Simply click on a color and the standard color picker dialog will appear. You can set the color to whatever you like. Of course, since the background color is white, you should not set any text elements to white./p
Symbol Coloring
pThis group-box allows you display the scene source text with different colors for different declared values and macros. This feature is able to search most include files you use in your scene as well. Simply click on a color and the standard color picker dialog will appear. You can set the color to whatever you like. Of course, since the background color is white, you should not set any text elements to white./p p class=NoteNote: Symbol coloring is only updated when you save the scene file to disc because it would be too slow updating while typing./p
Actions Pane
pThis pane contains settings for actions the POV-Ray application takes
on startup or termination./p
p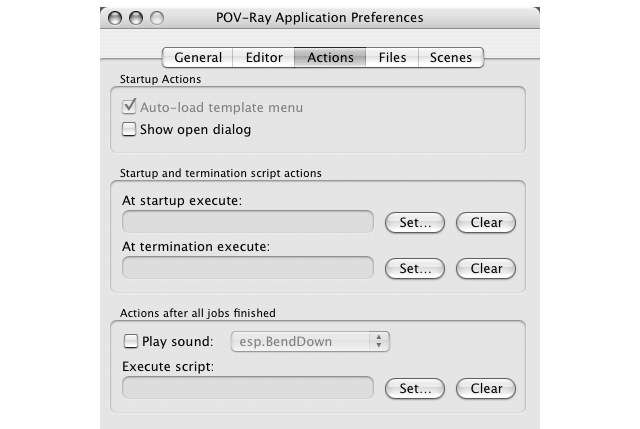 /p
/p
Startup Actions
pThe quot;Auto-load template menuquot; option is disabled because the Template menu is always loaded in POV-Ray 3.5. You may use the quot;Show open dialogquot; option so POV-Ray shows an Open Files dialog when you start it./p
Startup and termination script actions
pYou may select scripts that are executed whenever POV-Ray is started or terminated. This is useful for example to cleanup some rendered images or open certain scene files on ever startup./p
Actions after all jobs finished
pThis groupbox allows you to set what actions will be performed when rendering is finished. You can select a sound to be played and choose between no additionally notification, a notification by dialog. Using the script options you may create features similar to previous versions of POV-Ray like quitting POV-Ray or shutting down your computer./p
Files Pane
pThis pane contains settings for handling of files like which file
types can be rendered or which application will be selected as default
to open specific images files generated by POV-Ray./p
p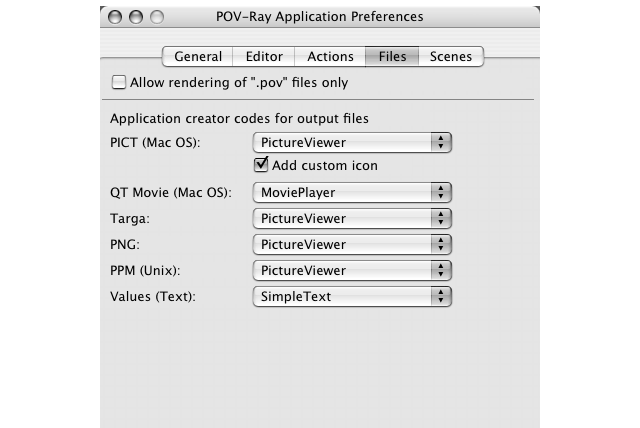 /p
/p
Allow rendering of .pov files only
pWith this option is useful when you frequently edit include and other files and do not want to quot;renderquot; those files by accident./p
Application creator codes for output files
pYou may select a specific application that will be made the default to open images of the listed type with these popup menus./p
Scenes Pane
pIn this pane you may select include paths and other settings for
scene files./p
p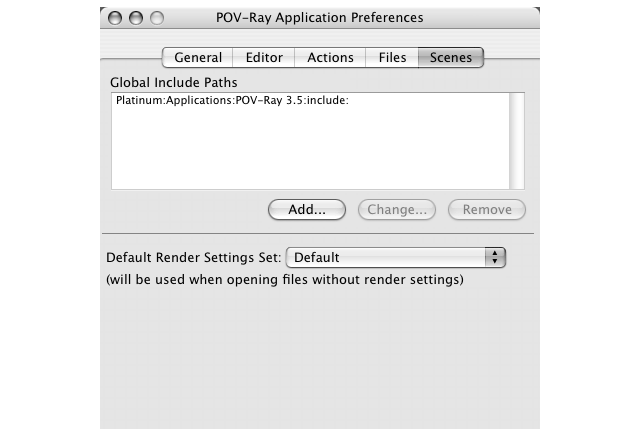 /p
/p
Global Include Paths
pThese include paths will be used with every scene you render. This is useful so you do not always have to add an include path to the default include files folder, which contains files such as quot;colors.incquot;./p
Default Render Settings Set
pIf you open scene files for the first time and those scene files do not have any render settings POV-Ray will use the set you specify with this popup menu./p
Render Settings Dialog
pThis modeless dialog box is displayed when the user selects the quot;Edit: Render Settings...quot; menu item. The user can set almost all of the POV-Ray command-line flags from this dialog. This information is saved in the currently open scene description file, so it is remembered between runs./p pYou can switch between the panes using the tab control near the top. You may switch back and forth between any or all of the panes and changing things. You can quickly cycle between the tabs by holding down the control and command keys and pressing the left arrow or right arrow key./p
Scene Pane
pThis pane contains settings for how the input scene file will be read
and if a preview will be displayed./p
p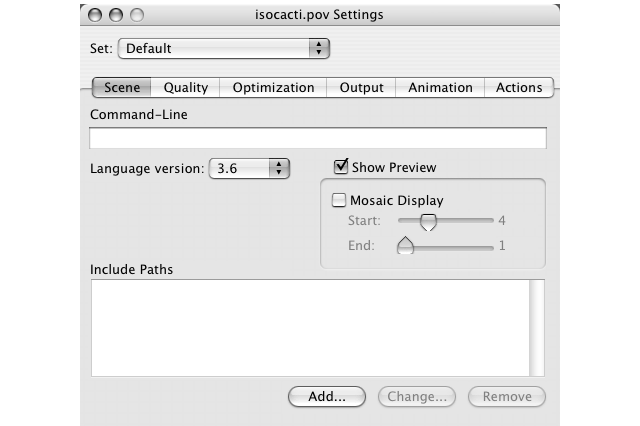 /p
/p
Command-Line
pPOV-Ray is controlled via command-line options on other platforms. In order to specify options not available in the Render Settings, such as INI files or stream redirection, you may enter any command-line arguments in this text field. Be aware that the command-line options override corresponding Render Settings dialog options./p
Language
pThis popup menu contains the settings for the quot;+MVquot; Max Version command line switch for POV-Ray. This determines what version of syntax POV-Ray will initially expect when parsing a scene. If this is an older version of a scene file, you can set its version here. You can also insert a quot;#versionquot; directive in the scene file itself, which is preferred, since it will then be carried across to other platforms./p
Show Preview
pThis will show the preview window with the rendered image. When you deactivate this option you cannot see the rendered image until it is completly rendered. In order to see the image then, you have to open it with another application. Generaly deactivating is only useful for the long, final rendering of an image because then deactivating the preview will speed up things a little bit (on fast Macs less than 1%)./p
Mosaic Preview
pThe checkbox activates mosaic preview. The pair of sliders set the behavior of Mosaic Preview mode. Mosaic Preview is a method of rendering that passes over the image multiple times, first rendering it in large blocks, then finer blocks, until it finally passes over it rendering a pixel at a time. Its algorithm is careful to only render pixels it hasn't rendered in the previous pass, so this is not too much slower than a regular scanline-by-scanline render. This is best used for quick preview renders, not for final anti-aliased renders. It will quickly give you a rough full-screen image, telling you if your camera and lights are close. You can stop the render, change the scene and re-render much more quickly than if you had to wait for a portion of your scene to show up./p pIf mosaic preview is activated the preview window is rendered in Mosaic Preview mode. The sliders set the size of the mosaic. The quot;Startquot; mosaic size has to be larger than the quot;Endquot; mosaic size. This will automatically insured when you change the silders position./p
File Specific Include Paths
pThese include paths will be used with this particular scene. This allows you to use a set of different include paths for each scene without having to change the paths for every scene each time./p
Quality Pane
pThis pane contains settings for the quality of the rendering process.
Here you can turn on/off Anti- aliasing and set theoverall quality
(+Qnn) of the render./p
p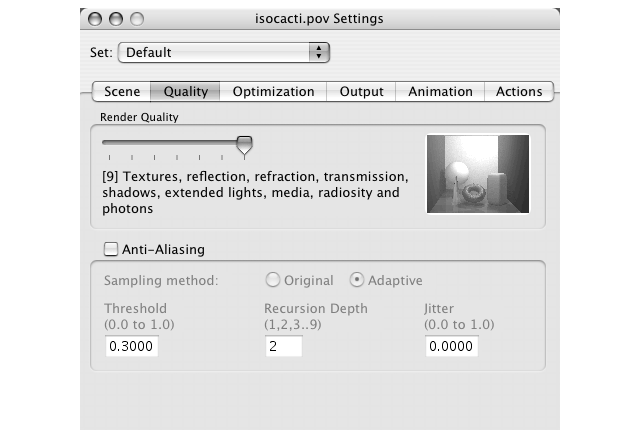 /p
/p
Render Quality
pThis groupbox allows you to set the quality of the rendered image. Use the slider to set the basic quality setting. The text below it will show the features offered by the setting. Moving the slider position to the right will increase the quality and rendering time will increase as well./p pThe image at the right will show a preview of the quality settings./p
Anti-Aliasing
pTurn this on to enable softening of the otherwise harsh jagged edges of computer rendered scenes. This is best used for the final rendering of your image. Sampling method quot;Adaptivequot; is a little faster and gives good results at recursion depth 1 or 2. Turning on Jitter will make the scene a little more blurry, but can often soften jaggies and herringbone interference patterns even more./p
Optimization Pane
pThis pane contains settings for the optimization during the rendering
process. Here you can turn on/off various flags that try to optimize
bounding and buffering to speed up rendering, often at the cost of
increased RAM memory usage./p
p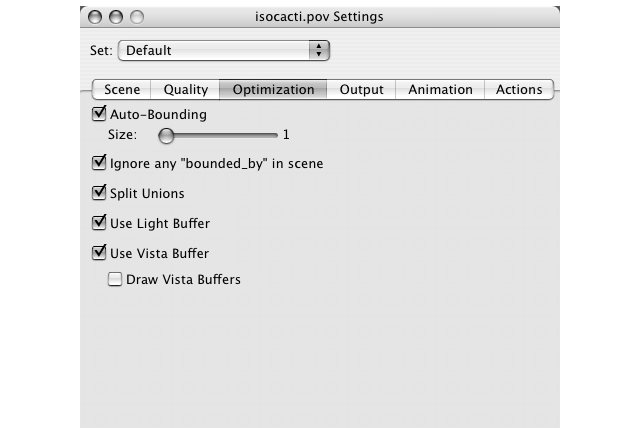 /p
/p
Auto-Bounding
pThis changes the bounding slab object threshold switch (+MBnn), or turns off auto-bounding altogether. Use the slider to set the threshold./p
Ignore any bounded_by in scene
pEarly versions of POV-Ray had no automatic bounding to speed up rendering. Users had to manually creating bounding boxes to speed up rendering. For most scenes using the automatic bounding is faster and you should keep this setting on, but some old scenes may expect the old bounding mechanism./p
Split Unions
pEarly versions of POV-Ray had no automatic bounding and handled unions a little bit different. Some scene files expect the old way unions could be used for and will not work with this option activated./p
Use Light Buffer
pTurn this on to speedup rendering. You only need to deactivate this option is when it does not work as expected./p
Use Vista Buffer
pTurn this on to speedup rendering. You only need to deactivate this option is when it does not work as expected./p
Draw Vista Buffers
pTurn this on to draw the vista buffers created. This is for your interest and for debugging only, it has no real use./p
Output Pane
pThis pane contains settings for the output size and file format of
the final image. It also allows setting the partial row and column
values, if a sub-square of the image is to be rendered./p
p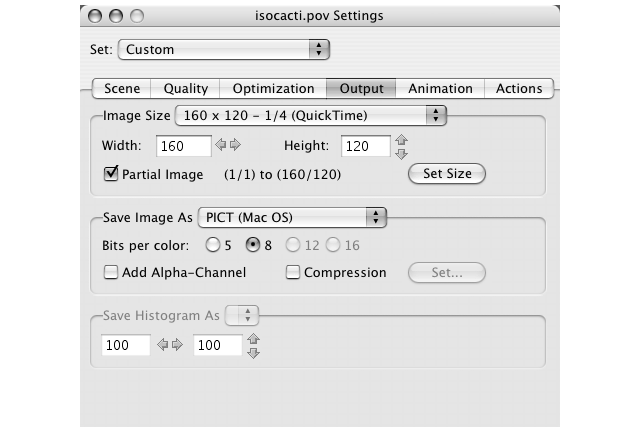 /p
/p
Image Size
pThis popup menu contains some of the more common settings for the image's width and height, in pixels. Beside each value is a description of what screens use that setting. When you select one of these items, the associated height and width are set to the corresponding values. If you manually type in a width and height that matches one of these presets, then the matching item on this popup menu will be checkmarked the next time you select the popup. If no predefined menu item matches the specified size the quot;User Definedquot; menu item is set to the current values./p
Partial Image
pThis groupbox allows you to render only a portion of the image. You can set these values through the selection mode of the preview window as well, but you have to set the values before rendering in order to be used./p
Save Image As
pThis popup menu lets you choose to write to native Mac PICT format, Targa, PNG, or Unix PPM formats. It also lets you write to a QuickTime movie file, most useful if you are also turning on animation./p
Bits per color
pThese radiobuttons will set the bits per color of certain file formats. Note that this confusing buttons really mean bits per color component, like red or green or blue, so 8 means 8 bits (a byte) for red, a byte for green, and a byte for blue, totalling a (8+8+8) 24 bit image. Note also, setting the bits per color for PICT to 5 will force PICTs to be quot;thousandsquot; of colors instead of quot;millionsquot;./p
Add Alpha-Channel
pThis adds an alpha-channel to the image. An alpha-channel is a fourth color compontent specifying how dense the image will be drawn over a background. This is similar to painting on a transpartent film. The more ink is on the film, the less background can be seen through it. Note that only advanced applications like PhotoShop can display an image properly. The shareware quot;GraphicConverterquot; can show the separate alpha-channel as well./p
Compression
pSome image formats allow to enable/disable compression. Use this item to activate compression of the image. This will save disk space for large images./p
Set Compression
pFor the Mac OS Picture and QuickTime Movie formats you can set the advanced QuickTime compression settings in the standard QuickTime compression settings dialog./p
Save Histogram As
pThis feature is not yet available./p
Animation Pane
pThis pane lets the user set up initial, final, and number of frames
for doing multiple frame animations. This sets up POV-Ray to do multiple
images, each time sending a slightly different quot;+Kquot; value to
the POV-Ray engine. You need to turn on the checkbox quot;Turn on clock
Animationquot; to make animation take effect./p
p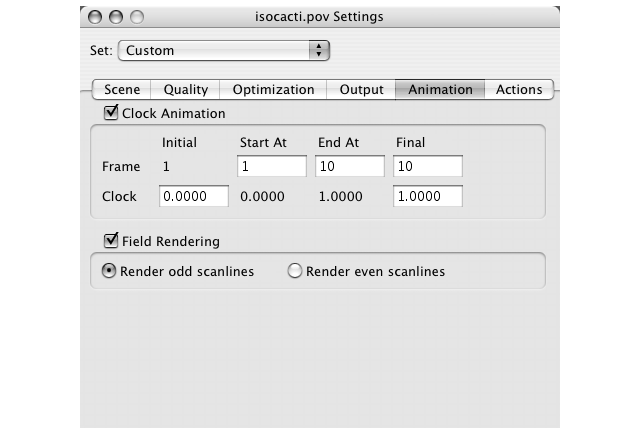 /p
/p
Frame Number
pThis is just a reference number which counts the number of frames (or images) to generate. It starts at one, and increments for each frame. This number is not accessable inside your scene files, it is simply an external counter of image frames. The overall span of frames for an animation goes from INITIAL to FINAL. The actual frames that will be rendered from that will be a subset, from START AT to END AT:/p pInitial - This is a constant low bound for the frame counter. It is always one./p pStart At - This is the first frame number to start generating images for. It can be any integer number from quot;Initialquot; to quot;End atquot;. You might want to set this to something higher than quot;Initialquot; if you want to render some subset of overall animation frames (e.g., you have several machines simultaneously rendering different parts of the animation sequence.)/p pEnd At - This is the last frame number to generate images for. It can be any integer number from quot;Start atquot;to quot;Finalquot;./p pFinal - This is the high bound for the frame counter. It is the total number of frames that should be generated for the scene. This is used to calculate the span of clock values./p
Clock Value
pThis is a variable passed into POV-Ray, which can be used as a dynamically changing animation variable (clock) in a scene file (the quot;+Knnquot; parameter.)/p pInitial - This is the clock value at frame #1. It must be different than the quot;Finalquot; clock value, but otherwise may be any floating point value./p pStart At - This is the displayed clock value at the quot;Start Atquot; frame value./p pEnd At - This is the displayed clock value at the quot;End Atquot; frame value./p pFinal - This is the clock value at the quot;Finalquot; frame #. It must be different than the quot;Initialquot; clock value, but otherwise may be any floating point value, higher or lower than Initial./p
Field Rendering
pActivate this option for rendering only the specified scanlines of an image. This is useful for animations on interlaced display, e.g. TVs. The radiobuttons let you choose which scanline to start on./p
Actions Pane
pThis pane contains settings for actions to be taken before or after
rendering a scene or individual frame. This is useful for scene cleanup
or making sure all needed files are in place./p
p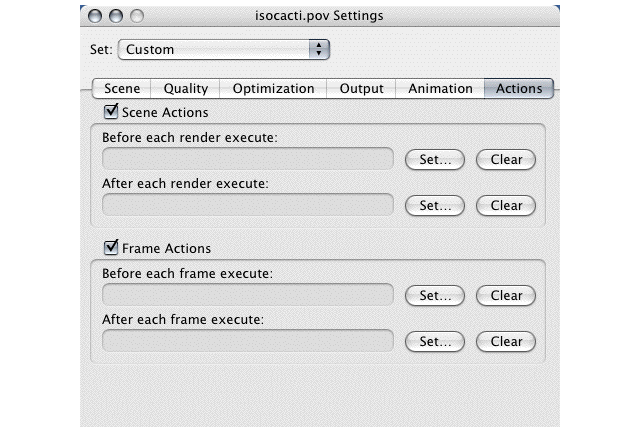 /p
!--wikinav---
br
table width=100% border=0 cellspacing=0 cellpadding=5
trtd width=50% bgcolor=#EEEEEF
Templates Window/td
td width=50% bgcolor=#EEEEEF align=right
Command-Line Options/td/tr
/table
!--/wikinav---
!--wikitalk---
br
table width=100% border=1 cellspacing=0 cellpadding=5
trtd width=100% bgcolor=#FFEEEE
This document is protected, so submissions, corrections and discussions should be held on this documents talk page.
/td/tr
/table
!--/wikitalk---