Difference between revisions of "Documentation:Windows Section 5.1"
Jholsenback (talk | contribs) m (Protected "Documentation:Windows Section 5.1" [edit=sysop:move=sysop]) |
Jholsenback (talk | contribs) m (heading changes, moved a sub-section and some cleanup) |
||
| Line 7: | Line 7: | ||
<br> | <br> | ||
<!--</wikitalk>---> | <!--</wikitalk>---> | ||
| − | ===None=== | + | <!--REMOVE--->===Text Menu===<!--THIS---> |
| + | <!--REMOVE--->====Indent====<!--THIS---> | ||
| + | =====None===== | ||
<p> | <p> | ||
No indentation occurs. The next line begins at column 1. | No indentation occurs. The next line begins at column 1. | ||
</p> | </p> | ||
| − | ===Language Scope=== | + | =====Language Scope===== |
<p> | <p> | ||
Language-specific scoping is used to determine the correct indentation level for the next | Language-specific scoping is used to determine the correct indentation level for the next | ||
| Line 21: | Line 23: | ||
</p> | </p> | ||
| − | ===Copy From Previous Line=== | + | =====Copy From Previous Line===== |
<p> | <p> | ||
Indentation is copied from the previous line. | Indentation is copied from the previous line. | ||
</p> | </p> | ||
| − | ===Bookmarks=== | + | ====Bookmarks==== |
<!--<indexentry primary "Text Menu, Bookmarks">---> | <!--<indexentry primary "Text Menu, Bookmarks">---> | ||
<p> | <p> | ||
| Line 33: | Line 35: | ||
</p> | </p> | ||
| − | <p> | + | <p>[[Image:WinImgSubMenusBookmarks.gif|-]]</p> |
| − | [[Image:WinImgSubMenusBookmarks.gif|-]] | ||
| − | </p> | ||
| − | ===Clear All=== | + | =====Clear All===== |
<p> | <p> | ||
Delete all bookmarks. | Delete all bookmarks. | ||
</p> | </p> | ||
| − | ===First=== | + | =====First===== |
<p> | <p> | ||
Jump to the first bookmark. | Jump to the first bookmark. | ||
</p> | </p> | ||
| − | ===Last=== | + | =====Last===== |
<p> | <p> | ||
Jump to the last bookmark. | Jump to the last bookmark. | ||
</p> | </p> | ||
| − | ===Next=== | + | =====Next===== |
<p> | <p> | ||
Jump to the next bookmark. | Jump to the next bookmark. | ||
</p> | </p> | ||
| − | ===Previous=== | + | =====Previous===== |
<p> | <p> | ||
Jump to the previous bookmark. | Jump to the previous bookmark. | ||
</p> | </p> | ||
| − | ===Toggle=== | + | =====Toggle===== |
<p> | <p> | ||
Toggle a bookmark on or off at the current line. | Toggle a bookmark on or off at the current line. | ||
| Line 75: | Line 75: | ||
</p> | </p> | ||
| − | <p> | + | <p>[[Image:WinImgMenusEditor.gif|-]]</p> |
| − | [[Image:WinImgMenusEditor.gif|-]] | ||
| − | </p> | ||
| − | ===Auto-Load Error File=== | + | ====Auto-Load Error File==== |
<p> | <p> | ||
If this option is checked, POVWIN will automatically load a file, in which a parse error | If this option is checked, POVWIN will automatically load a file, in which a parse error | ||
| Line 94: | Line 92: | ||
</p> | </p> | ||
| − | ===Auto-Show Parse Messages=== | + | ====Auto-Show Parse Messages==== |
<p> | <p> | ||
If this option is selected, when you start a render, a small version of the message window | If this option is selected, when you start a render, a small version of the message window | ||
| Line 107: | Line 105: | ||
</p> | </p> | ||
| − | ===Auto-Save Delay=== | + | ====Auto-Save Delay==== |
<p> | <p> | ||
The delay, in minutes, between automatic saves of your work. If you set this to 0, no | The delay, in minutes, between automatic saves of your work. If you set this to 0, no | ||
| Line 119: | Line 117: | ||
</p> | </p> | ||
| − | ===Create Backups=== | + | ====Create Backups==== |
<p> | <p> | ||
If this option is checked, the editor will create a backup file named the same as the original | If this option is checked, the editor will create a backup file named the same as the original | ||
| Line 134: | Line 132: | ||
</p> | </p> | ||
| − | ===Allow Undo After Manual Save=== | + | ====Allow Undo After Manual Save==== |
<p> | <p> | ||
Unless this option is checked, manually saving a file clears the undo buffer. In this case, | Unless this option is checked, manually saving a file clears the undo buffer. In this case, | ||
| Line 140: | Line 138: | ||
</p> | </p> | ||
| − | ===Click Beyond EOL=== | + | ====Click Beyond EOL==== |
<p> | <p> | ||
This option, which is on by default, allows the editor caret to be positioned beyond the end | This option, which is on by default, allows the editor caret to be positioned beyond the end | ||
| Line 150: | Line 148: | ||
</p> | </p> | ||
| − | ===Constrain Caret To Text=== | + | ====Constrain Caret To Text==== |
<p> | <p> | ||
This option forces the edit caret to always remain within existing text (except when extending | This option forces the edit caret to always remain within existing text (except when extending | ||
| Line 172: | Line 170: | ||
</p> | </p> | ||
| − | ===Overlay Keyword Expansion On Tab Key=== | + | ====Overlay Keyword Expansion On Tab Key==== |
<p> | <p> | ||
See the <!--<linkto "Keyword Expansion">Keyword Expansion</linkto>--->[[Documentation:Windows Section 2#Keyword Expansion and CodeList|Keyword Expansion]] section. | See the <!--<linkto "Keyword Expansion">Keyword Expansion</linkto>--->[[Documentation:Windows Section 2#Keyword Expansion and CodeList|Keyword Expansion]] section. | ||
</p> | </p> | ||
| − | ===Show Message Window=== | + | ====Show Message Window==== |
<p> | <p> | ||
Manually cause the small message window to be displayed (or hidden if it is showing, in which | Manually cause the small message window to be displayed (or hidden if it is showing, in which | ||
| Line 188: | Line 186: | ||
</p> | </p> | ||
| − | ===Editor Preferences Dialog=== | + | ====Editor Preferences Dialog==== |
<p> | <p> | ||
See the <!--<linkto "Editor Preferences">Editor Preferences</linkto>--->[[Documentation:Windows Section 5.1#Editor Preferences|Editor Preferences]] sub-section. | See the <!--<linkto "Editor Preferences">Editor Preferences</linkto>--->[[Documentation:Windows Section 5.1#Editor Preferences|Editor Preferences]] sub-section. | ||
</p> | </p> | ||
| − | ===Record Macro/Play Macro=== | + | ====Record Macro/Play Macro==== |
<p> | <p> | ||
A keystroke macro (not to be confused with POV-Ray scene file macros) is a collection of | A keystroke macro (not to be confused with POV-Ray scene file macros) is a collection of | ||
| Line 208: | Line 206: | ||
</p> | </p> | ||
| − | ===Auto-Reload=== | + | ====Auto-Reload==== |
<!--<indexentry primary "Editor Menu, Auto-Reload" "auto-reload" "reloading changed files">---> | <!--<indexentry primary "Editor Menu, Auto-Reload" "auto-reload" "reloading changed files">---> | ||
| − | <p> | + | <p>[[Image:WinImgSubMenusAutoreload.gif|-]]</p> |
| − | [[Image:WinImgSubMenusAutoreload.gif|-]] | ||
| − | </p> | ||
<p> | <p> | ||
| Line 260: | Line 256: | ||
</p> | </p> | ||
| − | ===Scroll Bars=== | + | ====Scroll Bars==== |
<!--<indexentry primary "Editor Menu, Scroll Bars">---> | <!--<indexentry primary "Editor Menu, Scroll Bars">---> | ||
| − | <p> | + | <p>[[Image:WinImgSubMenusScrollbars.gif|-]]</p> |
| − | [[Image:WinImgSubMenusScrollbars.gif|-]] | ||
| − | </p> | ||
<p> | <p> | ||
| Line 275: | Line 269: | ||
</p> | </p> | ||
| − | ===Color Scheme=== | + | ====Color Scheme==== |
<!--<indexentry primary "Editor Menu, Color Scheme">---> | <!--<indexentry primary "Editor Menu, Color Scheme">---> | ||
| − | [[Image:WinImgSubMenusColorscheme.gif|-]] | + | <p>[[Image:WinImgSubMenusColorscheme.gif|-]]</p> |
<p> | <p> | ||
| Line 301: | Line 295: | ||
</p> | </p> | ||
| − | ===Editor Preferences=== | + | ====Editor Preferences==== |
<!--<indexentry primary "Editor Menu, Preferences">---> | <!--<indexentry primary "Editor Menu, Preferences">---> | ||
<p> | <p> | ||
| Line 308: | Line 302: | ||
</p> | </p> | ||
| − | ===Color/Font=== | + | =====Color/Font===== |
<p> | <p> | ||
This property page allows setting of various editor parameters relating to the color of | This property page allows setting of various editor parameters relating to the color of | ||
| Line 316: | Line 310: | ||
</p> | </p> | ||
| − | <p> | + | <p>[[Image:WinImgDialogsEditprop-colorfont.gif|-]]</p> |
| − | [[Image:WinImgDialogsEditprop-colorfont.gif|-]] | ||
| − | </p> | ||
| − | ===Item=== | + | ======Item====== |
<p> | <p> | ||
This list box allows you to select which item you want to set the color for. An 'item' is | This list box allows you to select which item you want to set the color for. An 'item' is | ||
| Line 331: | Line 323: | ||
</p> | </p> | ||
| − | ===Color=== | + | ======Color====== |
<p> | <p> | ||
This sets the foreground color of the item selected in the 'Item' listbox. | This sets the foreground color of the item selected in the 'Item' listbox. | ||
</p> | </p> | ||
| − | ===Background=== | + | ======Background====== |
<p> | <p> | ||
This sets the background color of the item selected in the 'Item' listbox. If it is set | This sets the background color of the item selected in the 'Item' listbox. If it is set | ||
| Line 342: | Line 334: | ||
</p> | </p> | ||
| − | ===Font=== | + | ======Font====== |
<p> | <p> | ||
This allows you to set the font face, size, and style that is used for displaying the text | This allows you to set the font face, size, and style that is used for displaying the text | ||
| Line 348: | Line 340: | ||
</p> | </p> | ||
| − | ===Language/Tabs=== | + | =====Language/Tabs===== |
<!--<indexentry primary "Language, editor" "editor, language setting" "syntax highlighting, setting language" "language">---> | <!--<indexentry primary "Language, editor" "editor, language setting" "syntax highlighting, setting language" "language">---> | ||
<p> | <p> | ||
| Line 360: | Line 352: | ||
</p> | </p> | ||
| − | <p> | + | <p>[[Image:WinImgDialogsEditprop-language.gif|-]]</p> |
| − | [[Image:WinImgDialogsEditprop-language.gif|-]] | ||
| − | </p> | ||
| − | ===Auto Indentation Style=== | + | ======Auto Indentation Style====== |
<p> | <p> | ||
This allows you to select the auto-indentation style for the currently selected file. This | This allows you to select the auto-indentation style for the currently selected file. This | ||
| Line 373: | Line 363: | ||
</p> | </p> | ||
| − | ===Tabs=== | + | ======Tabs====== |
<p> | <p> | ||
You can select the number of columns tabs expand to here. Additionally, if 'Convert tabs | You can select the number of columns tabs expand to here. Additionally, if 'Convert tabs | ||
| Line 394: | Line 384: | ||
</p> | </p> | ||
| − | ===Language=== | + | ======Language====== |
<p> | <p> | ||
You can choose the file language here. This setting controls syntax highlighting and the | You can choose the file language here. This setting controls syntax highlighting and the | ||
| Line 405: | Line 395: | ||
</p> | </p> | ||
| − | ===Keyboard=== | + | =====Keyboard===== |
<!--<indexentry primary "Keyboard Configuration">---> | <!--<indexentry primary "Keyboard Configuration">---> | ||
| Line 444: | Line 434: | ||
</p> | </p> | ||
| − | ===Misc=== | + | =====Misc===== |
<p> | <p> | ||
With the exception of 'Line Numbers', all the options on this property page affect all | With the exception of 'Line Numbers', all the options on this property page affect all | ||
| Line 450: | Line 440: | ||
</p> | </p> | ||
| − | <p> | + | <p>[[Image:WinImgDialogsEditprop-misc.gif|-]]</p> |
| − | [[Image:WinImgDialogsEditprop-misc.gif|-]] | ||
| − | </p> | ||
| − | ===Smooth Scrolling=== | + | ======Smooth Scrolling====== |
<p> | <p> | ||
If checked, scrolling of the editor window will be 'smooth' rather than jerky. Some people | If checked, scrolling of the editor window will be 'smooth' rather than jerky. Some people | ||
| Line 460: | Line 448: | ||
</p> | </p> | ||
| − | ===Show Left Margin=== | + | ======Show Left Margin====== |
<p> | <p> | ||
If checked, the left margin will be visible. The left margin is a useful area that can contain | If checked, the left margin will be visible. The left margin is a useful area that can contain | ||
| Line 473: | Line 461: | ||
</p> | </p> | ||
| − | ===Line Tooltips on Scroll=== | + | ======Line Tooltips on Scroll====== |
<p> | <p> | ||
If checked, and you scroll the edit window by dragging the scroll-bar thumb, a line tooltip will | If checked, and you scroll the edit window by dragging the scroll-bar thumb, a line tooltip will | ||
| Line 479: | Line 467: | ||
</p> | </p> | ||
| − | ===Allow Drag and Drop=== | + | ======Allow Drag and Drop====== |
<p> | <p> | ||
If checked, OLE drag and drop text editing is enabled. This allows you to highlight blocks of | If checked, OLE drag and drop text editing is enabled. This allows you to highlight blocks of | ||
| Line 494: | Line 482: | ||
</table> | </table> | ||
| − | ===Allow Column Selection=== | + | ======Allow Column Selection====== |
<p> | <p> | ||
If checked, columns of text can be selected with the mouse and then manipulated. Empty | If checked, columns of text can be selected with the mouse and then manipulated. Empty | ||
| Line 504: | Line 492: | ||
See <!--<linkto "Using the Mouse">Using the Mouse</linkto>--->[[Documentation:Windows Section 2.1#Using the Mouse|Using the Mouse]] for a description of how to select | See <!--<linkto "Using the Mouse">Using the Mouse</linkto>--->[[Documentation:Windows Section 2.1#Using the Mouse|Using the Mouse]] for a description of how to select | ||
columnar blocks. | columnar blocks. | ||
| + | </p> | ||
| + | ======Confine Caret to Text====== | ||
| + | <p> | ||
| + | This is the same as the <!--<linkto "Constrain Caret To Text">Constrain Caret To Text</linkto>--->[[Documentation:Windows Section 5.1#Constrain Caret To Text|Constrain Caret To Text]] | ||
| + | option in the <!--<linkto "Editor Menu">Editor Menu</linkto>--->[[Documentation:Windows Section 5.1#Editor Menu|Editor Menu]]. Please refer to that documentation. | ||
| + | </p> | ||
| + | |||
| + | ======Color Syntax Highlighting====== | ||
| + | <p> | ||
| + | If checked, color syntax highlighting will be used according to the <!--<linkto "Language">Language</linkto>--->[[Documentation:Windows Section 5.1#Language|Language]] | ||
| + | setting. You can control the colors used from the <!---<linkto "Color/Font">Color/Font Property Page</linkto>--->[[Documentation:Windows Section 5.1#Color/Font|Color/Font]]. | ||
| + | </p> | ||
| + | |||
| + | <p> | ||
| + | See <!--<linkto "The Editor Window">The Editor Window</linkto>--->[[Documentation:Windows Section 4#The Editor Window|The Editor Window]] for an example of the appearance | ||
| + | of syntax highlighting. | ||
| + | </p> | ||
| + | |||
| + | ======Show Horizontal/Vertical Scrollbar====== | ||
| + | <p> | ||
| + | These two options select whether the edit window has horizontal scrollbars, vertical | ||
| + | scrollbars, or both. | ||
| + | </p> | ||
| + | |||
| + | <p> | ||
| + | Note that if you turn off a scrollbar, you lose the ability to split the window in that | ||
| + | direction (since the window splitter for each direction is on the scrollbar). In this | ||
| + | case, the appropriate 'Allow Splitting' option (see below) will be dimmed and unavailable. | ||
| + | </p> | ||
| + | |||
| + | ======Allow Horizontal/Vertical Splitting====== | ||
| + | <p> | ||
| + | These two options select whether or not you can split a window by dragging on the horizontal | ||
| + | or vertical splitters (see <!--<linkto "The Editor Window">The Editor Window</linkto>--->[[Documentation:Windows Section 4#The Editor Window|The Editor Window]] for an example | ||
| + | of what the splitters look like). | ||
| + | </p> | ||
| + | |||
| + | <p> | ||
| + | Using this method you can split the window into up to four different sections. Each section will | ||
| + | still show the same file, but the sections can show different parts of the file. Editing in one | ||
| + | section causes the changes to be immediately visible in any other sections that are showing the | ||
| + | same part of the file. | ||
| + | </p> | ||
| + | |||
| + | ======Line Numbering====== | ||
| + | <p> | ||
| + | This allows you to turn on line numbering, which may be in decimal, hex, octal or binary (!). | ||
| + | Note that this setting does not influence whether or not line numbers are included in printouts | ||
| + | you make of the file; if you want printed line numbers, you can select that option in the | ||
| + | print dialog. | ||
| + | </p> | ||
| + | |||
| + | <p> | ||
| + | Note that, unlike the other settings on this property page, the Line Numbers setting only applies | ||
| + | to the current editor file. Additionally, it is not preserved across invocations of the editor; | ||
| + | once you exit, the setting is forgotten. | ||
| + | </p> | ||
| + | |||
| + | ======Max Undoable Actions====== | ||
| + | <p> | ||
| + | Allows you to set a limit on the number of edit actions that will be stored in the 'undo' | ||
| + | buffer. Actions older than this limit will be discarded. Unless you are critically low | ||
| + | on memory (or don't like having hundreds of undo's available), we recommend that you leave | ||
| + | this on the default setting of 'infinite'. | ||
</p> | </p> | ||
<!--<wikinav>---> | <!--<wikinav>---> | ||
| Line 511: | Line 563: | ||
[[Documentation:Windows Section 5#Auto-Indent Style|Auto-Indent Style]]</td> | [[Documentation:Windows Section 5#Auto-Indent Style|Auto-Indent Style]]</td> | ||
<td width=50% bgcolor=#EEEEEF align=right> | <td width=50% bgcolor=#EEEEEF align=right> | ||
| − | [[Documentation:Windows Section 5. | + | [[Documentation:Windows Section 5.3#Inser Menu|Insert Menu]]</td></tr> |
</table> | </table> | ||
<!--</wikinav>---> | <!--</wikinav>---> | ||
Revision as of 11:45, 27 March 2010
|
This document is protected, so submissions, corrections and discussions should be held on this documents talk page. |
Text Menu
Indent
None
No indentation occurs. The next line begins at column 1.
Language Scope
Language-specific scoping is used to determine the correct indentation level for the next line. This setting causes the editor to parse the buffer contents, looking backward for scope keywords until the start of the current scope is encountered. Once found, the indentation is copied to the next line. If no language is set, the editor acts as if 'Copy From Previous Line' was chosen.
Copy From Previous Line
Indentation is copied from the previous line.
Bookmarks
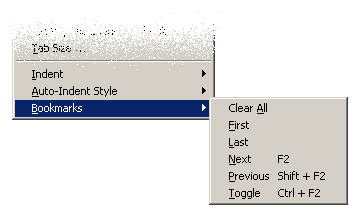
Bookmarks provide a means to quickly get to a previously-marked position in a file. Any bookmarks you define are lost when POVWIN exits.
Clear All
Delete all bookmarks.
First
Jump to the first bookmark.
Last
Jump to the last bookmark.
Next
Jump to the next bookmark.
Previous
Jump to the previous bookmark.
Toggle
Toggle a bookmark on or off at the current line.
Editor Menu
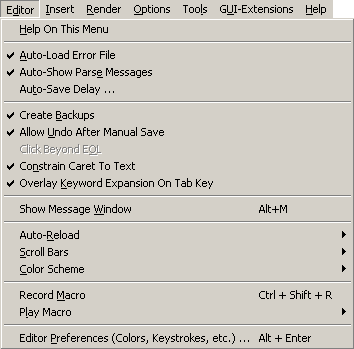
The Editor Menu contains commands that relate to the configuration and use of the editor. It is only displayed when an editor pane is selected.
Auto-Load Error File
If this option is checked, POVWIN will automatically load a file, in which a parse error has occurred, into the editor (or select it if it's already loaded), then place the cursor on the line and column of the offending code.
Note that if this option is on, and the message window was displayed automatically (see 'Auto-Show Parse Messages' below), it will be closed automatically rather than being left open. The text describing the error will be displayed in the status bar at the bottom of the window. Note that, occasionally, if the error occurs inside a macro, the displayed line/column for the error will be wrong.
Auto-Show Parse Messages
If this option is selected, when you start a render, a small version of the message window will be opened at the bottom of the edit window. You can resize this window vertically using the mouse. To close it, just hit ESCAPE.
Note that unless you have 'Auto-Load Error File' selected, the message window will remain visible upon a parse error (so that you can see it without switching windows). If the render completes successfully, the message window will close.
Auto-Save Delay
The delay, in minutes, between automatic saves of your work. If you set this to 0, no automatic saves will be made.
Be aware that if Auto-Reload is set to either 'Ask' or 'Always', switching focus to another application will cause all of your files to be automatically saved.
Create Backups
If this option is checked, the editor will create a backup file named the same as the original but with '.bak' appended to it the first time the file is saved in each edit session. Note that it is not created with each save, but only the first!
Also note that appending the '.bak' extension is meant literally - unlike editors that hail from the old 8.3 filename era, which would remove the old extension and replace it with .bak (e.g. 'foo.pov' would become 'foo.bak'), we literally append '.bak', such that 'foo.pov' becomes 'foo.pov.bak', thus avoiding the problem that having two files named 'foo.pov' and 'foo.inc' in the same directory would have caused.
Allow Undo After Manual Save
Unless this option is checked, manually saving a file clears the undo buffer. In this case, you will not be able to undo changes made before you saved a file.
Click Beyond EOL
This option, which is on by default, allows the editor caret to be positioned beyond the end of the line if you choose to left-click there with the mouse. This is the behavior that most users seem to want. However, a number of users have requested that the 'old' behavior (from the previous POVWIN editor, which did not allow the caret beyond the end of a line) be preserved. Note that this option is only available if 'Constrain Caret to Text' (see below) is not checked.
Constrain Caret To Text
This option forces the edit caret to always remain within existing text (except when extending the end of the file). As with the 'Click Beyond EOL' option above, this is the behaviour that some users prefer and was the default in the POVWIN 3.0 editor. Note that selecting this option causes the 'Click Beyond EOL' menu entry to be disabled.
If 'Click Beyond EOL' is turned off, and you left-click beyond the end of a line, the editor caret will snap to the location after the last character on the line. You can still manually (using the cursor keys) move the caret right past the end of the line, or down onto a new line (and thus be past the end of that line, if it were shorter).
If 'Constrain Caret to Text' is turned on, it has the same effect as turning 'Click Beyond EOL' on, with the additional restriction that using the cursor keys will not move the caret into virtual space. For example, moving the caret right at the end of a line will cause it to wrap to the start of the next line instead of moving right into virtual space.
Overlay Keyword Expansion On Tab Key
See the Keyword Expansion section.
Show Message Window
Manually cause the small message window to be displayed (or hidden if it is showing, in which case this menu entry will read 'Hide Message Window' instead of 'Show Message Window'). Note that you can also use the Escape key to hide the message window.
See Auto-Show Parse Messages for more information.
Editor Preferences Dialog
See the Editor Preferences sub-section.
Record Macro/Play Macro
A keystroke macro (not to be confused with POV-Ray scene file macros) is a collection of editing actions (which may include cursor movement, text editing, search, replace, and so forth) which may be assigned to a shortcut key and stored for re-use. POV-Ray for Windows stores macros in the registry, so they will still be available next time you run the program. You can have up to ten keystroke macros recorded at any one time.
Once you activate the 'Record Macro' command, a small dialog box will appear that allows you to stop the recording, and then assign a key to the macro before it is saved. If you do not assign a key, the macro will still be playable via the 'Play Macro' menu.
Auto-Reload
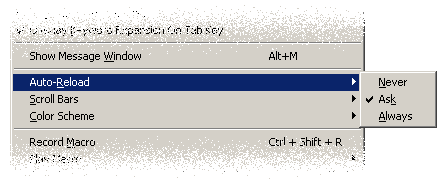
The Auto-Reload facility (which by default is set to 'Ask') causes the editor to check the time and date of all files that are currently open when it receives focus from another application. For example, suppose you were using a program that automatically generates POV scene files (these are quite common) and had the output file open in POVWIN. If you switched to that application, told it to regenerate the output file, then switched back to POVWIN, the editor would detect that the file had been changed (assuming Auto-Reload is enabled).
The three settings available for Auto-Reload are 'Never', 'Ask', and 'Always'.
- 'Never' means never check - changes to a file made externally to POVWIN will not be detected and you risk overwriting the changes if you save the copy open in the editor.
- 'Ask' means that, if changes to a file are detected, POVWIN will ask you if you want it reloaded. If you reply 'Yes' and you have unsaved changes, they will be lost. Your undo buffer will also be cleared.
- 'Always' means that, if POVWIN detects that a file has changed, it will always reload it without asking you! If you have unsaved changes, they will be automatically discarded. Your undo buffer is also cleared.
Be aware that if Auto-Reload is set to either 'Ask' or 'Always', switching focus to another application will cause all of your files to be automatically saved.
Warning: The auto-reload feature is not intended as a substitute for common sense. We do not guarantee that it will work. It is not always possible to determine if a file has changed (for example, the time stamp may not be updated by the other application) and apart from that, it takes time to save a file. If the other application is still in the process of saving the file when you switch back to POVWIN, it's possible that the change won't be picked up. Likewise if POVWIN is still saving the file when the other application is selected ; for example, if it is an editor with a similar feature, it may not pick up the change.
Nevertheless, Auto-Reload is a useful feature under most circumstances.
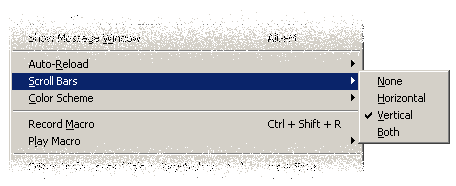
Scroll Bars
Select whether the edit window has horizontal scrollbars, vertical scrollbars, or both.
Note that if you turn off a scrollbar, you lose the ability to split the window in that direction (since the window splitter for each direction is on the scrollbar).
Color Scheme
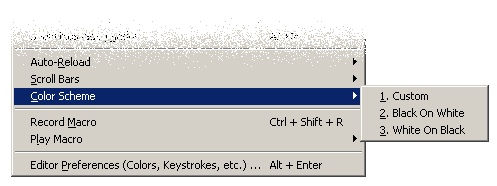
The colors used by POVWIN's editor are able to be customized by you on a case-by-case basis. However, for convenience, there are two built-in color schemes accessible from the Editor menu. These are 'Black on White' (the default) and 'White on Black'.
Black on White is the traditional Windows style of presentation, with black text being drawn on a white background.
White on Black is the other way around - a black background with white text. Many users who became accustomed to using text editors under DOS will be comfortable with this.
Note that choosing one of these options will overwrite any changes you had made to your color scheme ! Once you have chosen a new scheme, you may customize it from that point (or simply choose 'Custom' to be taken to the Color/Font dialog).
Editor Preferences
Before reading this section, we recommend you review Global vs. Local Options if you have not done so recently.
Color/Font
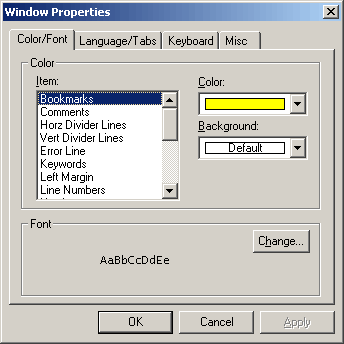
This property page allows setting of various editor parameters relating to the color of the syntax highlighting, page background, and font. Changes made on this page affect all editor windows immediately and are stored in the registry for recall the next time POVWIN is run.
Item
This list box allows you to select which item you want to set the color for. An 'item' is any individually-controllable color within the editor. For example, plain text, bookmarks, the left border, comments, and so on are all individually controllable.
See also Color Scheme.
Color
This sets the foreground color of the item selected in the 'Item' listbox.
Background
This sets the background color of the item selected in the 'Item' listbox. If it is set to 'default', then the background color will be the same as the window background.
Font
This allows you to set the font face, size, and style that is used for displaying the text within the editor windows.
Language/Tabs
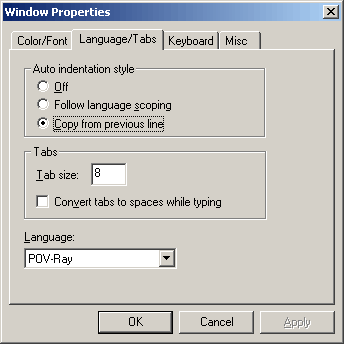
This property page allows you to manually specify the language that the current file uses. The editor normally will set this for you, but if you are editing a supported language in a file with an unrecognized extension, you may want to manually specify it.
You can also set the auto-indentation style in use and the tab settings.
Auto Indentation Style
This allows you to select the auto-indentation style for the currently selected file. This style will then become the default for all newly-loaded files, but will not change the auto-indentation style for any already-loaded files. Note that the auto-indentation style selected for a file is saved in the registry, and is retained with the file in the MRU (most-recently-used) file list held in the File Menu.
Tabs
You can select the number of columns tabs expand to here. Additionally, if 'Convert tabs to spaces while typing' is checked, pressing the TAB key will not insert a hard tab but will instead insert the apppropriate number of spaces.
We strongly recommend that you use the 'Convert tabs to spaces while typing' option if you intend to use the tab key in a file that you will distribute to other users. This is because different people have different preferences for tab indentation settings, and if a person receives a file from you with hard tabs embedded in it, and has a different setting for tab expansion, your code may not align properly. This can make it hard to read.
Changing the tab expansion setting affects the current file, and also becomes the default for any newly-loaded files. It does not affect the tab expansion settings for already-loaded files.
Language
You can choose the file language here. This setting controls syntax highlighting and the indentation rules (if you have 'Follow Language Scoping' set for the Auto-indentation style).
The editor supports syntax highlighting for the following file types: POV-Ray, C/C++, Basic, Java, Pascal, SQL, HTML, and XML.
Keyboard
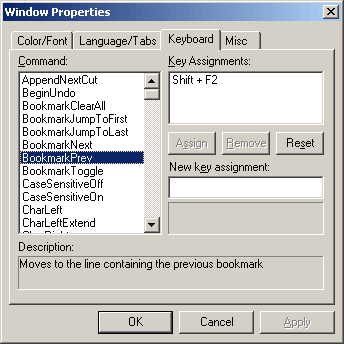
This property page allows you to set the key sequence assigned to all built-in editor commands.
Not all commands are assignable ! In general, only the commands that are directly implemented in the CodeMax editor DLL are able to be set. These commands are ones that relate to operations on individual edit buffers. They do not include such things as file operations (load, save, print, etc). These operations are implemented in the POVWIN editor wrapper code and are not managed or able to be changed by CodeMax. Therefore, it should be clear that you can neither change the key bindings for operations such as file save, nor use the POVWIN- assigned keystroke (e.g. Ctrl-S in the case of save) for any other purpose.
See the Default Key Mappings section for a list of all the default assignments of editor commands to keystrokes. Note that each command may have two different key sequences assigned to it, and that each key sequence may have up to two keystrokes (e.g. the old 'Wordstar'-style commands).
To assign a key to a command, choose the command you want in the listbox on the left, and then click in the box titled 'New Key Assignment' and press the key(s) you want to use, then press 'Assign' to set it.
Hint: it's very easy to just press 'OK' after typing in a new key assignment, without pressing 'Assign' first! If you do this, the new keystroke will not be assigned.
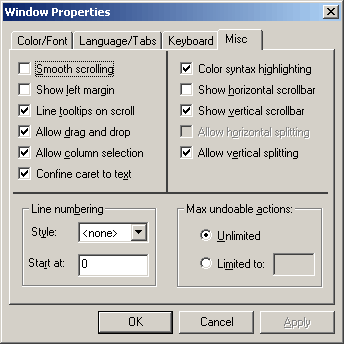
Misc
With the exception of 'Line Numbers', all the options on this property page affect all editors. All take effect immediately.
Smooth Scrolling
If checked, scrolling of the editor window will be 'smooth' rather than jerky. Some people prefer this, though it is slower than the traditional scrolling.
Show Left Margin
If checked, the left margin will be visible. The left margin is a useful area that can contain things such as line numbers and bookmark markers. It can also be colored differently from the main text. You can highlight an entire line by clicking in the left margin next to it, and highlight a range of lines by clicking and dragging in the margin.
See The Editor Window for an example of the appearance of the left margin.
Line Tooltips on Scroll
If checked, and you scroll the edit window by dragging the scroll-bar thumb, a line tooltip will show the approximate line number you have scrolled to.
Allow Drag and Drop
If checked, OLE drag and drop text editing is enabled. This allows you to highlight blocks of text and drag them to another position within the editor window, or even to another editor program that supports the same feature (e.g. the standard Windows 'wordpad' editor, Microsoft Word, and many others). Of course, you can also drag text from those applications and drop it into the editor window.
| Mouse Action | Result |
|---|---|
| L-Button down over selection, and drag | Moves text |
| Ctrl + L-Button down over selection, and drag | Copies text |
Allow Column Selection
If checked, columns of text can be selected with the mouse and then manipulated. Empty columns (columns with a width of zero characters) can be selected, causing subsequent typing and deletion to occur over multiple lines at the same time.
See Using the Mouse for a description of how to select columnar blocks.
Confine Caret to Text
This is the same as the Constrain Caret To Text option in the Editor Menu. Please refer to that documentation.
Color Syntax Highlighting
If checked, color syntax highlighting will be used according to the Language setting. You can control the colors used from the Color/Font.
See The Editor Window for an example of the appearance of syntax highlighting.
Show Horizontal/Vertical Scrollbar
These two options select whether the edit window has horizontal scrollbars, vertical scrollbars, or both.
Note that if you turn off a scrollbar, you lose the ability to split the window in that direction (since the window splitter for each direction is on the scrollbar). In this case, the appropriate 'Allow Splitting' option (see below) will be dimmed and unavailable.
Allow Horizontal/Vertical Splitting
These two options select whether or not you can split a window by dragging on the horizontal or vertical splitters (see The Editor Window for an example of what the splitters look like).
Using this method you can split the window into up to four different sections. Each section will still show the same file, but the sections can show different parts of the file. Editing in one section causes the changes to be immediately visible in any other sections that are showing the same part of the file.
Line Numbering
This allows you to turn on line numbering, which may be in decimal, hex, octal or binary (!). Note that this setting does not influence whether or not line numbers are included in printouts you make of the file; if you want printed line numbers, you can select that option in the print dialog.
Note that, unlike the other settings on this property page, the Line Numbers setting only applies to the current editor file. Additionally, it is not preserved across invocations of the editor; once you exit, the setting is forgotten.
Max Undoable Actions
Allows you to set a limit on the number of edit actions that will be stored in the 'undo' buffer. Actions older than this limit will be discarded. Unless you are critically low on memory (or don't like having hundreds of undo's available), we recommend that you leave this on the default setting of 'infinite'.
| Auto-Indent Style | Insert Menu |
|
This document is protected, so submissions, corrections and discussions should be held on this documents talk page. |
