Difference between revisions of "Documentation:Windows Section 5"
m (Fixing/updating some index entries in windows docs) |
Jholsenback (talk | contribs) m (added tag admonishment) |
||
| (19 intermediate revisions by 3 users not shown) | |||
| Line 12: | Line 12: | ||
===File Menu=== | ===File Menu=== | ||
{{#indexentry:Menus, File Menu}} | {{#indexentry:Menus, File Menu}} | ||
| + | <!--BEGIN DO NOT alter or move---> | ||
| + | {{#indexentry:File Menu}} | ||
| + | <!--END DO NOT alter or move---> | ||
<table class="centered" width="700x" cellpadding="0" cellspacing="10"> | <table class="centered" width="700x" cellpadding="0" cellspacing="10"> | ||
<tr> | <tr> | ||
<td> | <td> | ||
| − | [[Image: | + | [[Image:win-filemenu.png|center|223px<!--left--->]] |
</td> | </td> | ||
<td> | <td> | ||
| Line 42: | Line 45: | ||
<p> | <p> | ||
This creates a new window in the internal editor and opens the specified file in it. POV-Ray | This creates a new window in the internal editor and opens the specified file in it. POV-Ray | ||
| − | will attempt to set the language type according to the extension. .POV and . | + | will attempt to set the language type according to the extension. .POV, .INC, .MAC and .MCR files are |
assumed to be POV-Ray files and will have POV syntax highlighting. If you use a different file | assumed to be POV-Ray files and will have POV syntax highlighting. If you use a different file | ||
extension for POV source code, you can set the language type manually after you open it. | extension for POV source code, you can set the language type manually after you open it. | ||
| Line 54: | Line 57: | ||
====Close==== | ====Close==== | ||
| − | |||
| − | |||
<p> | <p> | ||
This closes the file open in the currently-selected internal editor. | This closes the file open in the currently-selected internal editor. | ||
| Line 83: | Line 84: | ||
If you shut down your computer without exiting POV-Ray for Windows first, POV-Ray will load | If you shut down your computer without exiting POV-Ray for Windows first, POV-Ray will load | ||
itself again next time you log in as the same user. Note that we do not recommend shutting | itself again next time you log in as the same user. Note that we do not recommend shutting | ||
| − | down your computer without saving any edited files first | + | down your computer without saving any edited files first - while the editor will attempt to |
| − | |||
do the right thing with unsaved files during a shutdown, to a great extent it is at the mercy | do the right thing with unsaved files during a shutdown, to a great extent it is at the mercy | ||
of the operating system. | of the operating system. | ||
| Line 100: | Line 100: | ||
and moved to the top of the MRU list. Otherwise, it is opened and moved to the top of the | and moved to the top of the MRU list. Otherwise, it is opened and moved to the top of the | ||
list. The MRU list remembers several things about files, including the last line, column, and | list. The MRU list remembers several things about files, including the last line, column, and | ||
| − | top line number, plus the | + | top line number, plus the language and indent settings. The comments in this paragraph |
also apply to the Older Files menu. | also apply to the Older Files menu. | ||
</p> | </p> | ||
| − | ====Older Files==== | + | ====Older Files sub-menu==== |
{{#indexentry:File Menu, Older Files}} | {{#indexentry:File Menu, Older Files}} | ||
| + | {{#indexentry:Older Files Menu}} | ||
<p> | <p> | ||
After files have scrolled off the bottom of the MRU (Most Recently Used) list that appears at | After files have scrolled off the bottom of the MRU (Most Recently Used) list that appears at | ||
| Line 114: | Line 115: | ||
===Edit Menu=== | ===Edit Menu=== | ||
| − | {{#indexentry:Edit Menu | + | {{#indexentry:Edit Menu}} |
| + | {{#indexentry:Menus, Edit Menu}} | ||
<table class="centered" width="660x" cellpadding="0" cellspacing="10"> | <table class="centered" width="660x" cellpadding="0" cellspacing="10"> | ||
<tr> | <tr> | ||
<td> | <td> | ||
| − | [[Image: | + | [[Image:win-editmenu.png|center|214px<!--left--->]] |
</td> | </td> | ||
<td> | <td> | ||
| Line 203: | Line 205: | ||
</p> | </p> | ||
| − | ====Selection==== | + | ====Selection sub-menu==== |
| − | {{#indexentry:Edit Menu, Selection | + | {{#indexentry:Edit Menu, Selection}} |
| − | <table class="centered" width=" | + | {{#indexentry:Selection Menu}} |
| + | <p>The Selection sub-menu contains commands which relate to operations on blocks of selected text. If there is no text selected in the editor, all of these commands will be disabled.</p> | ||
| + | |||
| + | <table class="centered" width="700px" cellpadding="0" cellspacing="10"> | ||
<tr> | <tr> | ||
<td> | <td> | ||
| − | + | [[Image:win-selectionmenu.png|center|420px<!--centered--->]] | |
| − | |||
| − | |||
| − | [[Image: | ||
</td> | </td> | ||
</tr> | </tr> | ||
<tr> | <tr> | ||
| − | |||
<td> | <td> | ||
| − | <p class="caption">The Selection | + | <p class="caption">The Selection sub-menu</p> |
</td> | </td> | ||
</tr> | </tr> | ||
</table> | </table> | ||
| + | |||
| + | <p>See <!--<linkto "Using the Mouse">Using the Mouse</linkto>--->[[Documentation:Windows Section 2#Using the Mouse|Using the Mouse]] for a description of the various ways you can select text (including full line blocks, stream blocks, and column blocks).</p> | ||
=====Indent===== | =====Indent===== | ||
| Line 263: | Line 266: | ||
===Search Menu=== | ===Search Menu=== | ||
| − | {{#indexentry:Search Menu | + | {{#indexentry:Menus, Search Menu}} |
| + | {{#indexentry:Search Menu}} | ||
<table class="centered" width="660x" cellpadding="0" cellspacing="10"> | <table class="centered" width="660x" cellpadding="0" cellspacing="10"> | ||
<tr> | <tr> | ||
<td> | <td> | ||
| − | [[Image: | + | [[Image:win-searchmenu.png|center|230px<!--left--->]] |
</td> | </td> | ||
<td> | <td> | ||
| Line 281: | Line 285: | ||
</table> | </table> | ||
| − | ====Find==== | + | ====Find dialog==== |
<table class="centered" width="660x" cellpadding="0" cellspacing="10"> | <table class="centered" width="660x" cellpadding="0" cellspacing="10"> | ||
<tr> | <tr> | ||
<td> | <td> | ||
| − | [[Image: | + | [[Image:win-finddialog.png|center|372px<!--left--->]] |
</td> | </td> | ||
<td> | <td> | ||
| Line 368: | Line 372: | ||
<tr> | <tr> | ||
<td> | <td> | ||
| − | [[Image: | + | [[Image:win-replacedialog.png|center|372px<!--left--->]] |
</td> | </td> | ||
<td> | <td> | ||
| Line 394: | Line 398: | ||
also works in reverse. | also works in reverse. | ||
</p> | </p> | ||
| − | |||
| − | |||
| − | |||
| − | |||
| − | |||
| − | |||
| − | |||
| − | |||
| − | |||
| − | |||
| − | |||
| − | |||
| − | |||
| − | |||
| − | |||
| − | |||
| − | |||
| − | |||
| − | |||
| − | |||
| − | |||
| − | |||
| − | |||
| − | |||
| − | |||
| − | |||
| − | |||
| − | |||
| − | |||
| − | |||
| − | |||
| − | |||
| − | |||
| − | |||
| − | |||
| − | |||
| − | |||
| − | |||
| − | |||
| − | |||
| − | |||
| − | |||
| − | |||
| − | |||
| − | |||
| − | |||
| − | |||
| − | |||
| − | |||
| − | |||
| − | |||
| − | |||
| − | |||
| − | |||
| − | |||
| − | |||
| − | |||
| − | |||
| − | |||
| − | |||
| − | |||
| − | |||
| − | |||
| − | |||
| − | |||
| − | |||
| − | |||
| − | |||
| − | |||
| − | |||
| − | |||
| − | |||
| − | |||
| − | |||
| − | |||
| − | |||
| − | |||
| − | |||
| − | |||
| − | |||
| − | |||
<!--<wikinav>---> | <!--<wikinav>---> | ||
<br> | <br> | ||
| Line 481: | Line 404: | ||
[[Documentation:Windows Section 4#The Render Window|The Render Window]]</td> | [[Documentation:Windows Section 4#The Render Window|The Render Window]]</td> | ||
<td width=50% bgcolor=#EEEEEF align=right> | <td width=50% bgcolor=#EEEEEF align=right> | ||
| − | [[Documentation:Windows Section 5.1# | + | [[Documentation:Windows Section 5.1#Text Menu|Text Menu]]</td></tr> |
</table> | </table> | ||
<!--</wikinav>---> | <!--</wikinav>---> | ||
Latest revision as of 13:05, 16 December 2016
|
This document is protected, so submissions, corrections and discussions should be held on this documents talk page. |
Menus
File Menu
|
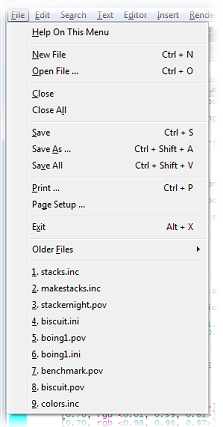
The File Menu contains commands that, in general, relate to loading and saving files. Note: In the interest of brevity, we will not explain obvious file menu entries. We assume that all readers will understand Save, Save As, etc., as these are basic Windows knowledge issues. |
|
|
The File Menu |
New File
This creates a new file in a new window in the internal editor. The language type will be set to 'none', so unless you change this from the editor properties, syntax highlighting will not occur until you do a Save As.
Open File
This creates a new window in the internal editor and opens the specified file in it. POV-Ray will attempt to set the language type according to the extension. .POV, .INC, .MAC and .MCR files are assumed to be POV-Ray files and will have POV syntax highlighting. If you use a different file extension for POV source code, you can set the language type manually after you open it.
Note that POVWIN will not let you load more than one copy of the same file. If you attempt to load an already-loaded file, that file will be selected as the current file in the editor, but nothing else will happen.
Close
This closes the file open in the currently-selected internal editor.
Close All
This closes all files currently open in the internal editor.
Provides a dialog that allows selection of printing options for the currently selected editor file (does not work with the message window). You can even choose two-up printing (that is, printing two pages on a single sheet of paper by splitting it down the middle). Note that the printing will not reflect any colored syntax highlighting in the editor; printing is always done in monochrome.
Exit
This option lets you exit POV-Ray for Windows. If you have Save Settings on Exit selected, your current POV-Ray for Windows settings will be saved for your next session.
If you shut down your computer without exiting POV-Ray for Windows first, POV-Ray will load itself again next time you log in as the same user. Note that we do not recommend shutting down your computer without saving any edited files first - while the editor will attempt to do the right thing with unsaved files during a shutdown, to a great extent it is at the mercy of the operating system.
MRU List
The MRU (most recently used) file list holds up to nine (9) files. The Older Files menu (see above) holds up to 32 additional files. After a file scrolls off the bottom of the MRU list it goes into the top of the Older Files menu.
When you select a file from the MRU list, if it is already open in the editor, it is selected and moved to the top of the MRU list. Otherwise, it is opened and moved to the top of the list. The MRU list remembers several things about files, including the last line, column, and top line number, plus the language and indent settings. The comments in this paragraph also apply to the Older Files menu.
After files have scrolled off the bottom of the MRU (Most Recently Used) list that appears at the bottom of the File Menu, they will appear in the Older Files menu. The MRU list holds up to nine (9) files, the Older Files menu holds up to 32 additional files. If there are no files in the Older Files menu (such as when POV-Ray is initially installed), it will be disabled.
Edit Menu
|
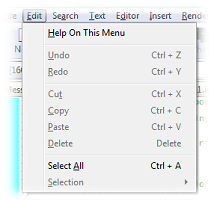
The Edit Menu contains commands relating to altering, cutting, copying, and pasting text. Note that there are actually two edit menus, though you only ever see one at a time. These are the edit menu that is displayed when the message window is selected, and the edit menu that is displayed when any of the editor windows are selected. The contents are different since the windows have different functions. |
|
|
The Edit Menu |
Note: The Message Window shortcut keys for Cut, Copy, etc. have been changed to the newer Ctrl-C, Ctrl-V style. The old shortcuts (Ctrl-Ins etc.) will still work, however, even though they're not shown in the menu.
The shortcut keys assigned when the Editor Windows are selected are set according to your preferences. See the Configuring the Internal Editor section for more information as to how to do this.
Copy Pane
This command lets you copy all the text currently displayed in the POV-Ray window to the clipboard. From there you can paste it into any text file for modification with a text editor or word processor. This can be particularly useful for bug reporting. Note: This command only appears if the currently selected window is the Messages window.
Clear Messages
Clears all messages in the Message Window. This command only appears if the currently selected window is the Messages window.
Undo
This command, and the remaining ones, only appear if the current window is an editor window.
The Undo command 'undoes' (reverses or remedies) the last change made to the text. Consecutive Undo operations can be used to revert to earlier and earlier text. The editor keeps seperate Undo and Redo histories for each open file.
Redo
Redoes the last change undone with Undo. Can only be used immediately following an Undo operation; editing the text will erase the Redo history. Consecutive Redo operations are possible if consecutive Undo operations were performed. The editor keeps seperate Undo and Redo histories for each open file.
Cut
Deletes the selected text and places it on the clipboard.
Copy
Places the selected text on the clipboard.
Paste
Inserts text from the clipboard, overwriting any selected text. If no text is selected, the pasted text is inserted at the current caret position, even if the editor is in overwrite mode.
Delete
Deletes the selected text.
Select All
Selects all text in the current window.
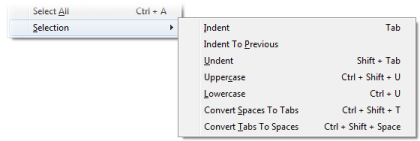
The Selection sub-menu contains commands which relate to operations on blocks of selected text. If there is no text selected in the editor, all of these commands will be disabled.
|
The Selection sub-menu |
See Using the Mouse for a description of the various ways you can select text (including full line blocks, stream blocks, and column blocks).
Indent
Inserts a tab (or spaces, depending on your tab settings) at the beginning of the selection on each line. You must have multiple lines and/or a newline selected, or the selected text will be replaced by a tab instead.
Indent To Previous
Moves the caret to the position of the next text on the previous line.
Undent
Removes one level of indent from the beginning of the selected lines.
Uppercase
Converts all alphabetical characters in the selected text to uppercase.
Lowercase
Converts all alphabetical characters in the selected text to lowercase.
Convert Spaces To Tabs
Converts sequences of space characters to tabs. (Note: The tab size can be set under the Text menu.)
Convert Tabs To Spaces
Converts tabs to sequences of space characters. (Note: The editor does this automatically by default. This behavior can be turned off in the Language/Tabs section of the Editor Preferences.)
Search Menu
|
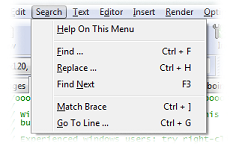
The Search Menu, which is only displayed when an edit pane is active, contains commands related to searching for and replacing text. |
|
|
The Search Menu |
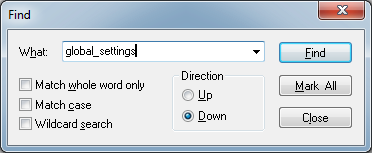
Find dialog
|
Searches the file for the first occurrence of a specific string of text and highlights/selects it. |
|
|
The Find Dialog |
Match Whole Word Only
If this option is checked, partial matches will not occur (for example, the search string 'Persist' will not find the word 'Persistence', whereas normally it would).
Match Case
If this option is checked, then the case of the search string and the searched-for text will be the same.
Wildcard Search
The search string allows the following wildcard characters if the "Wildcard Search" option is checked -
| ? | Matches any single character |
| + | Matches one or more of the previous character or item (which may be a wildcard
or group), up to a maximum of the end of the line. For example, |
| * | This operator works like '+' above, but matches zero or more rather than one or more.
Put another way, it makes the previous character or item optional. |
| [] | Characters enclosed in square brackets will be treated as an inclusive set.
Character ranges may be specified with a '-' (e.g. |
| | | Subexpressions may be ORed together with the | pipe symbol. |
| () | A wildcard expression may be enclosed within parentheses and will be treated as a unit. |
| Sequences such as \t, etc. will be substituted for an equivalent single character.
To represent a literal backslash, use two (e.g. |
Be Aware: The wildcard search facility does have some bugs in it and may not always match
correctly (e.g. [0-9A-Za-z] will match all alphanumerics, but [A-Za-z0-9] does not match numbers, even though it should).
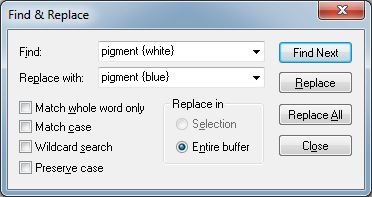
Replace
|
Searches the file for any occurrences of a specific string of text and replaces them with a different string. Users of other programmer's editors should note that there is no means of back-referencing wildcard groups from the search expression during a replace operation. |
|
|
The Replace Dialog |
Find Next
Finds the next occurrence of the string specified in the last Find operation.
Match Brace
Finds and highlights/selects the other brace for the block of code enclosed by the brace at the caret. For example, if you had the edit caret on a '{' character, it would be moved to the matching '}', taking into account the nesting of any '{}' blocks between them. Note that this also works in reverse.
| The Render Window | Text Menu |
|
This document is protected, so submissions, corrections and discussions should be held on this documents talk page. |
