Difference between revisions of "Documentation:Windows Section 5.3"
Jholsenback (talk | contribs) m (moved platform specific content to this location) |
Jholsenback (talk | contribs) m (moved sub sections back) |
||
| Line 157: | Line 157: | ||
</tr> | </tr> | ||
</table> | </table> | ||
| − | |||
| − | |||
| − | |||
| − | |||
| − | |||
| − | |||
| − | |||
| − | |||
| − | |||
| − | |||
| − | |||
| − | |||
| − | |||
| − | |||
| − | |||
| − | |||
| − | |||
| − | |||
| − | |||
| − | |||
| − | |||
| − | |||
| − | |||
| − | |||
| − | |||
| − | |||
| − | |||
| − | |||
| − | |||
| − | |||
| − | |||
| − | |||
| − | |||
| − | |||
| − | |||
| − | |||
| − | |||
| − | |||
| − | |||
| − | |||
| − | |||
| − | |||
| − | |||
| − | |||
| − | |||
| − | |||
| − | |||
| − | |||
| − | |||
| − | |||
| − | |||
| − | |||
| − | |||
| − | |||
| − | |||
| − | |||
| − | |||
| − | |||
| − | |||
| − | |||
| − | |||
| − | |||
| − | |||
| − | |||
| − | |||
| − | |||
| − | |||
====Use Editor==== | ====Use Editor==== | ||
| − | <p> | + | <p>Turns the use of the internal editor on or off.</p> |
| − | Turns the use of the internal editor on or off. | ||
| − | </p> | ||
====Show Tips of the Day==== | ====Show Tips of the Day==== | ||
| − | <p> | + | <p>This command lets you decide whether you want POV-Ray for Windows to display the tip of the |
| − | This command lets you decide whether you want POV-Ray for Windows to display the tip of the | ||
day on startup. By default, POV-Ray for Windows displays a new tip every time the program is | day on startup. By default, POV-Ray for Windows displays a new tip every time the program is | ||
started more than 24 hours after the previous tip was shown. Selecting Show Tips of the Day | started more than 24 hours after the previous tip was shown. Selecting Show Tips of the Day | ||
| − | has the same effect as selecting the 'Show tip tomorrow' box in the tip screen. | + | has the same effect as selecting the 'Show tip tomorrow' box in the tip screen.</p> |
| − | </p> | ||
====Show Tooltips==== | ====Show Tooltips==== | ||
| − | <p> | + | <p>Turns Tooltips on or off. A Tooltip is a little yellow window that will pop up over a toolbar |
| − | Turns Tooltips on or off. A Tooltip is a little yellow window that will pop up over a toolbar | ||
button if you keep the cursor there for long enough. The tip window tells you what the button | button if you keep the cursor there for long enough. The tip window tells you what the button | ||
| − | does. | + | does.</p> |
| − | </p> | ||
====Preserve Messages==== | ====Preserve Messages==== | ||
| − | <p> | + | <p>Whenever you perform a render, POV-Ray for Windows generates a number of messages (active |
| − | Whenever you perform a render, POV-Ray for Windows generates a number of messages (active | ||
POV-Ray settings, rendering statistics etc.) in the POV-Ray window. If you select Preserve | POV-Ray settings, rendering statistics etc.) in the POV-Ray window. If you select Preserve | ||
Messages, POV-Ray for Windows retains all messages generated during the current session. If | Messages, POV-Ray for Windows retains all messages generated during the current session. If | ||
you deselect this option, all existing messages are deleted every time you perform a new | you deselect this option, all existing messages are deleted every time you perform a new | ||
| − | render. See also Clear Messages in the <!--<linkto "Edit Menu">Edit Menu</linkto>--->[[Documentation:Windows Section 5#Edit Menu|Edit Menu]]. | + | render. See also Clear Messages in the <!--<linkto "Edit Menu">Edit Menu</linkto>--->[[Documentation:Windows Section 5#Edit Menu|Edit Menu]].</p> |
| − | </p> | + | |
====Save Settings on Exit==== | ====Save Settings on Exit==== | ||
| − | <p> | + | <p>If you select this option, any settings you have selected during your current POV-Ray for |
| − | If you select this option, any settings you have selected during your current POV-Ray for | ||
Windows session will be stored for the next one. These include the position and size of the | Windows session will be stored for the next one. These include the position and size of the | ||
| − | Main Window as well the position of the Render Window. | + | Main Window as well the position of the Render Window.</p> |
| − | </p> | ||
====Hide New User Help==== | ====Hide New User Help==== | ||
<!--<indexentry primary "Help On This Menu">---> | <!--<indexentry primary "Help On This Menu">---> | ||
| − | <p> | + | <p>Selecting this option will cause the 'Help On This Menu' entries to be removed from all |
| − | Selecting this option will cause the 'Help On This Menu' entries to be removed from all | + | menus. We recommend you do this once you're an experienced user.</p> |
| − | menus. We recommend you do this once you're an experienced user. | ||
| − | </p> | ||
====Show Next Tip==== | ====Show Next Tip==== | ||
| − | <p> | + | <p>If you do not want to see the tip of the day pop up automatically on startup every day, you |
| − | If you do not want to see the tip of the day pop up automatically on startup every day, you | ||
can still see a tip whenever you feel like it. If you select Show Next Tip, POV-Ray for | can still see a tip whenever you feel like it. If you select Show Next Tip, POV-Ray for | ||
| − | Windows displays a single tip but keeps the 'Show tip tomorrow' box unchecked. | + | Windows displays a single tip but keeps the 'Show tip tomorrow' box unchecked.</p> |
| − | </p> | ||
====Re-Render Insert Menu Bitmaps==== | ====Re-Render Insert Menu Bitmaps==== | ||
| − | <p> | + | <p>The preview bitmaps distributed with the POV-Ray for Windows insert menu are of a fairly |
| − | The preview bitmaps distributed with the POV-Ray for Windows insert menu are of a fairly | ||
small size in order to keep the size of the distributed setup file down. However, it | small size in order to keep the size of the distributed setup file down. However, it | ||
is easy to re-render them all at a larger size (though it may take a while on a slower | is easy to re-render them all at a larger size (though it may take a while on a slower | ||
| − | computer). | + | computer).</p> |
| − | </p> | ||
| − | <p> | + | <p>Just select the 'Re-Render Insert Menu Bitmaps' option and leave POV-Ray for Windows |
| − | Just select the 'Re-Render Insert Menu Bitmaps' option and leave POV-Ray for Windows | + | running. Eventually all the bitmaps will be replaced with larger ones.</p> |
| − | running. Eventually all the bitmaps will be replaced with larger ones. | ||
| − | </p> | ||
====Message Window==== | ====Message Window==== | ||
Revision as of 01:01, 21 November 2011
|
This document is protected, so submissions, corrections and discussions should be held on this documents talk page. |
Options Menu
Online Operations
|
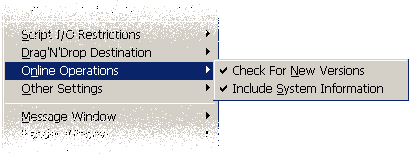
This sub-menu contains two options relating to POV-Ray for Window's ability to contact the POV-Ray web site to determine if there is an updated version available. |
|
|
Online Operations Sub-Menu |
Check For New Versions
The 'Check For New Versions' feature - which is turned on by default - instructs POV-Ray for Windows to periodically ask our web server if there is a newer version of POV-Ray available than the one you are using.
Note: All POV-Ray does is check for a new version; it does not download it! We would never download any files onto your computer without your permission.
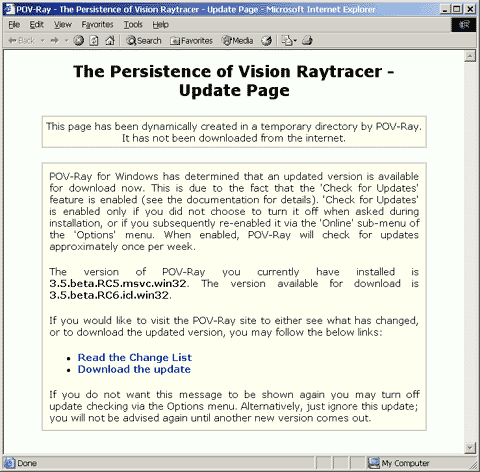
If POV-Ray discovers that there is a new version available, it will display a page in your default web browser that looks something like the one depicted below -
|
A sample updated version available page |
POV-Ray attempts to be both intelligent and polite about the way that it does these checks. It will not perform one unless Windows tells it that the internet is already connected. In this way, it does not cause an annoying dialer dialog to pop up while you are working. Additionally, POV-Ray does not run the checks out of a scheduler or something like that - you have to be actually running the program for anything to happen. It also won't run a check the first time it is run after installation, in order to give you time to turn off the update check option if that's what you want to do.
If it successfully contacts our web server and receives a 'yes' or 'no' answer as to whether an upgrade is available, it will not attempt again for several days. (By default, the update checks in release versions are set for every five days, though this may change). If, however, it failed in its attempt to contact the server, it will try again in no less than 24 hours. POV-Ray will never contact our server more than once per day.
Note: POV-Ray uses the Microsoft WinINet functionality to perform the above connection; this means that whatever settings have been configured in the 'Internet' applet of your control panel (e.g. your proxy server) will be applied to the request.
Include System Information
This option - which is turned on by default, unless you chose to turn it off when given the opportunity during install - instructs POV-Ray for Windows to include some information that is valuable to the developers when it sends the above update request.
Note: We would never intentionally send any information that personally identifies you or that could violate your privacy. All we are interested in is system information that will help us better cater our userbase when we rewrite POV-Ray for version 4.0.
Here is an actual sample of the information that is sent, exactly as it appears on the wire (taken as of v3.5 release candidate 5). The data sent in the current version may vary from this, but is fundamentally the same concept.
TestVersion=3.5.beta.RC5.msvc.win32
CurrentVersion=3.5.beta.RC5.msvc.win32
CPUArchitecture=0x0000
NumberOfCPUs=0x0001
ProcessorType=0x024a
ProcessorLevel=0x0006
ProcessorRevision=0x0404
OSVersion=5.0
OSBuild=0x00000893
CSDVersion=Service Pack 2
BitsPerPixel=32
HorzRes=1600
VertRes=1200
NumberOfMonitors=1
HasMouseWheel=1
CPUFrequency=1396
FeatureSet=0x00004fff
CPUName=AMD Athlon(tm) Processor
CPUIdentifier=x86 Family 6 Model 4 Stepping 4
VendorIdentifier=AuthenticAMD
PhysicalMemory=1073201152
DefaultLanguage=English (Australia)
This tells us that the machine running POV-Ray was a single-CPU box equipped with an AMD Athlon CPU running at 1396mhz (1.4ghz), and had 1,073,201,152 bytes (1 gigabyte) of RAM. It is running version 3.5.beta.RC5.msvc.win32 of POV-Ray for Windows on version 5.0 of Microsoft Windows (this is Windows 2000), which had been patched up to service pack 2. It had a single monitor, set for a resolution of 1600x1200 pixels with 32 bits per pixel. Its mouse had a mouse wheel. The user's default language selection was English.
Information like this - while seeming rather mundane - is important to us because it tells us the sort of hardware that people are using POV-Ray on.
Other Settings
|
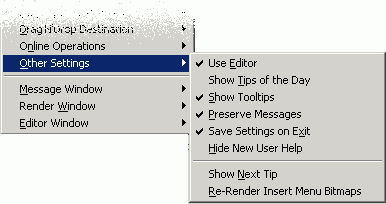
This sub-menu contains a number of less-commonly-used options so as to reduce clutter in the main options menu. |
|
|
The Other Settings Sub-Menu |
Use Editor
Turns the use of the internal editor on or off.
Show Tips of the Day
This command lets you decide whether you want POV-Ray for Windows to display the tip of the day on startup. By default, POV-Ray for Windows displays a new tip every time the program is started more than 24 hours after the previous tip was shown. Selecting Show Tips of the Day has the same effect as selecting the 'Show tip tomorrow' box in the tip screen.
Show Tooltips
Turns Tooltips on or off. A Tooltip is a little yellow window that will pop up over a toolbar button if you keep the cursor there for long enough. The tip window tells you what the button does.
Preserve Messages
Whenever you perform a render, POV-Ray for Windows generates a number of messages (active POV-Ray settings, rendering statistics etc.) in the POV-Ray window. If you select Preserve Messages, POV-Ray for Windows retains all messages generated during the current session. If you deselect this option, all existing messages are deleted every time you perform a new render. See also Clear Messages in the Edit Menu.
Save Settings on Exit
If you select this option, any settings you have selected during your current POV-Ray for Windows session will be stored for the next one. These include the position and size of the Main Window as well the position of the Render Window.
Hide New User Help
Selecting this option will cause the 'Help On This Menu' entries to be removed from all menus. We recommend you do this once you're an experienced user.
Show Next Tip
If you do not want to see the tip of the day pop up automatically on startup every day, you can still see a tip whenever you feel like it. If you select Show Next Tip, POV-Ray for Windows displays a single tip but keeps the 'Show tip tomorrow' box unchecked.
Re-Render Insert Menu Bitmaps
The preview bitmaps distributed with the POV-Ray for Windows insert menu are of a fairly small size in order to keep the size of the distributed setup file down. However, it is easy to re-render them all at a larger size (though it may take a while on a slower computer).
Just select the 'Re-Render Insert Menu Bitmaps' option and leave POV-Ray for Windows running. Eventually all the bitmaps will be replaced with larger ones.
Message Window
|
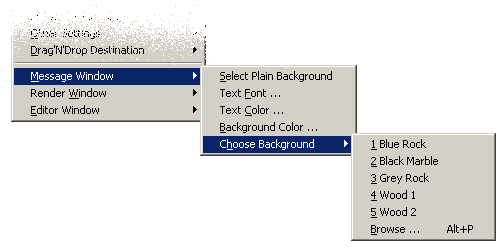
This sub-menu allows you to set certain properties of the message window. |
|
|
The Message Window Sub-Menu |
Select Plain Background
POV-Ray for Windows comes with a bitmapped background as default. If you prefer a plain background, you can select this command. The background takes on the currently defined background color (see Background Color below).
Text Font
Use this command to determine the font POV-Ray for Windows uses to display messages and statistics. In addition to the type of (non-proportional) font, you can set font size and appearance. POV-Ray for Windows remembers the font setting between sessions.
Note: If you select italic text, this setting will not be preserved across invocations of POV-Ray.
Text Color
This command lets you determine which text color best fits the background you have selected for the Main Window.
Background Color
This command lets you select the color of the plain background for the Main Window. Note that this command has no effect while you have tiled the background with a bitmap. The color only becomes visible when you select Plain Background (see above).
Tiling Options
You can change the tiled bitmap POV-Ray for Windows displays in its message window. Choosing Tiling Options brings up a sub-menu where you can select one of several built-in bitmaps. You can also browse your disk for other bitmaps you might prefer. POV-Ray for Windows pre-installs a number of them in the TILES subdirectory of your POV-Ray for Windows home directory. The bitmaps should have no more than 256 colors. If the BMP file you select is smaller than the Main Window, it will be tiled. If it is larger, POV-Ray for Windows fits it into the top-left corner of the Main Window and displays as much of it as the Main Window allows.
Note that because of the POV-Ray for Windows generalized palette, if you are running in 256-color mode, external bitmaps may not tile 100% perfectly, and the colors may be slightly altered. If you are running in 16-color mode, tiled backgrounds are not available at all. In practice, choosing tileable bitmaps other than the standard Marble one, using a 256-color display, will often not yield attractive results.
Render Window
|
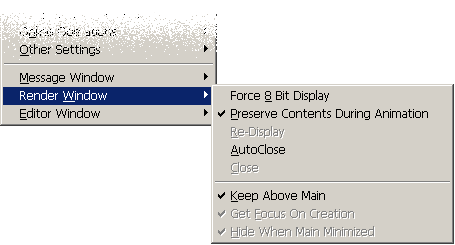
This sub-menu allows you to set certain properties of the render window. |
|
|
The Render Window Sub-Menu |
Force 8 Bit Display
POV-Ray for Windows is capable of displaying a rendering scene in 24-bit color (Truecolor). This takes up a great deal of RAM, however: 3 bytes for every pixel in the rendered scene. If you do not have enough RAM to spare, you should select this option. It forces POV-Ray for Windows to display the scene in 8-bit color (1 byte per pixel) and to use color dithering to represent the rendered image on the screen. If you are already using a 256-color video mode it does not make any difference since the image is already stored as one byte per pixel. Note that this does not change the way that the rendered image is stored on disk. If you are writing an output file, the file will still be 24-bit color!
In 15 or 16 bit color modes, the image is stored in memory as 24-bit but only displayed as 15 or 16 bit. No dithering is (currently) performed in these modes.
Preserve Contents During Animation
If this option is enabled (the default) and you are rendering an animation, the contents of the render window (which shows the previous frame of the animation) are not erased prior to a new frame being started. This makes it easier to see subtle changes in the image output (such as a small object moving from frame to frame, while the rest of the image stays static).
Note that the render window contents are always erased prior to the first frame, regardless of the setting of this option.
Re-display
If the Render Window is closed (see Close below), you can re-display it by selecting this command. If the window is not closed in the first place (or has never been displayed), you cannot re-display it, and so the Re-display command is grayed.
Note that this command is also available on the toolbar.
Autoclose
This causes the Render window to close automatically when rendering is complete. This is particularly useful if you're doing quick test renders at low resolution.
Close
This command closes the Render Window. This does not interfere with any rendering activity. Indeed, it speeds up rendering (see also Speed Considerations). To re-display the Render Window, select Re-display, use the right-mouse button speed menu on the message window, or simply click the 'Show' toolbar button.
Note that this command is also available on the toolbar.
Keep Above Main
If you make the POV-Ray for Windows Main Window active with Keep Above Main deselected, the rendering window may still be obscured by the main or any other window. Selecting Keep Above Main ensures that the rendering window pops up from under other windows whenever you make POV-Ray for Windows active. Note that if this option is set, you cannot hide the render window behind the main window (this can be a problem if you are rendering at the same time you are editing; hence the ability to set both modes via this option).
Note: If you enable this option, the 'Get Focus on Creation' and 'Hide When Main Minimized' options detailed below will be grayed out.
Get Focus on Creation
This command causes the POV-Ray window to get focus (pop to the foreground and become active) whenever a new file is processed. If POV-Ray for Windows is processing a file queue or animation, the POV-Ray Main Window gets focus every time a new file is initialized from the top of the queue, or a new pass over the animation source file is performed. This only applies, of course, if you are using the render window.
If you want to do other work on your Windows machine while POV-Ray is rendering, but you have the render window displayed, you will probably want to have this option off since otherwise the window will keep on popping up over whatever you are doing, each time a new image is rendered.
Hint: A handy shortcut to remember is that hitting the Escape key when the render window gets focus will return focus to the main window. This is particularly useful after a quick test render.
Note: If the 'Keep Above Main' option documented above is enabled, this option will be grayed out. This is because 'Keep Above Main' implies 'Get Focus On Creation'. If you don't want the render window to get focus on creation, you will need to turn 'Keep Above Main' off.
Hide When Main Minimized
If you have 'Keep Above Main' turned off, the main POV-Ray window and the Render Window are no longer linked. You now have the option of continuing to show the Render Window whenever the Main Window is minimized. If you select this option, the Render Window disappears as soon as you minimize the Main Window.
Note: If the 'Keep Above Main' option documented above is enabled, this option will be grayed out. This is because 'Keep Above Main' implies 'Hide When Main Minimized'. If you don't want the render window to be hidden when the main window is minimized, you will need to turn 'Keep Above Main' off.
Editor Window
This sub-menu is identical to the main Editor Menu. It is included in the Options Menu for consistency.
Tools Menu
|
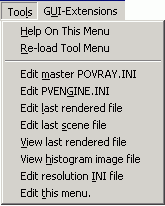
The Tools Menu provides you with a simple means of customizing POV-Ray for Windows. You can develop your own commands (up to 32) to show up under this menu. Since the menu is determined by the file PVTOOLS.INI, editing and reloading this INI file changes the Tools Menu. |
|
|
The Tools Menu |
PVTOOLS.INI Syntax
The syntax of entries in PVTOOLS.INI is as follows:
[Menu]
Item<em>n</em>=Description

[Command]
Item<em>n</em>=command_string

[Help]
Item<em>n</em>=help_line
Where n is a number between 0 and 31, and entries in the [Help] section are optional.
Item0 ... Item31
are the item numbers that define the order in which entries appear in the Tools Menu.
[Menu]
Entries in the [Menu] section are what actually appears in the Tools Menu. The '&'
character tells Windows where to put the underline in the menu entry. The underlined letter
becomes the abbreviation for the command. For example the letter 'C' in '&Click Me' would
become 'Click Me' when displayed in the Tools Menu, and you could access the command by
pressing Alt+T and then 'C'. (Alt+T activates the Tools Menu).
You should make sure that all Tools Menu entries have different abbreviations if you intend to
access them this way. Of course, you don't have to supply any abbreviation if you don't want
to.
[Command]
This is the command that POV-Ray will execute for that entry. This can be a Windows EXE or
PIF, a DOS EXE or COM, or even a DOS batch file. The command consists of the actual command
name followed by any parameters you want to supply to the program.
There is one special command, called '$S'. $S means 'use the shell association for the
filename that follows it'. Let's look at an example -
Item4=$S %1
Since %1 refers to the output file (see below) this means that Item 4 of the tools menu expands to a command to Windows to open the last output file with whatever program is associated with it. For example, if the last output file was 'c:\images\torus4.bmp' then the above command example would use whatever program is associated with BMP files (i.e. the program that Windows runs if you double-clicked on the TORUS4.BMP file in Windows Explorer) to open it.
Note: If using the Shell Open command ($S), DO NOT quote the parameters with '"', even if they will have spaces in them.
POV-Ray for Windows has a number of pre-defined parameters that you can substitute into the command line before the program is run. These are defined by a percent sign ('%') followed by a letter or number. For example, '%i' means substitute the POV-Ray for Windows INI file directory in the place of the '%i'.
Let's look at the command:
notepad.exe %ipvtools.txt
If you had installed POV-Ray for Windows into the directory 'c:\povwin3', then our standard INI file directory would be 'c:\povwin3\ini\'. When POV-Ray ran the above command, the '%i' would be replaced with 'c:\povwin3\ini\'. Note that the trailing '\' is provided by POV-Ray. This means that:
notepad.exe %ipvtools.txt
would become:
notepad.exe c:\povwin3\ini\pvtools.txt
Here are all of the predefined substitutions:
| %0 |
The contents of the 'SourceFile' entry of the 'LastRender' section in PVENGINE.INI. This will be the input file provided to POV-Ray for the most recent render. This information is extracted from the rendering engine itself, rather than any input dialog or command-line. It is the file which, after all processing of the command line and INI files was complete, was finally assigned as the input file. |
| %1 |
The contents of the 'OutputFile' entry of the 'LastRender' section in PVENGINE.INI. This will be the output file from the last render, if any. This entry could be blank. |
| %2 |
The contents of the 'SceneFile' entry of the 'LastRender' section in PVENGINE.INI. This will be the scene file name for the last render, without the .POV extension. You can use this by appending a new extension to it. For example, tga2gif %d\%1 %2.gif could expand to: tga2gif c:\scenes\myscene.tga myscene.gif assuming the input file was myscene.pov and the current directory at that time was c:\scenes. |
| %3 |
The contents of the 'HistogramFile' entry of the 'LastRender' section in PVENGINE.INI. If there was a histogram file written, this will be its name. If the histogram file was in .CSV format, you'd probably use this to fire up Excel. Otherwise, you could use it to run a viewer program or a post-processor. |
| %4 |
The contents of the 'IniOutputFile' entry of the 'LastRender' section in PVENGINE.INI. If you had instructed POV-Ray to write an INI file from the last render, this would contain its name. |
| %D |
The contents of the 'CurrentDirectory' entry of the 'LastRender' section in PVENGINE.INI. This is the current working directory that was set on your machine when POV-Ray began rendering the last file, and is what the other output file entries are probably relative to. You may need to provide '%d' with some of these other entries to get the full path. |
| %H |
The POV-Ray for Windows home directory, as specified in the registry, e.g. 'c:\Program Files\POV-Ray for Windows v3.6\'. Note the trailing backslash is supplied. |
| %I |
The POV-Ray for Windows INI directory. e.g. 'c:\Program Files\POV-Ray for Windows v3.6\ini'. |
| %N |
The preset INI filename, as used in the render options dialog. |
| %R |
The last render file (with full path) as supplied to POV-Ray from the render or choose file dialog. This is not necessarily the same thing as %S or %0. |
| %S |
The source file name as provided to POV-Ray on the last render of the current session. This is not necessarily the same thing as the %0 or %R directive. For example, %R will never provide the path to a file that was rendered via the File Queue without the use of the Command dialog. %S will, however, include any such file. |
| %T |
The full path to PVTOOLS.INI. This is the file which holds the Tools Menu commands. |
| %% |
A literal percent character ('%'). |
If any of the above seems confusing, there's an easy way to find out what's going on. If you place the statement DEBUG=1 in the General section of PVTOOLS.INI, POV-Ray for Windows will print out the string for each command both before and after it is expanded, instead of running the command that you select in the tool menu. That way you can see exactly what POV-Ray substitutes. The printout will be visible in the messages window.
For example:
[General]
Debug=1
will turn on debugging. while
[General]
Debug=0
or omitting the statement entirely turns it off.
[Help]
You can have a help line appear in the status bar at the bottom of the window. You don't have to supply this entry if you don't want to.
Example:
[Help]
Item8=Lets you shell out to DOS
This command makes the string 'Lets you shell out to DOS' appear on the status bar when the mouse is over the 8th item in the Tools menu.
Reload Tool Menu
If you want your changes to take immediate effect after you have edited PVTOOLS.INI using a text editor, you have to select the Tools Menu command Reload Tool Menu to instruct POV-Ray for Windows to re-read the INI file and activate the new settings.
Edit PVTOOLS.INI
This standard Tools Menu command lets you modify PVTOOLS.INI using the Notepad editor. The command is part of PVTOOLS.INI itself, which means you may delete it entirely if you don't want it. It is present by default in the standard distribution of POV-Ray for Windows.
Example PVTOOLS.INI
[Menu]
Item0=Edit &master POVRAY.INI
Item1=Edit &last rendered file
Item2=Edit last &scene file
Item3=&View last rendered file
Item4=View &histogram image file
Item5=Edit resolution &INI file
Item6=Edit &this menu.

[Command]
# NOTE! If using the Shell Open command ($S), DO NOT quote the parameters with '"'
Item0=notepad.exe "%hrenderer\povray.ini"
Item1=notepad.exe "%r"
Item2=notepad.exe "%0"
Item3=$S %1
Item4=$S %3
Item5=notepad.exe "%n"
Item6=notepad.exe "%t"

[Help]
Item0=Edit master POVRAY.INI in installation directory
Item1=Edit the last file that POV-Ray was rendering
Item2=Edit the last scene file that you selected
Item3=View the output of the last render (assumes file output was on)
Item4=View the histogram of the last render (assumes histogram image output was on)
Item5=Edit secondary INI file as specified in Command-line dialog.
Item6=Edit PVTOOLS.INI to alter this menu

[General]
Debug=0
Context Menus
Most POV-Ray windows have shortcut (also known as 'context') menus. You access them by right-clicking over the window in question (e.g. the message, edit, or render window). The menu that appears will have the most commonly-used commands (as available in the main menus) that apply to that particular type of window.
The Message Window Context Menu
|
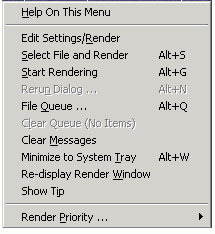
When the mouse right button is pressed over the Message window, a pop-up menu containing these commands are displayed: |
|
|
The Message Window Context Menu |
All of these commands and sub-menus except 'Minimize to System Tray' and 'Show Tip' are documented elsewhere; the following list links to that documentation.
- Edit Settings/Render
- Select File and Render
- Start Rendering
- File Queue
- Clear Queue
- Clear Messages
- Re-display Render Window
- Render Priority
Minimize to System Tray
This command (which is also available as a toolbar button) will hide POV-Ray for Windows and place a small icon in the system tray (the system tray usually contains a clock and is often at the right hand side of the task bar at the bottom of the screen).
You can use the right-mouse button on this icon to get a context menu. Double-clicking on it restores POVWIN from the tray.
Show Tip
If you select Show Tip, POV-Ray for Windows displays a single tip (see Show Tips of the Day).
The Render Window Context Menu
|
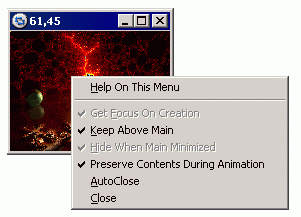
When the mouse right button is pressed over the Render window, a pop-up menu containing these commands are displayed: |
|
|
The Render Window Context Menu |
See the Render Window sub-menu for documentation on the commands in this menu.
The Editor Window Context Menu
|
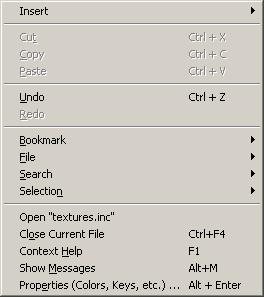
When the mouse right button is pressed over the Editor window, a pop-up menu containing these commands are displayed: |
|
|
The Editor Window Context Menu |
The actual content of the line shown as 'Open "filename"' will vary according to what was on the line under the cursor when the right mouse button was clicked. All of the commands except 'Show Messages', 'Context Help', and 'Open "filename"' are documented elsewhere; the following list links to that documentation.
Show or Hide Messages
Manually cause the small message window to be displayed (or hidden if it is showing, in which case this menu entry will read 'Hide Message Window' instead of 'Show Message Window'). Note that you can also use the Escape key to hide the message window.
See Auto-Show Parse Messages for more information.
Context Help
This command (which can also be activated with the F1 key) will cause the editor to look for the closest word to the edit caret and attempt to look it up in the help file. If more than one match is found, you will be given a choice as to which one. If no match is found, the help file will open with the index at the closest match it could find.
Open Filename
Whenever you open the context menu, the editor first looks underneath the edit caret to see if there is a line that looks like a POV-Ray scene file '#include' directive. If one is found, the name of the specified file is placed into the menu in place of "filename". If one is not found, then it may show Copy ... to Command-Line (see below).
If you then select this command, the editor will attempt to find and open the file in a new edit window. The standard include paths (as defined in PVENGINE.INI) will be searched if the file is not found relative to the current directory.
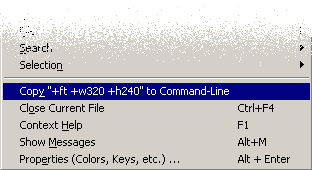
Copy "..." to Command-Line
If, when the editor searches for an include file name on the current line (see above), it does not find one, it will then look for something that looks like a 'command line'. By 'command line' we mean a line that could be used in the toolbar command-line field as options. The editor uses several simple rules to decide if something is likely to be a command-line:
Firstly, the line must contain a '//' somewhere. Then, either -
- The first non-whitespace character after the '
//' is either a '+' or a '-', and the next character after that is alphabetical, or - The first non-whitespace after the '
//' contains 'Cmd:' (case-insensitive).
If the line fits this description then the text after the '//' (with the 'Cmd:' removed if it were present) is considered the command-line (minus leading and trailing whitespace).
|
In this case the menu will have a command to copy the found command to the toolbar command-line, such as the one shown on the left. If this command is chosen, the text in the toolbar command-line will be replaced with the text extracted from the line, and focus will be changed to the toolbar command-line field. |
|
|
The "Copy to" Command-Line Feature |
The purpose of this facility is to allow users to keep a set of commonly-used command-line options at the top of the scene file, and use this facility to quickly copy one of them to the command-line for a render.
Example command-lines which could be embedded into a scene file -
// +w480 +h200 +a0.1
// +w960 +h400 +a0.1
The following would also be legal (and equivalent to the above example) -
// Cmd: Width=480 Height=200 Antialias_Threshold=0.1 AntiAlias=On
// Cmd: Width=960 Height=400 Antialias_Threshold=0.1 AntiAlias=On
See also Toolbar Command Line.
| Drag'N'Drop Destination | Bug Reports |
|
This document is protected, so submissions, corrections and discussions should be held on this documents talk page. |
