Difference between revisions of "HowTo:Use radiosity"
(added a few example images, fleshed out what was there and added sections. Removed some of the code examples until a better description of what they mean and when to use them is provided) |
|||
| Line 1: | Line 1: | ||
| − | + | '''Radiosity''', also known as global illumination (GI), is one of the two methods POV-ray supports of simulating the inter-reflections of light that occur in the real world. | |
| − | Radiosity, also known as global illumination (GI), is a | + | |
| − | + | ===What radiosity does=== | |
| − | radiosity block in the | + | We can see objects because light from a light source (such as the sun) is reflected from the surface of the object and picked up by our eyes. However, not all of this light goes into our eyes, but also strikes the other objects around us, likewise, not all of the light coming from an object is directly from a light source. The light we see may have been reflected many times by the surrounding objects. |
| − | + | A good example of this is a shadow on a sunny day. The shadow is certainly darker than its surroundings, but will not be pure black because of the reflected light. | |
| − | the | + | POV-ray can simulate this in two ways: |
| − | POV’s radiosity algorithm the easiest way to get started is to use the | + | #Via the [[ambient]] property in the [[finish|finish block]] of a [[texture]], which gives the color of the object when no light is shining on it. |
| − | Rad_Settings macro from rad_def.inc | + | #By using radiosity. |
| − | and | + | |
| + | |||
| + | ===When to use it=== | ||
| + | Radiosity should be used when you want a realistic look of indirect lighting. Indoor scenes frequently use radiosity, but outdoor scenes can greatly benefit from it too. Since black or uniformly dark shadows are very unrealistic and almost never occur in the real world, radiosity can do a lot to make an image look good. Here are some images to help compare: | ||
| + | <gallery> | ||
| + | Image:Sa_no_rad_amb_000.jpg|Without Radiosity and finish{ ambient 0.00 } | ||
| + | Image:Sa_no_rad_amb_025.jpg|Without Radiosity and finish{ ambient 0.25 } | ||
| + | Image:Simplearch_full_rad.jpg|With Radiosity and finish{ ambient 0.00 } | ||
| + | </gallery> | ||
| + | |||
| + | Radiosity can also be used to make glowing objects in a scene cast light onto other objects: | ||
| + | |||
| + | (EXAMPLE IMAGES) | ||
| + | |||
| + | ===Basic Use of Radiosity=== | ||
| + | To use radiosity, include a radiosity block in the [[global_settings]]. If you are unfamiliar with the settings that control the look and performance of POV’s radiosity algorithm, the easiest way to get started is to use the Rad_Settings macro from rad_def.inc. A description of the parameters and how you can tune them is also covered in this tutorial. | ||
| + | |||
| + | ====Rad_Settings macro==== | ||
| + | The Rad_Settings macro allows a user to easily use any of the predefined quality settings from below: | ||
*Radiosity_Default | *Radiosity_Default | ||
*Radiosity_Debug | *Radiosity_Debug | ||
| Line 18: | Line 36: | ||
*Radiosity_OutdoorLight | *Radiosity_OutdoorLight | ||
*Radiosity_IndoorLQ | *Radiosity_IndoorLQ | ||
| − | *Radiosity_IndoorHQ | + | *Radiosity_IndoorHQ |
| − | + | ||
| + | |||
| + | The macro expects the first parameter to be one of the above quality settings followed by two boolean parameters for normals and medias, respectively. | ||
| + | |||
| + | Example use of Rad_settings macro: | ||
<source lang="pov"> | <source lang="pov"> | ||
#include “rad_def.inc” | #include “rad_def.inc” | ||
global_settings { | global_settings { | ||
radiosity { | radiosity { | ||
| − | Rad_Settings(Radiosity_Normal,off,off) | + | Rad_Settings(Radiosity_Normal,off,off) |
} | } | ||
} | } | ||
| Line 30: | Line 52: | ||
</source> | </source> | ||
| − | == | + | That's it right there! We've just applied to our scene radiosity at a medium quality setting that will not take into account normals or media! |
| − | + | ===Developing a Better Understanding of Radiosity=== | |
| − | == | + | The macro works well for most scenes and is very easy to use, but it may not always suit our purposes. What if we tried all of the quality settings, but our scene still isn't rendering correctly? We need a good understanding of the radiosity parameters so we can fine-tune the settings to our needs. |
| − | + | ||
| + | ====Radiosity Parameters==== | ||
| + | Below is a description of everything that can be in a radiosity block as defined by the documentation: | ||
| + | |||
| + | |||
| + | ;pretrace_start | ||
| + | ;pretrace_end | ||
| + | : | ||
| + | |||
| + | ;count | ||
| + | : | ||
| + | |||
| + | ;nearest_count | ||
| + | : | ||
| + | |||
| + | ;error_bound | ||
| + | : | ||
| + | |||
| + | ;recursion_limit | ||
| + | :The recursion_limit is an integer value which determines how many recursion levels are used to calculate the diffuse inter-reflection. The default value is 3, the upper limit is 20 | ||
| + | |||
| + | :This represents the number of times light bounces off of objects before reaching your eye. In the real world, this could be a very high number. In POV-ray, higher is not always better! Values between 2 and 4 tend to give very good results for most scenes. Higher values can have a significant speed penalty. It is recommended that you use the lowest value that gets the look you want in your scene. Note that the number of recursions can affect both the brightness and contrast of your indirectly lit objects, which means that test tuning with a significantly different recursion level than what you intend to do the final trace with may have unexpected results. | ||
| + | |||
| + | ;low_error_factor | ||
| + | : | ||
| + | |||
| + | ;gray_threshold | ||
| + | : | ||
| + | |||
| + | ;minimum_reuse | ||
| + | : | ||
| + | |||
| + | ;brightness | ||
| + | :The brightness keyword specifies a float value that is the degree to which objects are brightened before being returned upwards to the rest of the system. The default value is 1.0 | ||
| + | |||
| + | :Brightness should be balanced with your ambient and diffuse values as well as your light_source intensity. Remember that brightness doesn't refer directly to the overall scene brightness, it refers to the radiosity calculation which ''affects'' the overall scene brightness. This distinction is important, because we can use it to change the contrast of some indirectly lit areas. | ||
| + | |||
| + | ;adc_bailout | ||
| + | : | ||
| + | |||
| + | ;normal | ||
| + | : | ||
| + | |||
| + | ;media | ||
| + | : | ||
| + | |||
| + | ;save_file | ||
| + | ;load_file | ||
| + | : | ||
| + | |||
| + | |||
| + | ;always_sample | ||
| + | : | ||
| + | |||
| + | ;max_sample | ||
| + | : | ||
| + | |||
| + | |||
| + | ===Tuning Radiosity=== | ||
| + | Tuning radiosity for your scene is the longest and arguably the most important part of the process. While we can often apply radiosity settings that worked well in another scene and have good results, the different lighting conditions and geometry means that the perfect settings for your scene will not be found in any guide. Fear not! There are ways to find the settings for your scene: | ||
| + | |||
| + | |||
| + | |||
| + | |||
| + | |||
| + | |||
| + | |||
| + | |||
| + | ===Pitfalls and Work-arounds=== | ||
| + | ====Artifacts==== | ||
| + | Sometimes radiosity can cause artifacts, one of the most common causes of artifacts is infinite radiosity rays. A good rule is to place any radiosity scene inside a large inverse sphere to avoid any ray colliding with the background or sky_sphere. | ||
| + | Another potential cause of artifacts is coincident surfaces, sometimes a radiosity ray leaks through the corners of a box or between CSG seams, one work-around seems to be using a round box with a small radius instead of a box. | ||
| + | Non-zero ambient values in textures emit light when radiosity is on. This may be intended, but it makes textures look wrong in test renders without radiosity. Using declared variables to adjust the ambient and diffuse values or turn on/off lights and/or radiosity is recommended | ||
| + | |||
| + | ====Partial Output==== | ||
| + | Partial image output will affect radiosity! Partial image output can be a good way of splitting up slow renders across different machines; unfortunately, the radiosity calculations will be adversely affected. If you render a scene with radiosity with full image output, then do a series of re-renders of the same scene using partial output and stitch the pieces together, there will be a visible difference in the two images. | ||
| + | A possible workaround is to let a single machine calculate the radiosity on a lower resolution render without anti-aliasing, and use the save_file command to store the radiosity data. When the final version is run, ensure that the radiosity data is available to all machines or processes that need it, set always_sample to off, and both pretrace_start and pretrace_end to 1. This ensures that no radiosity calculations are performed and only the loaded data is used. | ||
| + | |||
| + | |||
| + | ====Using radiosity with sky_sphere==== | ||
| + | The sky_sphere is always the exact color you specify as it isn't subject to lighting calculations, therefore it can be thought of as having a finish of ambient 1 diffuse 0. Since radiosity is affected by any luminous object in the scene, the sky will be a light source in your scene. | ||
| + | |||
| + | |||
| − | + | ===Notes=== | |
| − | + | ||
| − | + | #Radiosity is slow and requires lots of calculations. Using it requires a lot of patience, but the results are very rewarding. | |
| − | |||
| − | |||
| − | |||
| − | |||
| − | |||
| − | |||
| − | |||
| − | |||
| − | |||
| − | |||
| − | |||
| − | |||
| − | |||
| − | |||
| − | |||
| − | |||
| − | |||
| − | |||
| − | |||
| − | |||
| − | |||
| − | |||
| − | |||
| − | |||
| − | |||
| − | |||
| − | |||
| − | |||
| − | |||
| − | |||
| − | |||
| − | |||
| − | |||
| − | |||
| − | |||
| − | |||
| − | |||
| − | + | #Radiosity usage will vary from scene to scene and taste of the artist using it. | |
| − | |||
| − | |||
| − | |||
| − | |||
| − | |||
| − | + | #Radiosity isn't that haaaaaaard... | |
| − | #Radiosity | ||
| − | |||
| − | |||
Revision as of 13:30, 30 December 2007
Radiosity, also known as global illumination (GI), is one of the two methods POV-ray supports of simulating the inter-reflections of light that occur in the real world.
What radiosity does
We can see objects because light from a light source (such as the sun) is reflected from the surface of the object and picked up by our eyes. However, not all of this light goes into our eyes, but also strikes the other objects around us, likewise, not all of the light coming from an object is directly from a light source. The light we see may have been reflected many times by the surrounding objects. A good example of this is a shadow on a sunny day. The shadow is certainly darker than its surroundings, but will not be pure black because of the reflected light. POV-ray can simulate this in two ways:
- Via the ambient property in the finish block of a texture, which gives the color of the object when no light is shining on it.
- By using radiosity.
When to use it
Radiosity should be used when you want a realistic look of indirect lighting. Indoor scenes frequently use radiosity, but outdoor scenes can greatly benefit from it too. Since black or uniformly dark shadows are very unrealistic and almost never occur in the real world, radiosity can do a lot to make an image look good. Here are some images to help compare:
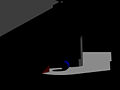
Without Radiosity and finish{ ambient 0.00 }
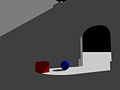
Without Radiosity and finish{ ambient 0.25 }
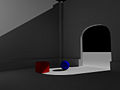
With Radiosity and finish{ ambient 0.00 }


Radiosity can also be used to make glowing objects in a scene cast light onto other objects:
(EXAMPLE IMAGES)
Basic Use of Radiosity
To use radiosity, include a radiosity block in the global_settings. If you are unfamiliar with the settings that control the look and performance of POV’s radiosity algorithm, the easiest way to get started is to use the Rad_Settings macro from rad_def.inc. A description of the parameters and how you can tune them is also covered in this tutorial.
Rad_Settings macro
The Rad_Settings macro allows a user to easily use any of the predefined quality settings from below:
- Radiosity_Default
- Radiosity_Debug
- Radiosity_Fast
- Radiosity_Normal
- Radiosity_2Bounce
- Radiosity_Final
- Radiosity_OutdoorLQ
- Radiosity_OutdoorHQ
- Radiosity_OutdoorLight
- Radiosity_IndoorLQ
- Radiosity_IndoorHQ
The macro expects the first parameter to be one of the above quality settings followed by two boolean parameters for normals and medias, respectively.
Example use of Rad_settings macro:
#include “rad_def.inc”
global_settings {
   radiosity {
      Rad_Settings(Radiosity_Normal,off,off)
   }
}
#default {finish{ambient 0}}
That's it right there! We've just applied to our scene radiosity at a medium quality setting that will not take into account normals or media!
Developing a Better Understanding of Radiosity
The macro works well for most scenes and is very easy to use, but it may not always suit our purposes. What if we tried all of the quality settings, but our scene still isn't rendering correctly? We need a good understanding of the radiosity parameters so we can fine-tune the settings to our needs.
Radiosity Parameters
Below is a description of everything that can be in a radiosity block as defined by the documentation:
- pretrace_start
- pretrace_end
- count
- nearest_count
- error_bound
- recursion_limit
- The recursion_limit is an integer value which determines how many recursion levels are used to calculate the diffuse inter-reflection. The default value is 3, the upper limit is 20
- This represents the number of times light bounces off of objects before reaching your eye. In the real world, this could be a very high number. In POV-ray, higher is not always better! Values between 2 and 4 tend to give very good results for most scenes. Higher values can have a significant speed penalty. It is recommended that you use the lowest value that gets the look you want in your scene. Note that the number of recursions can affect both the brightness and contrast of your indirectly lit objects, which means that test tuning with a significantly different recursion level than what you intend to do the final trace with may have unexpected results.
- low_error_factor
- gray_threshold
- minimum_reuse
- brightness
- The brightness keyword specifies a float value that is the degree to which objects are brightened before being returned upwards to the rest of the system. The default value is 1.0
- Brightness should be balanced with your ambient and diffuse values as well as your light_source intensity. Remember that brightness doesn't refer directly to the overall scene brightness, it refers to the radiosity calculation which affects the overall scene brightness. This distinction is important, because we can use it to change the contrast of some indirectly lit areas.
- adc_bailout
- normal
- media
- save_file
- load_file
- always_sample
- max_sample
Tuning Radiosity
Tuning radiosity for your scene is the longest and arguably the most important part of the process. While we can often apply radiosity settings that worked well in another scene and have good results, the different lighting conditions and geometry means that the perfect settings for your scene will not be found in any guide. Fear not! There are ways to find the settings for your scene:
Pitfalls and Work-arounds
Artifacts
Sometimes radiosity can cause artifacts, one of the most common causes of artifacts is infinite radiosity rays. A good rule is to place any radiosity scene inside a large inverse sphere to avoid any ray colliding with the background or sky_sphere. Another potential cause of artifacts is coincident surfaces, sometimes a radiosity ray leaks through the corners of a box or between CSG seams, one work-around seems to be using a round box with a small radius instead of a box. Non-zero ambient values in textures emit light when radiosity is on. This may be intended, but it makes textures look wrong in test renders without radiosity. Using declared variables to adjust the ambient and diffuse values or turn on/off lights and/or radiosity is recommended
Partial Output
Partial image output will affect radiosity! Partial image output can be a good way of splitting up slow renders across different machines; unfortunately, the radiosity calculations will be adversely affected. If you render a scene with radiosity with full image output, then do a series of re-renders of the same scene using partial output and stitch the pieces together, there will be a visible difference in the two images. A possible workaround is to let a single machine calculate the radiosity on a lower resolution render without anti-aliasing, and use the save_file command to store the radiosity data. When the final version is run, ensure that the radiosity data is available to all machines or processes that need it, set always_sample to off, and both pretrace_start and pretrace_end to 1. This ensures that no radiosity calculations are performed and only the loaded data is used.
Using radiosity with sky_sphere
The sky_sphere is always the exact color you specify as it isn't subject to lighting calculations, therefore it can be thought of as having a finish of ambient 1 diffuse 0. Since radiosity is affected by any luminous object in the scene, the sky will be a light source in your scene.
Notes
- Radiosity is slow and requires lots of calculations. Using it requires a lot of patience, but the results are very rewarding.
- Radiosity usage will vary from scene to scene and taste of the artist using it.
- Radiosity isn't that haaaaaaard...