HowTo:Use radiosity
Radiosity, also known as global illumination (GI), is one of the two methods POV-ray supports of simulating the inter-reflections of light that occur in the real world.
What radiosity does
We can see objects because light from a light source (such as the sun) is reflected from the surface of the object and picked up by our eyes. However, not all of this light goes into our eyes, but also strikes the other objects around us, likewise, not all of the light coming from an object is directly from a light source. The light we see may have been reflected many times by the surrounding objects. A good example of this is a shadow on a sunny day. The shadow is certainly darker than its surroundings, but will not be pure black because of the reflected light. POV-ray can simulate this in two ways:
- Via the ambient property in the finish block of a texture, which gives the color of the object when no light is shining on it.
- By using radiosity.
When to use it
Radiosity should be used when you want a realistic look of indirect lighting. Indoor scenes frequently use radiosity, but outdoor scenes can greatly benefit from it too. Since black or uniformly dark shadows are very unrealistic and almost never occur in the real world, radiosity can do a lot to make an image look good. Here are some images to help compare:

Radiosity can also be used to make glowing objects in a scene cast light onto other objects:
(EXAMPLE IMAGES)
Basic Use of Radiosity
To use radiosity, include a radiosity block in the global_settings. If you are unfamiliar with the settings that control the look and performance of POV’s radiosity algorithm, the easiest way to get started is to use the Rad_Settings macro from rad_def.inc. A description of the parameters and how you can tune them is also covered in this tutorial.
Rad_Settings macro
The Rad_Settings macro allows a user to easily use any of the predefined quality settings from below:
- Radiosity_Default
- Radiosity_Debug
- Radiosity_Fast
- Radiosity_Normal
- Radiosity_2Bounce
- Radiosity_Final
- Radiosity_OutdoorLQ
- Radiosity_OutdoorHQ
- Radiosity_OutdoorLight
- Radiosity_IndoorLQ
- Radiosity_IndoorHQ
The macro expects the first parameter to be one of the above quality settings followed by two boolean parameters for normals and medias, respectively.
Example use of Rad_settings macro:
#include “rad_def.inc”
global_settings {
   radiosity {
      Rad_Settings(Radiosity_Normal,off,off)
   }
}
#default {finish{ambient 0}}
That's it right there! We've just applied to our scene radiosity at a medium quality setting that will not take into account normals or media!
Developing a Better Understanding of Radiosity
The macro works well for most scenes and is very easy to use, but it may not always suit our purposes. What if we tried all of the quality settings, but our scene still isn't rendering correctly? We need a good understanding of the radiosity parameters so we can fine-tune the settings to our needs.
Radiosity Parameters
Below is a description of everything that can be in a radiosity block as defined by the documentation:
- pretrace_start
- pretrace_end
- To control the radiosity pre-trace gathering step, use the keywords pretrace_start and pretrace_end within the radiosity{} block. Each of these is followed by a decimal value between 0.0 and 1.0 which specifies the size of the blocks in the mosaic preview as a percentage of the image size. The defaults are 0.08 for pretrace_start and 0.04 for pretrace_end.
- These pretrace settings can be used to balance speed against quality. The pretrace parameters help POV-Ray determine where more radiosity samples are needed. For a final high-quality render, it's generally best to keep the pretrace_start setting around the default value, but have a much smaller pretrace_end setting, such as 0.005.
- One trick is to set the pretrace values as a function of the output resolution using the image_width identifier. Something like:
#local p_start		=	64/image_width;
#local p_end_tune	=	8/image_width;
#local p_end_final	=	4/image_width;
- This means the bigger the image you render, the higher the quality settings used, but small, quick test previews still use coarser values so that they are not slowed down needlessly.
- count
- The integer number of rays that are sent out whenever a new radiosity value has to be calculated is given by count. A value of 35 is the default, and the maximum is 1600.
- Count is probably the main speed/quality parameter. A higher count gives more accurate results, but significantly increases render times. Count needs to be balanced with the error_bound parameter, as smaller error_bound values generally need a higher count.
- nearest_count
- The nearest_count integer value is the minimum number of old ambient values blended together to create a new interpolated value. The total number blended will vary depending on error_bound. All previous values that fit within the specified error_bound will be used in the average. The default is 5, and the maximum is 20.
- Raising nearest_count can significantly reduce or smooth out splotchiness, since more nearby values will be averaged. As always, there is a corresponding speed penalty, but using higher values like 10 or even 20 for the final trace may help remove artifacts. Some artifacts can also be removed by adjusting the count parameter.
- error_bound
- The error_bound float value is one of the two main speed/quality tuning values (the other is count, the number of rays shot). It is intended to mean the fraction of error tolerated. For example, if it were set to 1 the algorithm would not calculate a new value until the error on the last one was estimated to be 100%. Ignoring the error introduced by rotation for the moment, on flat surfaces this is equal to the fraction of the reuse distance, which in turn is the distance to the closest item hit. If you have an old sample on the floor 10 distance units from a wall, an error bound of 0.5 will get you a new sample at a distance of about 5 distance units from the wall.
- The default value of 1.8 is good for a smooth general lighting effect, but may render corners or smaller shadows incorrectly. Using lower values is more accurate, but it will increase the danger of artifacts and therefore require a higher count value. You can use values lower than 0.1 but both render time and memory use can become extremely high then.
- recursion_limit
- The recursion_limit is an integer value which determines how many recursion levels are used to calculate the diffuse inter-reflection. The default value is 3, the upper limit is 20.
- This represents the number of times light bounces off objects before reaching your eye. In the real world, this could be a very high number. In POV-Ray, higher is not always better. Values between 2 and 4 tend to give good results for most scenes. Higher values can have a significant speed penalty. It is recommended that you use the lowest value that gets the look you want in your scene. Note that the number of recursions can affect both the brightness and contrast of your indirectly-lit objects, which means that test tuning with a significantly different recursion level than what you intend to do the final trace with may have unexpected results.
- low_error_factor
- If you calculate just enough samples, but no more, you will get an image which has slightly blotchy lighting. What you want is just a few extra samples interspersed, so that the blending will be nice and smooth. The solution to this is the mosaic preview, controlled by pretrace: it goes over the image one or more times beforehand, calculating radiosity values. To ensure that you get a few extra samples, the radiosity algorithm lowers the error bound during the initial pass or passes, then sets it back just before the final pass. The low_error_factor is a float tuning value which sets the amount that the error bound is dropped during the preliminary image passes. If the low error factor is 0.8 and the error bound is set to 0.4 it will use an error bound of 0.32 (0.4 × 0.8) during the initial passes and 0.4 on the final pass. The default value for low_error_factor is 0.5.
- gray_threshold
- Diffusely inter-reflected light is a function of the objects around the point in question. Since this is recursively defined to millions of levels of recursion in any real-life scene, every point is illuminated at least in part by every other part of the scene. Since we cannot afford to compute this, if we only do one bounce, the calculated ambient light is very strongly affected by the colors of the objects near it.
- This is known as color bleed and it really happens, but not as much as this calculation method would have you believe. The gray_threshold float value desaturates the colored light a little to make your scene more visually correct. A value of 0.6 means to calculate the ambient value as 60% of the equivalent gray value calculated, plus 40% of the actual value calculated. At 0.0, this feature does nothing. At 1.0, you will get 100% pure white/gray ambient light, with no hue.
- minimum_reuse
- brightness
- The brightness keyword specifies a float value that is the degree to which objects are brightened before being returned upwards to the rest of the system. The default value is 1.0.
- Brightness should be balanced with your ambient and diffuse values as well as your light_source intensity. Remember that brightness doesn't refer directly to the overall scene brightness, it refers to the radiosity calculation which affects the overall scene brightness. This distinction is important, because we can use it to change the contrast of some indirectly lit areas.
- adc_bailout
- normal
- Radiosity estimation can be affected by normals. To enable this feature, add normal on to the radiosity{} block. The default is off.
- media
- Radiosity estimation can be affected by media. To enable this feature, add media on to the radiosity{} block. The default is off.
- save_file
- load_file
- You can save the radiosity data using save_file "file_name" and load the same data later using load_file "file_name". In general, it is not a good idea to save and load radiosity data if scene objects are moving. Even if data are loaded, more samples may be taken during rendering (which produces a better approximation). You can disable samples from being taken during the final rendering phase by specifying always_sample off.
- always_sample
- You can force POV-Ray to only use the data from the pretrace step and not gather any new samples during the final radiosity pass. This may reduce splotchiness. To do this, set always_sample to off (the default value is on). It can also be useful when reusing previously-saved radiosity data.
- max_sample
- Sometimes very bright objects can cause problems with splotchiness. The max_sample keyword attempts to address this. Max_sample takes a float parameter which specifies the brightest that any gathered sample is allowed to be. Any samples brighter than this will have their brightness decreased (without affecting color). Specifying a non-positive value for max_sample will allow samples to have any brightness level. Max_sample defaults to 0.0, so this is the default behavior.
Tuning Radiosity
Tuning radiosity for your scene is the longest and arguably the most important part of the process. While we can often apply radiosity settings that worked well in another scene and have good results, the different lighting conditions and geometry means that the perfect settings for your scene will not be found in any guide. Fear not! There are ways to find the right settings for your scene:
Step 1: Prepare Your Source
When tuning radiosity, it is very convenient to have variables and conditional blocks of code that allow you to easily turn off and on light sources, adjust some or all of your textures' ambient values at once, etc. Keep this in mind as you work on your scene. You can go ahead and add a radiosity block to your global_settings, but leave it commented out until you are ready to use it.
Step 2: Complete the Scene
Since radiosity is calculated using all of the objects in a scene, it is best to finish placing everything first. You want the lowest (i.e. fastest) quality settings you can possibly use for your scene, so try to have most (if not all) objects in their final locations.
If your scene is very complex and contains a lot of objects, try to place the ones that you think the indirect lighting will really be affected by - what is casting the shadow? What objects will be in shadow?
Other speed or memory saving techniques like using lower polygon-count meshes during tuning might also be a good idea. The bottom line is that the fewer changes to your objects in between the tuning phase and the final trace, the better.
Step 3: Decide What Will Be Casting the Light
When working with radiosity, any object with a non-zero ambient value casts light. This behavior allows all of the light in your scene to be cast using objects (no light_source required).
I typically use a light_source for outdoor scenes, and objects with a high ambient for indoor scenes. This can work very well for artificial light sources; for instance, if you wanted to represent a fluorescent light with a high ambient cylinder, then you wouldn't have to worry about the gaps in between light sources in an area light.
This decision doesn't need to be set in stone. In many scenes you can use either one, or even some combination of both. If you are new to radiosity, I recommend using scene objects to cast light for indoor portions of your scene, and a single light_source (may be area light also) for the outdoor portions.
If you are doing a scene with a cloud-covered sky, you could even use your sky_sphere as the scene light source to get the soft, diffuse, directionless sort of light you would have on an overcast day.
Step 4: Set the ambient Values for Other Objects
Objects that are not intended to be luminous should have a very low ambient. Some people let all of their objects have a small amount of ambient and adjust the radiosity brightness accordingly. I recommend starting with zero because it gives maximum contrast for the indirectly lit areas. We can add more later if we want to reduce the contrast.
Step 5: Find Your Error Bound
As mentioned above, lower error_bound values produce more accurate lighting, but require a higher count, more memoery, and significantly increased render times. Therefore, we want to find the lowest value that will work for our scene. The scene being used for this example can be found here: btuning_00.pov This is the radiosity block we will use in the scene to determine an appropriate error bound:
#local p_start		=	64/image_width;
#local p_end_tune	=	8/image_width;
#local p_end_final	=	4/image_width;

global_settings{

radiosity
{
    pretrace_start p_start      // Use a pretrace_end value close to what you
    pretrace_end   p_end_tune   //  intend to use for your final trace

    count 1                     // Note the very low count!

    nearest_count 10            // 10 will be ok for now

    error_bound 1.0             // Start with 1.0

    recursion_limit 3           // Recursion should be near what you want it to be
                                //  If you aren't sure, start with 3 or 4

    }
}
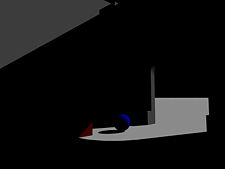
This will produce an image with very low quality radiosity and lots of errors... which is exactly what we need! We need to see the size of the smaller shadows in comparison to the area averaged in our radiosity samples. What we are looking for is where the shadows are completely missing.

Note the area circled in red. There is light "shining through" at the base of the object because the error_bound is too large for this scene. We drop it to 0.5 and render it again.

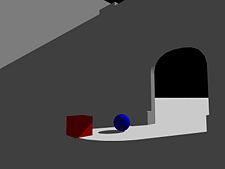
It seems like most of the shadows are now showing up, but just be sure we aren't missing any, we'll try 0.25 and see.

A side by side comparison shows that we picked up some more shadows in the most distant part of the scene. Anytime you pick up shadows, it is generally a good idea to try the image again, with a lower error bound.

The error_bound of 0.125 added more details to the shadows we saw before, and a test render at 0.0625 doesn't seem to pick up any more details. This allows us to establish a tentative range for our error_bound: no greater than 0.25 due to errors, and no less than 0.125 due to diminishing returns.
We could continue the bracketing method above, but because the numeric difference between 0.25 and 0.125 is small, we'll use 0.1875, the mean average of our upper and lower range. If the ranges we'd found had a greater differences, then it would be preferable to test and bracket again to keep the range narrow.
That's it, we now have an error_bound value that should work with our final trace!
Step 6: Determining an Appropriate Value for count
The count must be balanced with the error_bound parameter. A higher error_bound can produce very smooth results with a low count. Because our error_bound is to be 0.1875, we will need a count much higher than the default. To figure out an appropriate count value, we need to go back to one of our previous, too large settings from bracketing. We want to see what count will produce smooth results for a given error_bound:


#local p_start		=	64/image_width;
#local p_end_tune	=	8/image_width;
#local p_end_final	=	4/image_width;

global_settings{

radiosity
{
    pretrace_start p_start      // Use a pretrace_end value close to what you
    pretrace_end   p_end_tune   // intend to use for your final trace

    count 25                    // try 25 or so

    nearest_count 10            // 10 will be ok for now

    error_bound 0.375           // since 0.5 was too large, we use 0.375,
                                //  halfway between 0.25 and 0.5

    recursion_limit 3           // Recursion should be near what you want it to be
                                //  If you aren't sure, start with 3 or 4
    }
}
Remember, we want to see what produces smooth blending of the shadows, we aren't worried about errors or shadows not showing up right now. A count of 25 and even 50 are too blocky, but 75 seems to blend smoothly for this scene. Experimentation has shown me that count and error_bound can be roughly related once you find values that result in smooth shadows as follows:

We can set up and use this relation in our scene:
#local p_start		=	64/image_width;
#local p_end_tune	=	8/image_width;
#local p_end_final	=	4/image_width;

#local smooth_eb	=	0.50;
#local smooth_count	=	75;

#local final_eb		=	0.1875;
#local final_count	=	smooth_count * smooth_eb * smooth_eb / (final_eb * final_eb);

global_settings{

radiosity
{
    pretrace_start p_start      // Use a pretrace_end value close to what you
    pretrace_end   p_end_tune    // intend to use for your final trace

    count final_count            // as calculated above

    nearest_count 10             // 10 will be ok for now

    error_bound final_eb         //  from what we determined before, defined above
                                 //   halfway between 0.25 and 0.5

    recursion_limit 3            // Recursion should be near what you want it to be
                                 //  If you aren't sure, start with 3 or 4
    }
}
We now have a count that will be correct for any error_bound we specify. At this point, if we render the scene, we should have decent looking results, but...

Things don't look so good! What happened?
Step 7: Correcting for Corners and Finalizing
We need to make two more minor adjustments:
#local p_start		=	64/image_width;
#local p_end_tune	=	8/image_width;
#local p_end_final	=	4/image_width;

#local smooth_eb	=	0.50;
#local smooth_count	=	75;

#local final_eb		=	0.1875;
#local final_count	=	smooth_count * smooth_eb * smooth_eb / (final_eb * final_eb);

global_settings{

radiosity
{
    pretrace_start p_start        // Use p_end_final for the pretrace_end value
    pretrace_end   p_end_final    //

    count final_count            // as calculated above

    nearest_count 20             // set nearest_count to 20 for final trace

    error_bound final_eb         //  from what we determined before, defined above
                                 //   halfway between 0.25 and 0.5

    recursion_limit 3            // Recursion should be near what you want it to be
                                 //  If you aren't sure, start with 3 or 4

    minimum_reuse 0.005          // Use a lower minimum reuse
    }
}
We still had some of our settings at their test values, and not their final values. We lower pretrace_end, which makes POV do another pretrace pass, raise our nearest_count to average more samples, and lower the minimum reuse, to make sure our corners render correctly.

This is much better looking!
Step 8: About Colors
The scene we've been practicing uses only shades of gray, but the color of objects is also taken into account. Because we are simulating only a few bounces of light compared to the millions that actually occur in the real world, the colors of the objects struck by the rays tend to influence the indirect light color too strongly. POV-ray has the gray_threshold keyword to allow us to change how much influence the color has. Values for gray_threshold may be anywhere from 0.0 (allow full influence of colors) to 1.0 (indirect light has no color).


Tricks to Speed Things Up
The demo scenes in this guide generally render very quickly on recent hardware due to their simplicity. In a large and complex scene, radiosity can take many times longer. Not only does this mean that your final trace will take a long time, but it also makes the tuning process above very time consuming. Here are a few ways to make things a bit faster:
Use the File Queue
When bracketing, make a few copies of your scene with the different values you will be testing, and place them into the queue. That way, you can let POV-ray raytrace them while you are doing other things, then compare the images later.
Saving and Loading Radiosity Data
Radiosity data can be saved and loaded using the save_file and load_file with the appropriate file name. This allows you to re-render a scene without waiting for the lengthy radiosity calculations to be done again. It is important to remember that radiosity takes the entire scene into account, and substantial changes to anything might result in strange or unrealistic lighting. This can include objects that are not even within the field of view, since some light may bounce off of out of sight objects and on to visible objects. Even so, certain finishing touches can be added without going through a long wait again. Likewise, if you decided that you wanted to render a higher resolution image, saving radiosity data can save a lot of time.
radiosity
{
    pretrace_start  64/image_width
    pretrace_end    8/image_width
    count 120
    nearest_count 20
    error_bound .5
    recursion_limit 3

    save_file "myRadData.rad"

    }
}
The above code will save the calculated radiosity data into a file called "myRadData.rad" which can be loaded as below:
radiosity
{
    pretrace_start  1
    pretrace_end    1
    count 120
    nearest_count 20
    error_bound .5
    recursion_limit 3
    load_file "myRadData.rad"
    always_sample off
    }
}
Note that the pretrace values have been set to one and always sample is off - we don't want to do any more sampling, we want to load our existing samples. The other settings should be left unchanged, as changing them can introduce artifacts.
There is one problem with using save_file and load_file like this: It is very easy to inadvertently destroy your radiosity data! How?
radiosity
{
    pretrace_start  1
    pretrace_end    1
    count 120
    nearest_count 20
    error_bound .5
    recursion_limit 3
    save_file "myRadData.rad"
    always_sample off
    }
}
Here, while changing back and forth between load_file and save_file, we accidentally saved when we should have loaded, overwriting our good radiosity data with an absolute minimum of samples, since the pretrace values are set to 1.
There are two ways to address this. The first and most obvious way is to make a backup copy of the saved radiosity data. The second way is to use a conditional statement to decide whether POV-Ray should sample and store data or load it:
radiosity
{
#if( file_exists("myRadData.rad") )
    pretrace_start  1
    pretrace_end    1
    load_file "myRadData.rad"
    always_sample off
#else
    pretrace_start  64/image_width
    pretrace_end    8/image_width
    save_file "myRadData.rad"
#end
    count 120
    nearest_count 20
    error_bound .5
    recursion_limit 3
    }
}
This code checks to see whether or not there is saved radiosity data. If there is, it sets our pretrace to 1 and loads the file. If it can't find the file, it sets pretrace appropriately and saves the data for next time.
Pitfalls and Work-arounds
Artifacts
Sometimes radiosity can cause artifacts, one of the most common causes of artifacts is infinite radiosity rays. A good rule is to place any radiosity scene inside a large inverse sphere to avoid any ray colliding with the background or sky_sphere. Another potential cause of artifacts is coincident surfaces, sometimes a radiosity ray leaks through the corners of a box or between CSG seams, one work-around seems to be using a round box with a small radius instead of a box. Non-zero ambient values in textures emit light when radiosity is on. This may be intended, but it makes textures look wrong in test renders without radiosity. Using declared variables to adjust the ambient and diffuse values or turn on/off lights and/or radiosity is recommended
Partial Output
Partial image output will affect radiosity! Partial image output can be a good way of splitting up slow renders across different machines; unfortunately, the radiosity calculations will be adversely affected. If you render a scene with radiosity with full image output, then do a series of re-renders of the same scene using partial output and stitch the pieces together, there will be a visible difference in the two images. A possible workaround is to let a single machine calculate the radiosity on a lower resolution render without anti-aliasing, and use the save_file command to store the radiosity data. When the final version is run, ensure that the radiosity data is available to all machines or processes that need it, set always_sample to off, and both pretrace_start and pretrace_end to 1. This ensures that no radiosity calculations are performed and only the loaded data is used.
The effects of background and sky_sphere on Radiosity
The sky_sphere or background is always the exact color you specify as it isn't subject to lighting calculations, therefore it can be thought of as having a finish of ambient 1 diffuse 0. Since radiosity is affected by any luminous object in the scene, the sky_sphere or background will behave as a light source in your scene.
For outdoor scenes using radiosity, this is almost always desirable. If you don't want your objects to be affected by the brightness of the sky, you can set the background color to black, use save_file, then load your radiosity data for the final trace with the sky as you want it.
More information about radiosity in outdoor scenes can be found here.
Notes
- Radiosity is slow and requires lots of calculations. Using it requires a lot of patience, but the results are very rewarding.
- Radiosity usage will vary from scene to scene and taste of the artist using it.