Difference between revisions of "HowTo:Extract 2D screen coordinates from 3D scenes"
(→Sample Scene #2: edit) |
(→Steps: edit link description) |
||
| (24 intermediate revisions by the same user not shown) | |||
| Line 3: | Line 3: | ||
At some point in your POV-Ray career you may need to retrieve high precision 2D screen coordinates of a point in a 3D POV-Ray render. Simply measuring the number of pixels in MS Paint is rarely a good solution because the precision is too low, even for very large renders. Instead, you need to use POV-Ray's own mechanisms to calculate and output finer measurements. | At some point in your POV-Ray career you may need to retrieve high precision 2D screen coordinates of a point in a 3D POV-Ray render. Simply measuring the number of pixels in MS Paint is rarely a good solution because the precision is too low, even for very large renders. Instead, you need to use POV-Ray's own mechanisms to calculate and output finer measurements. | ||
| − | I faced this problem when designing two images for Wikipedia. For the first image, I needed to overlay 2D vector elements on top of a 3D POV-Ray render in order to show a series of measurements I made of important angles in the 3D bitmap. For the second image, I used the points outputted from a POV-Ray render to create a brand new 2D vector image from scratch. In both cases I used GeoGebra to create the 2D vector elements, but you could use InkScape as well. | + | I faced this problem when designing two images for Wikipedia. For the first image, I needed to overlay 2D vector elements on top of a 3D POV-Ray render in order to show a series of measurements I made of important angles in the 3D bitmap. For the second image, I used the points outputted from a POV-Ray render to create a brand new 2D vector image from scratch. In both cases I used GeoGebra to create the 2D vector elements, but you could use InkScape for this purpose as well. |
| − | (The first image is named "Graphical projection comparison.png". The second image is named "Various projections of cube above plane.svg". I can't link to them from here because the captcha widget on this | + | (The first image is named "Graphical projection comparison.png". The second image is named "Various projections of cube above plane.svg". I can't link to them from here because the anti-spam captcha widget on this wiki is broken.) |
==Steps== | ==Steps== | ||
| − | The first thing you will need to do is download the updated version of "screen.inc" I created several years back, and place it somewhere in your library path. (Again, I cannot link to the file, but the thread | + | The first thing you will need to do is download the updated version of "screen.inc" I created several years back, and place it somewhere in your library path. (Again, I cannot link to the file, but the thread is named "Updated screen.inc" and is located in the "povray.text.scene-files" newsgroup. Make sure to grab the script from the latest post.) Once you have copied the script file to the correct directory, you will need to include it in your scene. |
<pre> | <pre> | ||
| Line 35: | Line 35: | ||
</pre> | </pre> | ||
| − | The updated script can also handle orthographic renders, | + | The updated script can also handle orthographic renders, as well as input values that take the form of ''location'', ''direction'', ''up'' and ''right'' instead of ''location'', ''look_at'', ''angle'' and ''sky''. For example: |
<pre> | <pre> | ||
| Line 89: | Line 89: | ||
</pre> | </pre> | ||
| − | You can now use these coordinates to place 2D objects in a vector image program such as GeoGebra or InkScape. | + | You can now use these coordinates to place 2D objects in a vector image or mathematics program such as GeoGebra or InkScape. |
==Sample Scene #1== | ==Sample Scene #1== | ||
| − | Here is a sample scene I created for this tutorial: | + | Here is a very simple sample scene I created for this tutorial, using a perspective camera: |
<pre> | <pre> | ||
| Line 108: | Line 108: | ||
#version 3.7; | #version 3.7; | ||
| − | + | // requires the latest version appearing in this thread: | |
| + | // http://news.povray.org/povray.text.scene-files/thread/%3C5b889a96%40news.povray.org%3E/ | ||
| + | #include "screen.inc" | ||
global_settings { | global_settings { | ||
| Line 116: | Line 118: | ||
// ------------------------------------- | // ------------------------------------- | ||
| − | + | // perspective camera | |
| − | + | #local cam_dist = 12; | |
| − | + | #local cam_loca = -z * cam_dist; | |
| − | + | #local cam_look = 0; | |
| − | + | #local cam_angl = 45; | |
| − | + | #local cam_tran = transform | |
| − | + | { | |
| − | + | rotate +x * asind(tand(30)) | |
| − | + | rotate +y * 300 | |
| − | + | } | |
| − | + | Set_Camera_Orthographic(false) | |
| − | + | Set_Camera_Transform(cam_tran) | |
| − | + | Set_Camera(cam_loca, cam_look, cam_angl) | |
| − | |||
| − | |||
| − | |||
| − | |||
| − | |||
| − | |||
| − | |||
| − | |||
| − | |||
| − | |||
| − | |||
| − | |||
| − | |||
| − | |||
| − | |||
| − | |||
| − | |||
| − | |||
| − | |||
| − | |||
| − | |||
| − | |||
background {color srgb <1,1,1>} | background {color srgb <1,1,1>} | ||
| Line 232: | Line 212: | ||
[[File:screen cube vector.png]] | [[File:screen cube vector.png]] | ||
| + | |||
| + | Note that the direction of the y axis in GeoGebra is reversed when compared to most image editing programs. You will need to compensate for this by multiplying each of the y values by -1. | ||
==Sample Scene #2== | ==Sample Scene #2== | ||
| − | Here is another sample scene I created for this tutorial: | + | Here is another sample scene I created for this tutorial, this time using an orthographic camera and a series of additional transforms: |
<pre> | <pre> | ||
| Line 251: | Line 233: | ||
#include "colors.inc" | #include "colors.inc" | ||
| − | + | // requires the latest version appearing in this thread: | |
| + | // http://news.povray.org/povray.text.scene-files/thread/%3C5b889a96%40news.povray.org%3E/ | ||
| + | #include "screen.inc" | ||
global_settings { | global_settings { | ||
| Line 259: | Line 243: | ||
// ---------------------------------------- | // ---------------------------------------- | ||
| − | + | // orthographic camera | |
| − | + | #local cam_aspc = image_width/image_height; | |
| − | + | #local cam_dist = 8; | |
| − | + | #local cam_move = 1/2; | |
| − | + | #local cam_area = 2; | |
| − | + | #local cam_loca = -z * cam_dist; | |
| − | + | #local cam_dirc = +z; | |
| − | + | #local cam_rgvc = +x * cam_area * cam_aspc; | |
| − | + | #local cam_upvc = +y * cam_area; | |
| − | + | #local cam_tran = transform | |
| − | + | { | |
| − | + | rotate +x * asind(tand(030)) | |
| − | + | rotate +y * 045 | |
| − | + | translate +y * cam_move | |
| − | + | } | |
| − | + | Set_Camera_Orthographic(true) | |
| − | + | Set_Camera_Transform(cam_tran) | |
| − | + | Set_Camera_Alt(cam_loca, cam_dirc, cam_rgvc, cam_upvc) | |
| − | |||
| − | |||
| − | |||
| − | |||
| − | |||
| − | |||
| − | |||
| − | |||
| − | |||
| − | |||
| − | |||
| − | |||
| − | |||
| − | |||
| − | |||
| − | |||
| − | |||
| − | |||
| − | |||
| − | |||
| − | |||
| − | |||
sky_sphere { | sky_sphere { | ||
| Line 385: | Line 347: | ||
[[File:czech hedge hog.png]] | [[File:czech hedge hog.png]] | ||
| − | The center points of the spheres at the end of each arm are the points I am recording. Note the many instances of the <tt>vtransform</tt> function. If you apply transformations to objects in your scene, then you're likely going to need to apply the ''same'' transformations to your point coordinates as well. | + | The center points of the spheres at the end of each arm are the points I am recording. Note the many instances of the <tt>transform</tt> block and the <tt>vtransform</tt> function. If you apply transformations to objects in your scene, then you're likely going to need to apply the ''same'' transformations to your point coordinates as well! The <tt>vtransform</tt> function makes this possible. |
SVG files are not working properly on this wiki, so here is a bitmap image of what a very simple GeoGebra image might look like. | SVG files are not working properly on this wiki, so here is a bitmap image of what a very simple GeoGebra image might look like. | ||
[[File:czech hedge hog vector.png]] | [[File:czech hedge hog vector.png]] | ||
Latest revision as of 18:31, 28 May 2019
Introduction
At some point in your POV-Ray career you may need to retrieve high precision 2D screen coordinates of a point in a 3D POV-Ray render. Simply measuring the number of pixels in MS Paint is rarely a good solution because the precision is too low, even for very large renders. Instead, you need to use POV-Ray's own mechanisms to calculate and output finer measurements.
I faced this problem when designing two images for Wikipedia. For the first image, I needed to overlay 2D vector elements on top of a 3D POV-Ray render in order to show a series of measurements I made of important angles in the 3D bitmap. For the second image, I used the points outputted from a POV-Ray render to create a brand new 2D vector image from scratch. In both cases I used GeoGebra to create the 2D vector elements, but you could use InkScape for this purpose as well.
(The first image is named "Graphical projection comparison.png". The second image is named "Various projections of cube above plane.svg". I can't link to them from here because the anti-spam captcha widget on this wiki is broken.)
Steps
The first thing you will need to do is download the updated version of "screen.inc" I created several years back, and place it somewhere in your library path. (Again, I cannot link to the file, but the thread is named "Updated screen.inc" and is located in the "povray.text.scene-files" newsgroup. Make sure to grab the script from the latest post.) Once you have copied the script file to the correct directory, you will need to include it in your scene.
#include "screen.inc"
The next step is to reconfigure your camera code to make it compatible with "screen.inc". Here is some camera code I created for a test scene:
#local cam_dist = 8;
#local cam_move = 1/2;
#local cam_area = 2;
#local cam_loca = -z * cam_dist;
#local cam_look = 0;
#local cam_angl = 45;
#local cam_tran = transform
{
	rotate		+x * asind(tand(30))
	rotate		+y * 045
	translate	+y * cam_move
}
Set_Camera_Orthographic(false)
Set_Camera_Transform(cam_tran)
Set_Camera(cam_loca, cam_look, cam_angl)
The updated script can also handle orthographic renders, as well as input values that take the form of location, direction, up and right instead of location, look_at, angle and sky. For example:
#local cam_aspc = image_width/image_height;
#local cam_dist = 8;
#local cam_move = 1/2;
#local cam_area = 2;
#local cam_loca = -z * cam_dist;
#local cam_dirc = +z;
#local cam_rgvc = +x * cam_area * cam_aspc;
#local cam_upvc = +y * cam_area;
#local cam_tran = transform
{
	rotate		+x * asind(tand(030))
	rotate		+y * 045
	translate	+y * cam_move
}
Set_Camera_Orthographic(true)
Set_Camera_Transform(cam_tran)
Set_Camera_Alt(cam_loca, cam_dirc, cam_rgvc, cam_upvc)
From that point onward, all you need to do is choose which 3D points you want to capture and output them as 2D screen coordinates. For instance, maybe there is a light source in your scene that you want to record the 2D position of:
#local light_location_3d = <+30, +30, -30>;

light_source
{
	light_location_3d
	color rgb <1, 1, 1>
	parallel
	point_at 0
}
Now that you have the 3D coordinates, just plug them into the Get_Screen_XY macro, like this:
#local light_location_2d = Get_Screen_XY(light_location_3d);
and send the result to the Messages window like this:
#debug concat("light_location_2d = (", vstr(2, light_location_2d, ",", 0, -1), ")\n")
As you render the scene, additional text will appear in the Messages window, looking similar to this:
light_location_2d = (205.036679,371.407180)
You can now use these coordinates to place 2D objects in a vector image or mathematics program such as GeoGebra or InkScape.
Sample Scene #1
Here is a very simple sample scene I created for this tutorial, using a perspective camera:
// Persistence of Vision Ray Tracer Scene Description File
// This file is licensed under the terms of the CC-LGPL.
// File: screen_cube.pov
// Vers: 3.7
// Desc: Screen and camera test
// Date: 08/30/2018
// Updt: 09/01/2018
// Auth: Michael Horvath
//

#version 3.7;

// requires the latest version appearing in this thread:
// http://news.povray.org/povray.text.scene-files/thread/%3C5b889a96%40news.povray.org%3E/
#include "screen.inc"

global_settings {
  assumed_gamma 1.0
}

// -------------------------------------

// perspective camera
#local cam_dist = 12;
#local cam_loca = -z * cam_dist;
#local cam_look = 0;
#local cam_angl = 45;
#local cam_tran = transform
{
	rotate		+x * asind(tand(30))
	rotate		+y * 300
}
Set_Camera_Orthographic(false)
Set_Camera_Transform(cam_tran)
Set_Camera(cam_loca, cam_look, cam_angl)

background {color srgb <1,1,1>}

light_source {
  <0, 0, 0>
  color rgb <1, 1, 1>
  translate <+30, +30, -30>
  parallel
  point_at 0
}

light_source {
  <0, 0, 0>
  color rgb <1, 1, 1>
  translate <+30, +30, -30>
  rotate y * 30
  parallel
  point_at 0
}

// -------------------------------------

box {
	<-1,-1,-1>, <+1,+1,+1>
	pigment {
		color srgbt <1,1,1,1/4>
	}
}

#debug "\n"

#local SphereLoc_1 = <+1,+1,+1>;
#local ScreenLoc_1 = Get_Screen_XY(SphereLoc_1);
sphere {SphereLoc_1, 0.1 pigment {color srgb SphereLoc_1}}
#debug concat("ScreenLoc_1 = (", vstr(2, ScreenLoc_1, ",", 0, -1), ")\n")

#local SphereLoc_2 = <+1,+1,-1>;
#local ScreenLoc_2 = Get_Screen_XY(SphereLoc_2);
sphere {SphereLoc_2, 0.1 pigment {color srgb SphereLoc_2}}
#debug concat("ScreenLoc_2 = (", vstr(2, ScreenLoc_2, ",", 0, -1), ")\n")

#local SphereLoc_3 = <+1,-1,+1>;
#local ScreenLoc_3 = Get_Screen_XY(SphereLoc_3);
sphere {SphereLoc_3, 0.1 pigment {color srgb SphereLoc_3}}
#debug concat("ScreenLoc_3 = (", vstr(2, ScreenLoc_3, ",", 0, -1), ")\n")

#local SphereLoc_4 = <+1,-1,-1>;
#local ScreenLoc_4 = Get_Screen_XY(SphereLoc_4);
sphere {SphereLoc_4, 0.1 pigment {color srgb SphereLoc_4}}
#debug concat("ScreenLoc_4 = (", vstr(2, ScreenLoc_4, ",", 0, -1), ")\n")

#local SphereLoc_5 = <-1,+1,+1>;
#local ScreenLoc_5 = Get_Screen_XY(SphereLoc_5);
sphere {SphereLoc_5, 0.1 pigment {color srgb SphereLoc_5}}
#debug concat("ScreenLoc_5 = (", vstr(2, ScreenLoc_5, ",", 0, -1), ")\n")

#local SphereLoc_6 = <-1,+1,-1>;
#local ScreenLoc_6 = Get_Screen_XY(SphereLoc_6);
sphere {SphereLoc_6, 0.1 pigment {color srgb SphereLoc_6}}
#debug concat("ScreenLoc_6 = (", vstr(2, ScreenLoc_6, ",", 0, -1), ")\n")

#local SphereLoc_7 = <-1,-1,+1>;
#local ScreenLoc_7 = Get_Screen_XY(SphereLoc_7);
sphere {SphereLoc_7, 0.1 pigment {color srgb SphereLoc_7}}
#debug concat("ScreenLoc_7 = (", vstr(2, ScreenLoc_7, ",", 0, -1), ")\n")

#local SphereLoc_8 = <-1,-1,-1>;
#local ScreenLoc_8 = Get_Screen_XY(SphereLoc_8);
sphere {SphereLoc_8, 0.1 pigment {color srgb SphereLoc_8}}
#debug concat("ScreenLoc_8 = (", vstr(2, ScreenLoc_8, ",", 0, -1), ")\n")

#debug "\n"
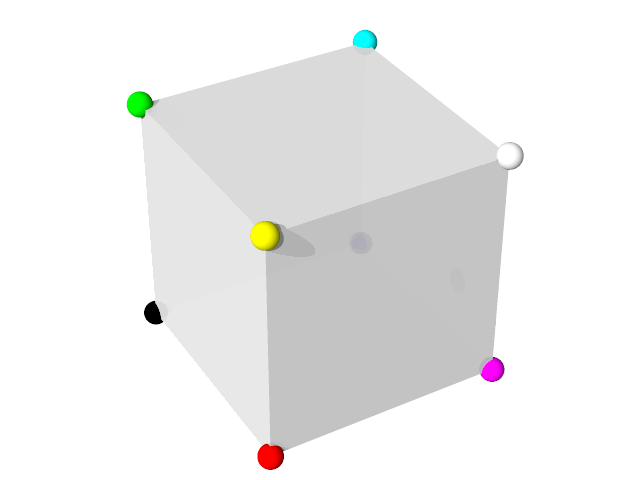
Here is what a rendering of the above sample scene should look like:
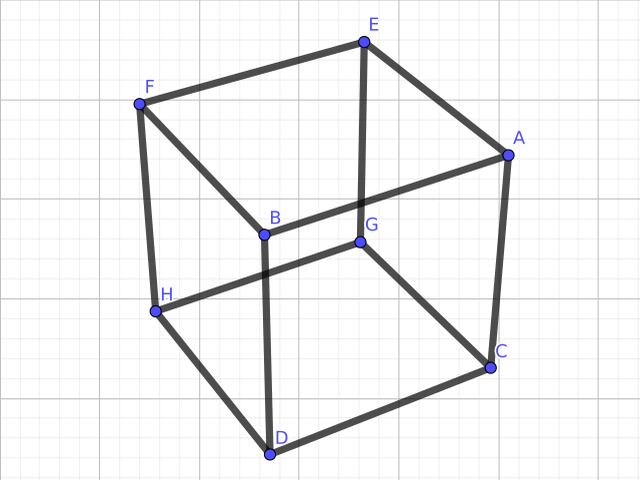
SVG files are not working properly on this wiki, so here is a bitmap image of what a very simple GeoGebra image might look like.
Note that the direction of the y axis in GeoGebra is reversed when compared to most image editing programs. You will need to compensate for this by multiplying each of the y values by -1.
Sample Scene #2
Here is another sample scene I created for this tutorial, this time using an orthographic camera and a series of additional transforms:
// Persistence of Vision Ray Tracer Scene Description File
// This file is licensed under the terms of the CC-LGPL.
// File: czech_hedge_hog.pov
// Vers: 3.7
// Desc: Screen and camera test
// Date: 08/30/2018
// Updt: 09/01/2018
// Auth: Michael Horvath
//

#version 3.7;

#include "colors.inc"
// requires the latest version appearing in this thread:
// http://news.povray.org/povray.text.scene-files/thread/%3C5b889a96%40news.povray.org%3E/
#include "screen.inc"

global_settings {
  assumed_gamma 1.0
}

// ----------------------------------------

// orthographic camera
#local cam_aspc = image_width/image_height;
#local cam_dist = 8;
#local cam_move = 1/2;
#local cam_area = 2;
#local cam_loca = -z * cam_dist;
#local cam_dirc = +z;
#local cam_rgvc = +x * cam_area * cam_aspc;
#local cam_upvc = +y * cam_area;
#local cam_tran = transform
{
	rotate		+x * asind(tand(030))
	rotate		+y * 045
	translate	+y * cam_move
}
Set_Camera_Orthographic(true)
Set_Camera_Transform(cam_tran)
Set_Camera_Alt(cam_loca, cam_dirc, cam_rgvc, cam_upvc)

sky_sphere {
  pigment {
    gradient y
    color_map {
      [0.0 rgb <0.6,0.7,1.0>]
      [0.7 rgb <0.0,0.1,0.8>]
    }
  }
}

light_source {
  <0, 0, 0>
  color rgb <1, 1, 1>
  translate <+30, +30, -30>
  parallel
  point_at 0
}

// ----------------------------------------

plane {
  +y, 0
  pigment {
  	checker
  	pigment {Gray}
  	pigment {White}
  }
}

#local TempAngle = pi/2 - atan(1/cos(pi/4));
#local TempTrans = transform
{
	rotate		+x * 45
	rotate		+z * degrees(TempAngle)
	translate	+y * sin(TempAngle)
	translate	+y * 1/10
}

union {
	cylinder {-x,+x,0.1 pigment {Red}}
	cylinder {-y,+y,0.1 pigment {Green}}
	cylinder {-z,+z,0.1 pigment {Blue}}
	transform {TempTrans}
}


#debug "\n"

#local SphereLoc_1 = vtransform(-x, TempTrans);
#local ScreenLoc_1 = Get_Screen_XY(SphereLoc_1);
sphere {SphereLoc_1, 0.1 pigment {Cyan}}
#debug concat("ScreenLoc_1 = (", vstr(2, ScreenLoc_1, ",", 0, -1), ")\n")

#local SphereLoc_2 = vtransform(+x, TempTrans);
#local ScreenLoc_2 = Get_Screen_XY(SphereLoc_2);
sphere {SphereLoc_2, 0.1 pigment {Cyan}}
#debug concat("ScreenLoc_2 = (", vstr(2, ScreenLoc_2, ",", 0, -1), ")\n")

#local SphereLoc_3 = vtransform(-y, TempTrans);
#local ScreenLoc_3 = Get_Screen_XY(SphereLoc_3);
sphere {SphereLoc_3, 0.1 pigment {Magenta}}
#debug concat("ScreenLoc_3 = (", vstr(2, ScreenLoc_3, ",", 0, -1), ")\n")

#local SphereLoc_4 = vtransform(+y, TempTrans);
#local ScreenLoc_4 = Get_Screen_XY(SphereLoc_4);
sphere {SphereLoc_4, 0.1 pigment {Magenta}}
#debug concat("ScreenLoc_4 = (", vstr(2, ScreenLoc_4, ",", 0, -1), ")\n")

#local SphereLoc_5 = vtransform(-z, TempTrans);
#local ScreenLoc_5 = Get_Screen_XY(SphereLoc_5);
sphere {SphereLoc_5, 0.1 pigment {Yellow}}
#debug concat("ScreenLoc_5 = (", vstr(2, ScreenLoc_5, ",", 0, -1), ")\n")

#local SphereLoc_6 = vtransform(+z, TempTrans);
#local ScreenLoc_6 = Get_Screen_XY(SphereLoc_6);
sphere {SphereLoc_6, 0.1 pigment {Yellow}}
#debug concat("ScreenLoc_6 = (", vstr(2, ScreenLoc_6, ",", 0, -1), ")\n")

#debug "\n"
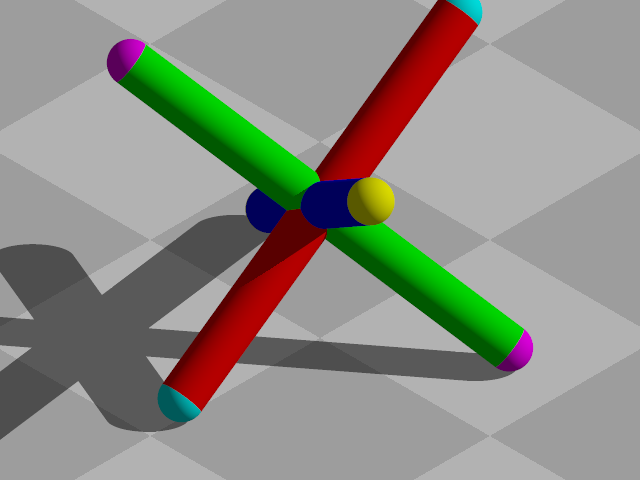
Here is what a rendering of the above sample scene should look like:
The center points of the spheres at the end of each arm are the points I am recording. Note the many instances of the transform block and the vtransform function. If you apply transformations to objects in your scene, then you're likely going to need to apply the same transformations to your point coordinates as well! The vtransform function makes this possible.
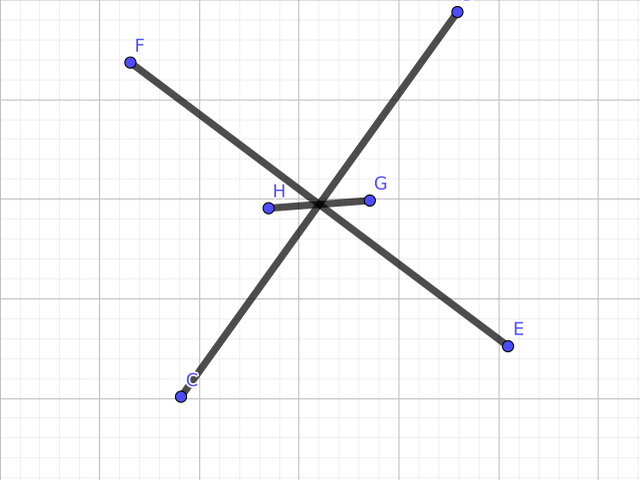
SVG files are not working properly on this wiki, so here is a bitmap image of what a very simple GeoGebra image might look like.


