Difference between revisions of "Reference:Light Source"
Jholsenback (talk | contribs) m (corrections) |
Jholsenback (talk | contribs) m (technical correction) |
||
| Line 40: | Line 40: | ||
media_interaction : on | media_interaction : on | ||
media_attenuation : off | media_attenuation : off | ||
| − | point_at : <0,0, | + | point_at : <0,0,1> |
radius : 70 | radius : 70 | ||
tightness : 10 | tightness : 10 | ||
Revision as of 14:25, 17 September 2016
The light_source is not really an object. Light sources have no visible shape of their own. They are just points or areas which emit light. They are categorized as objects so that they can be combined with regular objects using union.
Note: Due to a hard-coded limit the number of light sources should not exceed 127. Since the class of the variable that governs this limit is not exclusive to light sources, a value had to be chosen that provides the best balance between performance, memory use and flexibility. See the following news-group discussion for more details and information about ways to overcome this limitation.
The syntax is as follows:
LIGHT_SOURCE:
  light_source {
    <Location>, COLOR
    [LIGHT_MODIFIERS...]
    }
LIGHT_MODIFIER:
  LIGHT_TYPE | SPOTLIGHT_ITEM | AREA_LIGHT_ITEMS |
  GENERAL_LIGHT_MODIFIERS
LIGHT_TYPE:
  spotlight | shadowless | cylinder | parallel
SPOTLIGHT_ITEM:
  radius Radius | falloff Falloff | tightness Tightness |
  point_at <Spot>
PARALLEL_ITEM:
  point_at <Spot>
AREA_LIGHT_ITEM:
  area_light <Axis_1>, <Axis_2>, Size_1, Size_2 |
  adaptive Adaptive | area_illumination [Bool] |
  jitter | circular | orient
GENERAL_LIGHT_MODIFIERS:
  looks_like { OBJECT } |
  TRANSFORMATION fade_distance Fade_Distance |
  fade_power Fade_Power | media_attenuation [Bool] |
  media_interaction [Bool] | projected_through
Light source default values:
LIGHT_TYPE        : pointlight
falloff           : 70
media_interaction : on
media_attenuation : off
point_at          : <0,0,1>
radius            : 70
tightness         : 10
The different types of light sources and the optional modifiers are described in the following sections.
The first two items are common to all light sources. The <Location>
vector gives the location of the light. The COLOR gives the color
of the light. Only the red, green, and blue components are significant. Any
transmit or filter values are ignored.
Note: You vary the intensity of the light as well as the color using this parameter. A color such as
rgb <0.5,0.5,0.5> gives a white light that is half the normal intensity.
All of the keywords or items in the syntax specification above may appear in any order. Some keywords only have effect if specified with other keywords. The keywords are grouped into functional categories to make it clear which keywords work together. The GENERAL_LIGHT_MODIFIERS work with all types of lights and all options.
Note: TRANSFORMATIONS such as translate, rotate etc. may be applied but no other OBJECT_MODIFIERS may be used.
There are three mutually exclusive light types. If no LIGHT_TYPE is
specified it is a point light. The other choices are spotlight
and cylinder.
Point Lights
The simplest kind of light is a point light. A point light source sends
light of the specified color uniformly in all directions. The default light
type is a point source. The <Location> and
COLOR is all that is required. For example:
light_source {
  <1000,1000,-1000>, rgb <1,0.75,0> //an orange light
  }
Spotlights
Normally light radiates outward equally in all directions from the source.
However the spotlight keyword can be used to create a cone of
light that is bright in the center and falls of to darkness in a soft fringe
effect at the edge.
Although the cone of light fades to soft edges, objects illuminated by spotlights still cast hard shadows. The syntax is:
SPOTLIGHT_SOURCE:
  light_source {
    <Location>, COLOR spotlight
    [LIGHT_MODIFIERS...]
    }
LIGHT_MODIFIER:
  SPOTLIGHT_ITEM | AREA_LIGHT_ITEMS | GENERAL_LIGHT_MODIFIERS
SPOTLIGHT_ITEM:
  radius Radius | falloff Falloff | tightness Tightness |
  point_at <Spot>
Default values:
radius:    30 degrees
falloff:   45 degrees
tightness:  0
The point_at keyword tells the spotlight to point at a
particular 3D coordinate. A line from the location of the spotlight to the
point_at coordinate forms the center line of the cone of light.
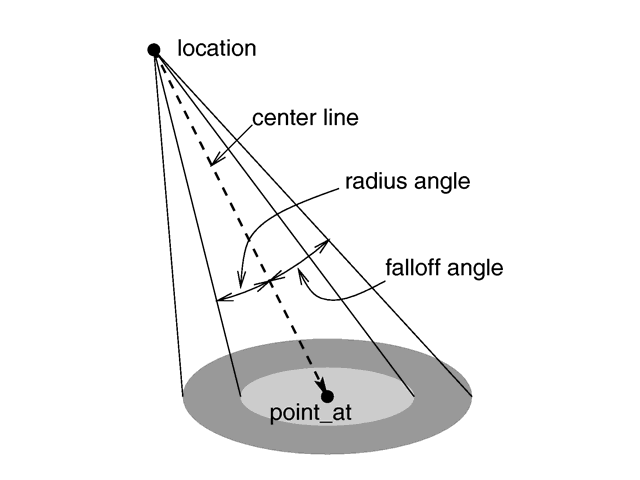
The following illustration will be helpful in understanding how these values
relate to each other.
|
The geometry of a spotlight. |
The falloff, radius, and tightness
keywords control the way that light tapers off at the edges of the cone.
These four keywords apply only when the spotlight or
cylinder keywords are used.
The falloff keyword specifies the overall size of the cone of
light. This is the point where the light falls off to zero intensity. The
float value you specify is the angle, in degrees, between the edge of the
cone and center line. The radius keyword specifies the size of
the hot-spot at the center of the cone of light. The
hot-spot is a brighter cone of light inside the spotlight cone
and has the same center line. The radius value specifies the
angle, in degrees, between the edge of this bright, inner cone and the center
line. The light inside the inner cone is of uniform intensity. The light
between the inner and outer cones tapers off to zero.
For example, assuming a tightness 0, with radius 10 and falloff 20 the light
from the center line out to 10 degrees is full intensity. From 10 to 20
degrees from the center line the light falls off to zero intensity. At 20
degrees or greater there is no light.
Note: If the radius and falloff values are close or equal the light intensity drops rapidly and the spotlight has a sharp edge.
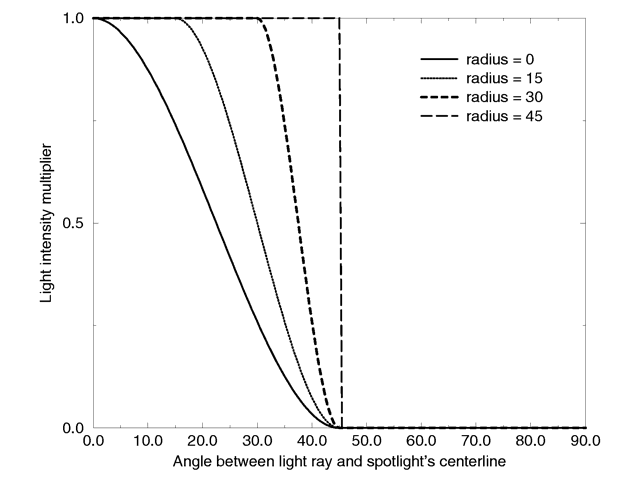
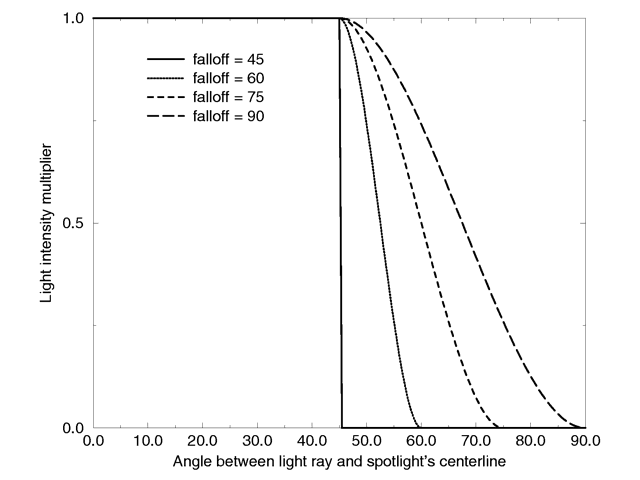
The values for the radius, and tightness parameters are half the opening angles of the
corresponding cones, both angles have to be smaller than 90 degrees. The
light smoothly falls off between the radius and the falloff angle like shown
in the figures below (as long as the radius angle is not negative).
|
Intensity multiplier curve with a fixed falloff angle of 45 degrees. |
|
Intensity multiplier curve with a fixed radius angle of 45 degrees. |
The tightness keyword is used to specify an
additional exponential softening of the edges. A value other than 0, will
affect light within the radius cone as well as light in the falloff cone.
The intensity of light at an angle from the center line is given by:
intensity * cos(angle)tightness.
The default value for tightness is 0. Lower
tightness values will make the spotlight brighter, making the spot wider and
the edges sharper. Higher values will dim the spotlight, making the spot
tighter and the edges softer. Values from 0 to 100 are acceptable.
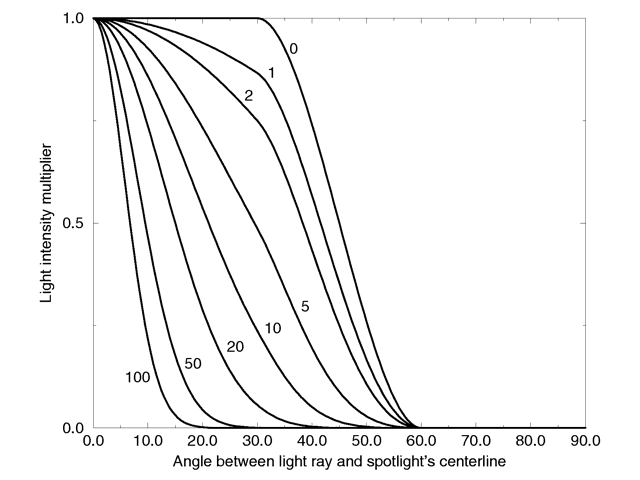
|
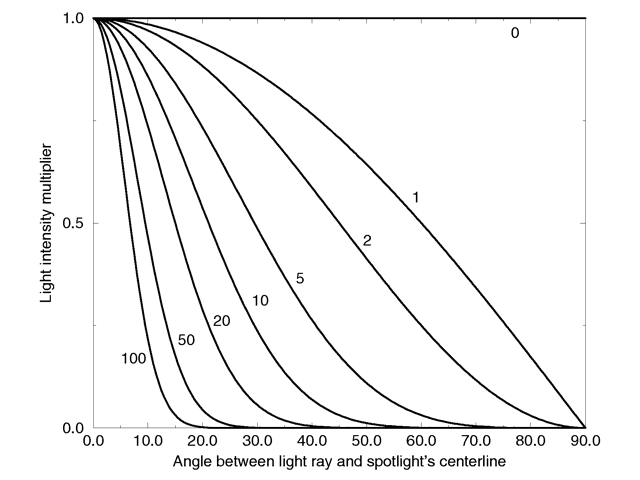
Intensity multiplier curve with fixed angle and falloff angles of 30 and 60 degrees respectively and different tightness values. |
You should note from the figures that the radius and falloff angles interact with the tightness parameter. To give the tightness value full control over the spotlight's appearance use radius 0 falloff 90. As you can see from the figure below. In that case the falloff angle has no effect and the lit area is only determined by the tightness parameter.
|
Intensity multiplier curve with a negative radius angle and different tightness values. |
Spotlights may be used any place that a normal light source is used. Like any light sources, they are invisible. They may also be used in conjunction with area lights.
Cylindrical Lights
The cylinder keyword specifies a cylindrical light source
that is great for simulating laser beams. Cylindrical light sources work
pretty much like spotlights except that the light rays are constrained by a
cylinder and not a cone. The syntax is:
CYLINDER_LIGHT_SOURCE:
  light_source {
    <Location>, COLOR cylinder
    [LIGHT_MODIFIERS...]
    }
LIGHT_MODIFIER:
  SPOTLIGHT_ITEM | AREA_LIGHT_ITEMS | GENERAL_LIGHT_MODIFIERS
SPOTLIGHT_ITEM:
  radius Radius | falloff Falloff | tightness Tightness |
  point_at <Spot>
Default values:
radius:     0.75 degrees
falloff:    1    degrees
tightness:  0
The point_at, radius, falloff and
tightness keywords control the same features as with the
spotlight. See Spotlights for details.
You should keep in mind that the cylindrical light source is still a point light source. The rays are emitted from one point and are only constraint by a cylinder. The light rays are not parallel.
Parallel Lights
syntax:

light_source {
  LOCATION_VECTOR, COLOR
  [LIGHT_SOURCE_ITEMS...]
  parallel
  point_at VECTOR
  }
The parallel keyword can be used with any type of light source.
Note: For normal point lights, point_at must come after
parallel.
Parallel lights are useful for simulating very distant light sources, such as sunlight. As the name suggests, it makes the light rays parallel.
Technically this is done by shooting rays from the closest point on a plane to the
object intersection point. The plane is determined by a perpendicular defined by the
light location and the point_at vector.
Two things must be considered when choosing the light location (specifically, its distance):
- Any parts of an object above the light plane still get illuminated according to the light direction, but they will not cast or receive shadows.
fade_distanceandfade_poweruse the lightlocationto determine distance for light attenuation, so the attenuation still looks like that of a point source.
Area light also uses the light location in its calculations.
Area Lights
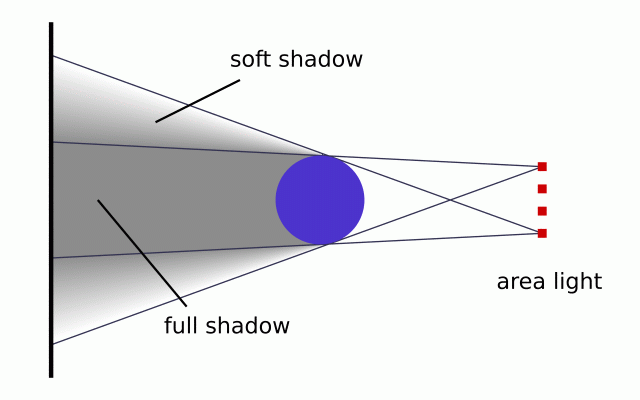
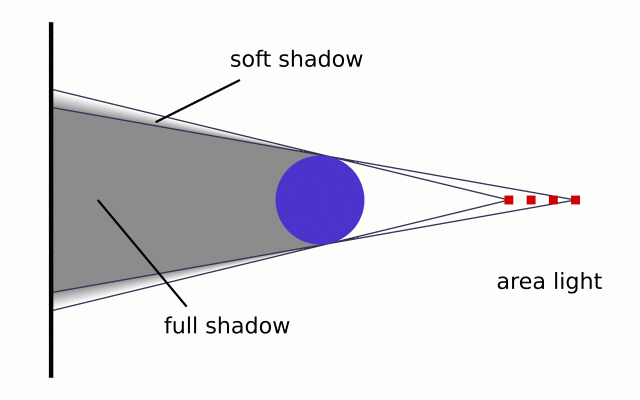
Area light sources occupy a finite, one or two-dimensional area of space. They can cast soft shadows because an object can partially block their light. Point sources are either totally blocked or not blocked.
The area_light keyword in POV-Ray creates sources that are rectangular in shape, sort of like a flat panel light. Rather than performing the complex calculations that would be required to model a true area light, it is approximated as an array of point light sources spread out over the area occupied by the light. The array-effect applies to shadows only, however with the addition of the area_illumination keyword, full area light diffuse and specular illumination can be achieved. The object's illumination is still that of a point source. The intensity of each individual point light in the array is dimmed so that the total amount of light emitted by the light is equal to the light color specified in the declaration. The syntax is:
AREA_LIGHT_SOURCE:
  light_source {
    LOCATION_VECTOR, COLOR
    area_light
    AXIS_1_VECTOR, AXIS_2_VECTOR, Size_1, Size_2
    [ adaptive Adaptive ] [ area_illumination on/off ]
    [ jitter ] [ circular ] [ orient ]
    [ [LIGHT_MODIFIERS...]
    }
Any type of light source may be an area light.
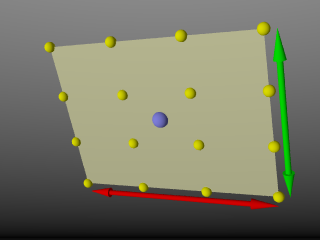
The area_light keyword defines the location, the size and orientation of the area light as well as the number of lights in the light source array. The location vector is the centre of a rectangle defined by the two vectors <Axis_1> and <Axis_2>. These specify the lengths and directions of the edges of the light.
|
4x4 Area light, location and vectors. |
Since the area lights are rectangular in shape these vectors should be perpendicular to each other. The larger the size of the light the thicker the soft part of shadows will be. The integers Size_1 and Size_2 specify the number of rows and columns of point sources of the. The more lights you use the smoother the shadows, but render time will increase.
Note: It is possible to specify spotlight parameters along with the area light parameters to create area spotlights. Using area spotlights is a good way to speed up scenes that use area lights since you can confine the lengthy soft shadow calculations to only the parts of your scene that need them.
An interesting effect can be created using a linear light source. Rather than having a rectangular shape, a linear light stretches along a line sort of like a thin fluorescent tube. To create a linear light just create an area light with one of the array dimensions set to 1.
Note: In version 3.7 experimental support for full area light diffuse and specular illumination was added.
This feature is off by default, so area lights will work as previously expected, and can be turned on by specifying the area_illumination keyword, followed by the optional on/off keyword, in the light source definition. As with area lights, the Size_1 and Size_2 parameters determine the quality of the lighting, as well as the quality of the shadows.
The jitter keyword is optional. When used it causes the positions of the point lights in the array to be randomly jittered to eliminate any shadow banding that may occur. The jittering is completely random from render to render and should not be used when generating animations.
The adaptive keyword is used to enable adaptive sampling of the light source. By default POV-Ray calculates the amount of light that reaches a surface from an area light by shooting a test ray at every point light within the array. As you can imagine this is very slow. Adaptive sampling on the other hand attempts to approximate the same calculation by using a minimum number of test rays. The number specified after the keyword controls how much adaptive sampling is used. The higher the number the more accurate your shadows will be but the longer they will take to render. If you are not sure what value to use a good starting point is adaptive 1. The adaptive keyword only accepts integer values and cannot be set lower than 0.
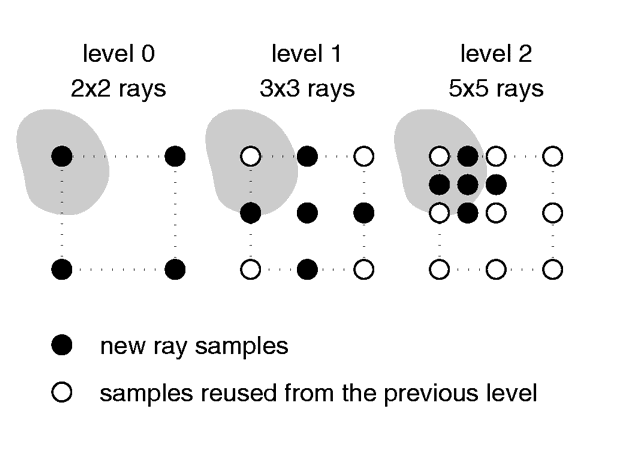
When performing adaptive sampling POV-Ray starts by shooting a test ray at each of the four corners of the area light. If the amount of light received from all four corners is approximately the same then the area light is assumed to be either fully in view or fully blocked. The light intensity is then calculated as the average intensity of the light received from the four corners. However, if the light intensity from the four corners differs significantly then the area light is partially blocked. The area light is split into four quarters and each section is sampled as described above. This allows POV-Ray to rapidly approximate how much of the area light is in view without having to shoot a test ray at every light in the array. Visually the sampling goes like shown below.
|
Area light adaptive samples. |
While the adaptive sampling method is fast (relatively speaking) it can sometimes produce inaccurate shadows. The solution is to reduce the amount of adaptive sampling without completely turning it off. The number after the adaptive keyword adjusts the number of times that the area light will be split before the adaptive phase begins. For example if you use adaptive 0 a minimum of 4 rays will be shot at the light. If you use adaptive 1 a minimum of 9 rays will be shot (adaptive
2 gives 25 rays, adaptive 3 gives 81 rays, etc). Obviously the more shadow rays you shoot the slower the rendering will be so you should use the lowest value that gives acceptable results.
The number of rays never exceeds the values you specify for rows and columns of points. For example area_light x,y,4,4 specifies a 4 by 4 array of lights. If you specify adaptive 3 it would mean that you should start with a 9 by 9 array. In this case no adaptive sampling is done. The 4 by 4 array is used.
The circular keyword has been added to area lights in order to better create circular soft shadows. With ordinary area lights the pseudo-lights are arranged in a rectangular grid and thus project partly rectangular shadows around all objects, including circular objects. By including the circular tag in an area light, the light is stretched and squashed so that it looks like a circle: this way, circular or spherical light sources are better simulated.
A few things to remember:
- Circular area lights can be ellipses: the AXIS_1_VECTOR and AXIS_2_VECTOR define the shape and orientation of the circle; if the vectors are not equal, the light source is elliptical in shape.
- Rectangular artefacts may still show up with very large area grids.
- There is no point in using
circularwith linear area lights or area lights which have a 2x2 size. - The area of a circular light is roughly 78.5 per cent of a similar size rectangular area light. Increase your axis vectors accordingly if you wish to keep the light source area constant.
The orient keyword has been added to area lights in order to better create soft shadows. Without this modifier, you have to take care when choosing the axis vectors of an area_light, since they define both its area and orientation. Area lights are two dimensional: shadows facing the area light receive light from a larger surface area than shadows at the sides of the area light.
|
Area light facing object. |
Actually, the area from which light is emitted at the sides of the area light is reduced to a single line, only casting soft shadows in one direction.
|
Area light not facing object. |
Between these two extremes the surface area emitting light progresses gradually. By including the orient modifier in an area light, the light is rotated so that for every shadow test, it always faces the point being tested. The initial orientation is no longer important, so you only have to consider the desired dimensions (area) of the light source when specifying the axis vectors. In effect, this makes the area light source appear 3-dimensional (e.g. an area_light with perpendicular axis vectors of the same size and dimensions using circular and orient simulates a spherical light source).
Orient has a few restrictions:
- It can be used with circular lights only.
- The two axes of the area light must be of equal length.
- The two axes of the area light should use an equal number of samples, and that number should be greater than one
These three rules exist because without them, you can get unpredictable results from the orient feature.
If one of the first two rules is broken, POV-Ray will issue a warning and correct the problem. If the third rule is broken, you will only get the error message, and POV-Ray will not automatically correct the problem.
Shadowless Lights
Using the shadowless keyword you can stop a light source from
casting shadows. These lights are sometimes called fill lights.
They are another way to simulate ambient light however shadowless lights have
a definite source. The syntax is:
SHADOWLESS_LIGHT_SOURCE:
  light_source {
    <Location>, COLOR shadowless
    [LIGHT_MODIFIERS...]
    }
LIGHT_MODIFIER:
  AREA_LIGHT_ITEMS | GENERAL_LIGHT_MODIFIERS
shadowless may be used with all types of light sources.
The only restriction is that shadowless should be before or
after all spotlight or cylinder option keywords. Do not mix or you get
the message Keyword 'the one following shadowless' cannot be used with
standard light source. Also note that shadowless lights will not cause
highlights on the illuminated objects.
Looks Like
By default a light source has no visible shape. The light simply radiates from an invisible point or area, however there are cases where this is not desired. Using looks_like is as an easy way to override this behavior. There is an implied no_shadow so that light is not blocked by the object, without it the light inside a non-transparent object could not escape. The object would, in effect, cast a shadow over everything.
When using looks_like there are a few important things to consider:
- the object should be positioned at the origin
- it's generally easier but not necessary to declare the object beforehand
- works with point and spot lights not parallel lights
- use a union instead if you want the object to block light and remember to make some portion of the object transparent
See the following examples:
#declare My_Lamp_Shape = sphere { <0, 0, 0>, Some_Radius }

// using looks_like
light_source {
  <100, 200, -300> color White
  looks_like { My_Lamp_Shape }
  }

// using union
union {
  light_source { <100, 200, -300> color White }
  object { My_Lamp_Shape translate <100, 200, -300> }
  }
Projected Through
You can use projected_through with any type of light source. Any object can be used, provided it has been declared beforehand. Projecting a light through an object can be thought of as the opposite of shadowing, in that only the light rays that hit the projected through object will contribute to the scene. This also works with area lights producing spots of light with soft edges. Any objects between the light and the projected through object will not cast shadows, additionally any surface within the projected through object will not cast shadows. Any textures or interiors on the object will be stripped and the object will not show up in the scene.
The syntax is as follows:
light_source {
  LOCATION_VECTOR, COLOR
  [LIGHT_SOURCE_ITEMS...]
  projected_through { OBJECT }
  }
Light Fading
By default POV-Ray does not diminish light from any light source as it
travels through space. In order to get a more realistic effect
fade_distance and fade_power keywords followed by float
values can be used to model the distance based falloff in light
intensity.
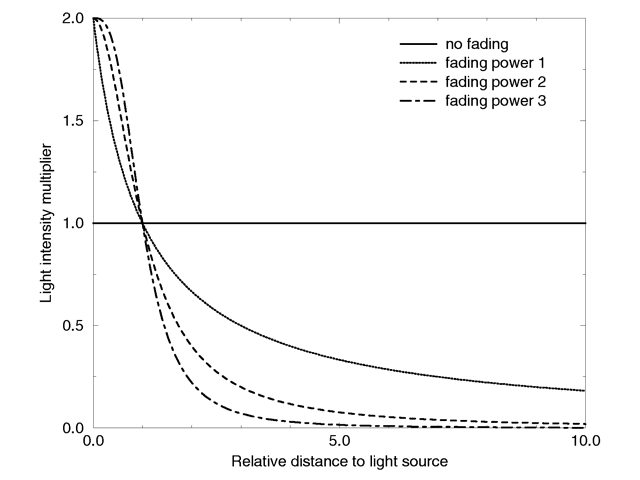
The fade_distance is used to specify the distance at which the full light intensity arrives, i.e.: the intensity which was given by the color attribute. The actual attenuation is described by the fade_power keyword, which determines the falloff rate. For example linear or quadratic falloff can be used by setting the fade_power to 1 or 2 respectively.
The complete formula to calculate the factor by which the light is attenuated is:
|
The attenuation of light fading formula |
Where d is the distance the light has traveled.
|
Light fading functions for different fading powers |
With any given value for fade_distance, either larger OR smaller than one, the light intensity at distances smaller than that given value actually increases. The internal calculation used to determine the attenuation factor is set up in a way so that one could set the fade distance and know that for any given fade distance, the light value would equal the set intensity. Lastly, only light coming directly from light sources is attenuated, and that reflected or refracted light is not attenuated by distance.
However, further investigation does reveal certain short comings with this method, as it doesn't follow a very good inverse-squared relationship over the fade distance and somewhat beyond. In other words, the function does break down to be very close to inverse squared as the distance from the given value for fade_distance gets significantly larger.
To that end consider the following:
A value for the light source intensity can be easily calculated when you take into account the distance from the light source to the scene center, or the object to be illuminated, and you set a relatively small value for fade_distance e.g.: the size of the light itself, relative to the scene dimensions.
The following example, that takes the inverse of the above formula that was used to calculate the factor by which the light is attenuated.
// setup the function
#declare Intensity_Factor = function (LD,FD,FP) {pow(1+(LD/FD),FP)/2};

// the translated position of the light source
#declare Light_Position = <0,0,-2400>;

// determine the light distance
#declare Light_Distance = vlength(Light_Position-<0,0,0>);

// scaled size of the light source
#declare Fade_Distance = 4.5;

// linear (1) or quadratic (2) falloff
#declare Fade_Power = 2;
Note: The above example calculates Light_Distance to the scene center, but you could have just as easily used the location of an object.
Now all you have to do is setup the light source. The #debug statements make it easy to see whats going on while tuning the light source.
#debug concat ("\nFade Distance: ", str(Fade_Distance,2,4))
#debug concat ("\nLight Distance: ", str(Light_Distance,5,4)," \n")
#debug concat ("Intensity Factor: ", str(Intensity_Factor (Light_Distance, Fade_Distance, Fade_Power),6,4)
#debug concat ("\n\n")

light_source {
  0, rgb <0.9,0.9,1> * Intensity_Factor (Light_Distance, Fade_Distance, Fade_Power)
  fade_distance Fade_Distance
  fade_power Fade_Power
  translate Light_Position
  }
At first glance this may seem counter-intuitive but it works out well given the small value used for Fade_Distance. You should be aware that this method is meant to give a light strength value of ONE at the point of interest ONLY. In other words, the point represented by the calculated value Light_Distance in the above example. Naturally objects closer to the light source will get a stronger illumination, while objects further away will receive less.
Atmospheric Media Interaction
By default light sources will interact with an atmosphere added to the
scene. This behavior can be switched off by using media_interaction off
inside the light source statement.
Note: In POV-Ray 3.0 this feature was turned off
and on with the atmosphere keyword.
Atmospheric Attenuation
Normally light coming from light sources is not influenced by fog or
atmospheric media. This can be changed by turning the media_attenuation on
for a given light source on. All light coming from this light source will now
be diminished as it travels through the fog or media. This results in an
distance-based, exponential intensity falloff ruled by the used fog or media.
If there is no fog or media no change will be seen.
Note: In POV-Ray 3.0 this
feature was turned off and on with the atmospheric_attenuation keyword.
