HowTo:Compile POV-Ray 2.2
Notice: This guide was tested with Debian 12 & FreeBSD 13.2, exact instructions may vary depending on your operating system. However, if you have even a basic understanding of software compilation you should be able to follow along without issue.
Preparation
Before we can build POV-Ray we need to sort out some prerequisites. First of all grab the source code from POV-Ray's website: https://www.povray.org/ftp/pub/povray/Old-Versions/Official-2.2/
The files we need are:
| Linux, BSD | Windows |
|---|---|
| POVDOC.TAR.Z | POVDOC.ZIP |
| POVSCN.TAR.Z | POVSCN.ZIP |
| POVSRC.TAR.Z | POVSRC.ZIP |
These archives will provide us with documentation, example scenes and the program sources, extract them to a destination of your choosing.
Now that we have the code, we need something to compile it with, on Debian GNU/Linux and derivatives (for example Ubuntu, Linux Mint, Pop!_OS) this is as easy as installing the build-essential package. To do that you can run the following command in a terminal (make sure you have root privileges):
apt install build-essential
This will pull in the GNU Compiler Collection (GCC) & GNU Make (BSD users should install and use gmake for this guide), our compiler and build tool respectively. With that we have everything we need.
Build setup
POV-Ray 2.2 can't be compiled straight away, this is because some important files aren't yet where they should be. If you navigate to the place where you extracted POVSRC you will see two folders (Windows users note that the ZIP archives contain upper case filenames), machine & source. machine has more folders with system specific source files covering various platforms of the time period, whereas source contains the actual source code for POV-Ray, we need to copy the correct machine files to source in order to make our executable.
Inside machine you will see a folder called unix in there you will find the files we need. Copy all of the files from unix (but not the unix directory itself) to the source folder from before (note that despite being for UNIX-compatible systems, these files will work for Windows users too, as long as you use the MinGW development environment when compiling). With the system files in place we need to rename the file unixconf.h to config.h or the build tool won't find it, so do that now.
It's now possible for us to build POV-Ray 2.2. However, before we do that we're going to make a couple of changes to the source code, one of which will make sure that we don't have a certain issue later on.
Fixing random number generation
POV-Ray uses random numbers in various parts of the rendering process, most notably in procedural texture generation. In the 2.x series these random numbers are by default sourced from your system RNG, which is usually a good idea (especially in scenarios involving cryptography where you want things to be as random as possible) but in this context it creates a couple of issues for us.
The first is that when you render the same scene on different operating systems, the final image can vary considerably, as seen here with "Planet" (planet.pov) by Ville Saari:

planet.pov on Debian 12 with system RNG

planet.pov on FreeBSD 13.2 with system RNG


This is quite a problem if aspects of a scene were designed around the way a procedural texture was generated. The other even worse issue is that sometimes, your system RNG will cause POV-Ray 2.2 to crash during rendering, demonstrated here with "Pawns" (pawns.pov) by Douglas Otwell:

pawns.pov on Debian 12 with system RNG
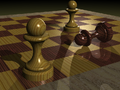
pawns.pov on Debian 12 with fixed RNG


Fortunately, the POV-Ray developers were aware of these consistency issues and mention it in the documentation, their suggested fix is to incorporate a deterministic RNG found in the IBM-compatible machine files. Head to the machine folder and this time look inside the ibmpc directory, there you will see a file called ibm.c, open it in your editor of choice. Navigate to line 2784 and you should find the following block of code:
/* ANSI Standard pseudo-random number generator */

int rand(void);
void srand(int);

static unsigned long int next = 1;

int rand()
   {
   next = next * 1103515245L + 12345L;
   return ((int) (next / 0x10000L) & 0x7FFF);
   }

void srand(seed)
   int seed;
   {
   next = (unsigned long int)seed;
   }
This is what we need, so copy it to your clipboard. In the source folder open unix.c, then paste the code at the end of the file, don't forget to save your changes and voila! Now there's just one more thing to sort out before building.
Enabling extra optimization
Although modern computers are orders of magnitude faster than the '90s machines POV-Ray 2 was written for, more complex scenes can still take quite some time to render. Fortunately though there's a free performance boost that we can employ with just a small edit.
In the source folder open unix.mak, at line 21 you should see the following:
CFLAGS=		-c -O
LFLAGS =	-o povray -O
These are the parameters (flags) that will be given to our compiler. By default our build will only have basic optimization, we're going to change this so that we create a level 2 optimized build (level 3 also exists but can sometimes cause bugs or even sacrifice performance compared to level 2, depending on the program). All you have to do is change the -O parameter on both lines so that it reads -O2:
CFLAGS=		-c -O2
LFLAGS =	-o povray -O2
Compiling POV-Ray 2.2
It's time to actually compile our build. This is the easiest part of the process, just run this command in the source folder:
make -f unix.mak
If you would like to speed things up and have a multi-core CPU, you can add -jX to the end of that command, where X is the number of jobs to run simultaneously, set this to the number of cores & threads you have for a faster compilation time. Note that while compiling you will see a number of warnings displayed on the terminal, these can be ignored as they don't cause any issues with the program.
Once the build has finished you should have a file called povray, this is our program. To run it, first we'll make sure it's marked as an executable:
chmod +x povray
That changes the file permissions so that we can actually run it. Now let's see if it works:
./povray
You should see some authorship and basic usage information printed to your terminal, if so then you've successfully built POV-Ray 2.2!
Rendering a scene
Now we have a binary let's test it out. Navigate to where you extracted POVSCN, inside there you will see a folder called povscn (not present in the ZIP archive) and under that you'll find the folder scenes, descend into it and from there head into the level2 directory. We can either copy our povray binary to the level2 folder or add it to our PATH, programs in our PATH can be run from any location on the system, allowing us to simply type povray in a terminal to execute it. On Debian and derivatives, if the folder structure .local/bin/ exists in our home directory it will be added to the PATH when we login, if it doesn't exist you can create it like so (logout and in after creating it to update your PATH):
mkdir -p ~/.local/bin/
Copy povray to bin and optionally rename it to povray2 so it doesn't conflict with a system-wide POV-Ray installation, such as if you have the povray package installed.
One last thing before rendering, we need to provide POV-Ray with the location of a folder called include to avoid some missing file errors. Head to where you extracted POVDOC and look inside, enter the povdoc folder (not present in the ZIP archive) and you'll see the include directory we're looking for. Make a note of its location and continue on.
We'll be rendering planet.pov from earlier, this time with the RNG fixed. Run the following command in the level2 folder (make sure you provide the location of include) and let POV-Ray 2.2 do its thing:
povray2 +L<Location of "include" directory> +Iplanet.pov +Oplanet.tga +FT +W640 +H480 +A0.1 +V
Once the render has finished you should have a planet.tga file, if it looks like these examples then you've correctly followed this guide:

planet.pov on Debian 12 with fixed RNG
planet.pov on FreeBSD 13.2 with fixed RNG
