HowTo:Create anaglyph images
I have been working with 'stereo' imagery for many years - I come from the Dan Dare and Weetabix days - and made a study of it at Cambridge University in the sixties.
There are a great many ways of seeing the world in stereo, but perhaps the simplest is using parallel images. You may prefer to view them cross-eyed, but personally I have never managed this.
On a computer, these are very easy to manipulate as you can easily resize the pair of images to suit your eyes - starting off small and increasing the size and resolution as your eyes become accustomed to viewing such images.
Stereo pairs are created by putting together two 'photos' taken at the positions where your two eyes would be - and viewing one with each eye. Obviously eyes vary in separation, but as scenes are scaled arbitrarily the distance between 'photos' is also arbitrary. You can adjust the separation to fit the scene, and also adjust for effect rather than scientific reality.
The simplest way to perform this in POVRay is to move the camera (and viewpoint) using the clock variable.
Use the parameter +KFI0 +KFF1 in the command line box, and camera { location < clock - 0.5, 5, 10> look_at < clock - 0.5, 0, 0> } in your scene, which will move the camera by one unit between shots.
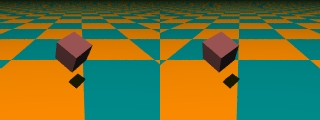
The rest of the scene can be as simple or as complex as you wish - this is the scene shown above. . .
plane { <0, 1, 0>, -10 pigment { checker color rgb<1,1,0>, color rgb<0,1,1> scale 20 } }
box { < 0, 0, 0>, < 2, 2, 2> texture { pigment { color rgb<.5, .5, .5> } } rotate <30,30,30> }
light_source { <0,100,100> rgb<2,1,1> }
Running the scene (TEST.POV in this case) will produce TEST0.bmp and TEST1.bmp. I copied these into a photoeditor and placed them side by side saving them as a single JPG shown above.
The advantage of side-by-side images is that they can be viewed in full-colour, although prolonged abuse of the eyes can be painful and ultimately damaging to your eyes.
An ANAGLYPH is the term usually used for a combination of a stereo pair of greyscale images which you view through special glasses - typically red-green or red-cyan.
The two greyscale images are tinted to the colours of the lenses, and merged into a single image. Each eye will only see one of the images. The 3-d impresssion is less than perfect, but more relaxing on the eyes in the long run, and can be considerably larger than side-by-side images.
You can create these images with sophisticated photo-manipulation programs like Photoshop, but it is much easier to use a dedicated tool (search for Stereo Photomaker on the web or download from here ) which does the one job very well.
The special red-green or red-cyan glasses are readily available on eBay for 'pennies', and shouldn't be confused with LCD shutter glasses (which cost about 25GBP/40EUR/50USD) or Polaroid glasses (which are about 10GBP/15EUR/20USD).
Polaroid glasses are designed for projected images (using a pair of projectors) and shutter glasses are designed for use with certain video cards on CRT monitors (television screens rather than flat panels). Both of these produce excellent full-colour 3d impressions without eye-strain but require specialist equipment.
Once you get the hang of creating anyglyphic images, you can easily move up to animations, although the clock method doesn't work here.
I produce a suitable animation with a constant in the header that will move the camera to a left-eye or right-eye position, and perform two runs, creating left and right-eye image sets.
I merge these sets into side-by-side videos using VIDEOMACH by Gromada which has tools for making an AVI file from a set of BMPs, and for producing multipane presentations from a set of videos. There is also a version of the StereoPhotomaker which produces anaglyphic movies from a pair of videos.
There are some sample video animations on DivX's Stage 6 in the HALFWITS collection - I will be uploading the anaglyphic images shortly.
Pat Crabb MA (Cantab)
